Cauldron-Born
| Cauldron-Born | ||
|---|---|---|

| ||
| Class: | Heavy Mech | |
| Faction: | Clan | |
| Ticket cost: | 10 upon destruction | |
| Tier: | 12 | |
| Tonnage: | 65 tons | |
| Speed: | 86 km/h (120 km/h with MASC) | |
| Torso yaw: | 200° | |
| Torso pitch: | -30° to +35° while standing -30° to +45° while crouching | |
| Variant Armament | ||
| Variant | Weapons | Equipment |
| Prime: Price: 88 300 CBills Total armor: 60 835 Engine Size: 325 XL Fusion |
||
| A: Price: 85 900 CBills Total armor: 60 835 Engine Size: 325 XL Fusion |
||
| B: Price: 93 600 CBills Total armor: 60 835 Engine Size: 325 XL Fusion |
||
| C: Price: 91 100 CBills Total armor: 60 835 Engine Size: 325 XL Fusion |
|
|
| D: Price: 89 400 CBills Total armor: 60 835 Engine Size: 325 XL Fusion |
||
| E: Price: 92 900 CBills Total armor: 60 835 Engine Size: 325 XL Fusion |
||
| F: Price: 98 900 CBills Total armor: 60 835 Engine Size: 325 XL Fusion |
||
| G: Price: 94 600 CBills Total armor: 60 835 Engine Size: 325 XL Fusion |
||
| Armor Points Distribution | ||
|
| ||
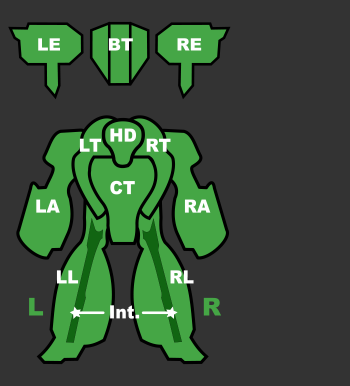
All stats current as of release 0.19.1
By Operation BULLDOG the Cauldron-Born (Clan designation Ebon Jaguar) made up a large proportion of the heavy 'Mechs of the rebuilding Smoke Jaguars, and following their Annihilation the design proliferated the remaining Clans, save the Jade Falcons Wolves and Coyotes who continued to favour the Hellbringer. Following the Wars of Reaving the Ebon Jaguar had finally supplanted the Hellbringer in most Homeworld Clans save the Coyotes who remained loyal to redeeming the honor of their design
Contents
Roles and Gameplay Hints
Prime
From the far reaching cLRM10, dependable cGauss, the trusty Lubalin auto cannon, over the ERML duo down to the (only) 350 meter far reaching cSRM4 missile launcher, this unit's firing solution has ever more weapons at disposal as the enemy draws near. Of all that arsenal only the cLRM mandates the use of active radar on the longer range, this might designate this unit stealth capable to a high degree. The main problem might be to most efficiently group the various weapons on the usual three weapon groups.
Its main selling point is the versatile arsenal, not heavily taxing the heat sinks while offering quite some punch from long to close range.
Its main drawback is the riddle of grouping its versatile weapons arsenal to least possible weapon groups. Combining the identically ranged LBX5 with the CGauss on the 1st group, while the twin cERML falls on the 2nd, the cLRM10 on the 3rd while the cSRM4 occupies the last group will help maximize the Prime's potential. B-Pod helps with Battle Armor ambushes.
Variant A
The Cauldron-Born's cheapest variant is outfitted as a powerful brawler with self-defense tools. A cUAC20 in the right arm strips off enemy armor while the pair of HEATM 6s in the externals provide a combination of raw damage and screenshake within 350m. Twin HMGs in the right arm serve as heatless auxiliary weapons with DPS maximized within 350m. Four Flamers in the left arm can quickly heat up opponents at 150m, preventing return fire. Be sure to watch your own heat as well, as the mechs's four DHS are insufficient for more than one cycle of firing all weapons. It's recommended to chain fire the HEATMs to maximize screenshake and dedicate the two free tons toward the UAC20.
Variant B
This Variant's "fluff" text is missing or out of date as of version 0.16.1. Please help us fix it by logging in. |
An asset worthy of a true sniper or lance commander - one cERPPC, two cERLL, and two cLBX5 shoot out to 900m, good for sniping and good against aircraft (be wary of the Cauldron-Born's poor max torso pitch, though). BHP gives the Cauldron-Born B excellent battlefield awareness and a TAG gives the B the opportunity to point out targets to its allies. With less armor that other Cauldron-Borns and an inadequate five DHS, the B functions well in a fire support role and less well in a continual close combat engagement. Without water, cold weather, long waits between shots, or judicious use of chain fire, the B easily overheats. When the B runs out of coolant and the pilot must choose what weapons to use. The pilot should either withhold the ERPPC, whenever the targeted enemy component is visible, or the pilot should withhold one or more ERLLs if the enemy is hiding their weak spot in which case the splash damage from the ERPPC is more relevant.
Variant C
Focusing on precision medium range skirmishing, the C variant packs a HAG30 for long range deterrence or shorter range component removal. Two ATM6 bring splash damage and cockpit shake inside 750 meters. Once shorter distances have been achieved, a duo of CMPL & 2x Extended Range Small Lasers rapidly exploit the holes punched by the HAG and ATMS. This variant shines at the 400-600 meter range, preferably using cover to approach to bring all it's weapon types to bear. The single spare ton of ammo rack space should always be dedicated to the HAG as it is deadly at any distance.
Care must be taken that opponents do not get inside the ATM-6's 125 meter arming range, though careful pilots can use the HAG to devastating effect at short distances.
Variant D
This Variant's "fluff" text is missing or out of date as of version 0.16.1. Please help us fix it by logging in. |
The Cauldron-Born D is a volatile brawler with supplemental long-range flexibility. The D's most powerful weapons are a cLBX20 in the right arm and a cERPPC in the left external. A spare ton of ammunition for the LBX20 extends the asset's battlefield longevity. Four cERSLs in the left arm provide rapid-cycling pinpoint damage within 450m, complementing the LBX20's burst damage in that range bracket. Two cLRM10s in the right external can effectively deter or suppress longer-ranged opponents while on approach, especially when paired with ERPPC shots timed to disrupt the aim of high-alpha skirmishers. In closer quarters, the two missile launchers offer modest screenshake when chainfired. Five DHS struggle to keep the mech cool while in optimal weapons range, so in order to keep heat under control in sustained combat, it's necessary to fire the hottest weapons (namely the LRMs and ERPPC) more sparingly than their cycle time allows. A quick flush of coolant allows for instantaneous bursts of damage and screenshake as necessary in a pinch.
Variant E
The Cauldron-Born E is a competent skirmisher capable of coming in for a close-rangeed fight or laying down medium-ranged firepower. For its medium-range weaponry, the E is equipped with three cERMLs and a cUAC10. Once in 350m of range, the E's four cSRM2s and one cDSRM4 provide substantial punch. Although the E has a very reasonable six DHS, Pilots struggling with heat need only moderate their ERML fire when in close combat either by withholding the ERMLs entirely or through chain firing. Chain firing is also useful for the E's many missile weapons in the event that the pilot wishes to engage in staring and maximizing screen shake instead of damage spreading. Really, the E is capable of both techniques. The E's two free tons should be dedicated, one ton each, to the UAC10 and the DSRM4.
Variant F - "Saito"
Nicknamed "Saito", a sibling to the Vulture E, this 'Mech is also an SSRM-boat. It trades the two DSSRM6 racks of the Vulture for a trio of CSSRM4s, giving slightly more shots before requiring a reload, while trading the MPLs for a HAG20. The two ERSLs are retained on this 'Mech and are useful for delivering the last couple points of damage to score a kill. Generally, this Cauldron Born will perform slightly better in a brawl due to the additional screenshake and burst capability of the HAG. It pays for that in having inferior mobility in comparison, slightly less ammo and being more expensive.
Overall, the F will give you slightly more durability and greater punch for a similar heat profile to the Vulture E, provided you can afford it.
Variant G - "ChiliDog"
The "ChiliDog" is unique among heavy 'Mechs -- it carries an impressive array of close combat weapons, starts at an unaided 86 km/h top speed, maxes out at 120 km/h aided top speed using MASC, and GECM, giving it incredible, stealthy, mobility. The G fills a role that Lokis and Novacats with MASC cannot fill. It is an excellent backcapper and an amazing choice when a Black Lanner isn't enough firepower in the late game. The G's short-ranged loadout, featuring two MPLs, two HMLs, a pair of SRM4s and a shoulder-mounted ATM9 with HE rounds, provide a massive short-range punch. Its eight impressive DHS allow it to backcap with amazing speed, rapidly flank opponents, run down fleeing targets, charge into a battle from unexpected angles, or maintain nearly continuous fire while sipping coolant. Just be careful about getting into a turning circle battle where the Cauldron-Born's poor turn rate will often force you to slow down to keep your target in your HUD, sacrificing your mobility and making you an easier target. Instead, try breaking line of sight with MASC while using its 200* torso rotation to spread damage, turn around under cover or amongst allies and run back into the battle guns blazing.
Although not capable of as much DPS, the G can still bring substantial firepower on hot maps and other maps where cooling is slow like Inferno and Sirus V.
Canon
Introduced in 3049 to address flaws in the venerable Hellbringer, by Operation REVIVAL the Ebon Jaguar had only just started to spread through the Jaguar's touman with the Inner Sphere first encountering the design during the Battle of Luthien. Facing it for the first time when engaging the First Jaguar Guards Cluster in the Kado-Guchi Valley, the 'Mech's ability to take damage and remain operational led the Inner Sphere warriors who fought it to call it the Cauldron-Born after the unstoppable zombies of Irish myth. Paradoxically many of the other Clans also used the Inner Sphere Cauldron-Born reporting name, having first learned detailed information of the design from Inner Sphere sources.
Date Introduced 3049 during the Era known as "Clan Invasion" (3050 - 3061) - Unit Role: Skirmisher