DPS
DPS has two main meanings. First, Damage Per Second is a popular measure of a weapons worth, and besides Range and Alpha Damage (damage per single shot) DPS is the most desirable characteristic in most weapons. Second, a DPS "Weapon" is any weapon that must be fired very frequently in order to deal damage efficiently, such as RACs and Mguns.
Contents
Introduction
DPS (Damage Per Second) is the maximum damage a weapon can deliver to a single component, over one second. It's a useful metric to gauge a weapons performance in comparison with alternatives, or in judging a Mech's loadout. These numbers should be treated as a 'theoretical maximum' in practice, however, since they're calculated on the assumption of perfect aim, reload timing, and in a vacuum free from heat or return fire; quite a rare occurrence in the midst of hectic Combined Arms battles in MWLL. So word of warning: Judging any weapon only by its DPS values is highly insufficient.
DPS Types
Types of DPS we currently use on the wiki:
Sustained DPS
The Sustained DPS value is something we can rely on in most circumstances to somewhat fairly compare weapons across various classes. Taken into account are the following:
- Jam(overheat) and cool down times
- Spool-up times (RACs)
- Charging times (Air-Gauss)
- Damage modifiers to give average value against Mech, Tank, Hovercraft, ASF and VTOL armor
Not taken into account are:
Burst DPS
Burst DPS is the maximum hurt rate that a weapon can deliver before the weapon limitations (typically jams/overheating) put an end to the dakka. For most weapons Burst DPS is the same as the Sustained DPS, as most weapons shoot with constant rate, but for ammunition based rapid-fire (Machine Guns, RACs, HAGs) and burst-fire weapons (UACs) the Burst DPS is considerably higher. Damage modifiers are applied same way as for Sustained DPS to give average value against Mech, Tank, Hover, ASF and VTOL armor.
Damage Types
There are three parts to any weapon's effects to its target-
- direct damage - dealt by collision or contact
- splash damage - dealt by explosion
- secondary splash damage - dealt by explosion (or fire?) as well
Total Damage
Total damage of a hit is usually calculated by simply adding all damages up. The actual damage in game can be more than this, due to splash damage being accounted for hitting adjacent components of one or more assets in the vicinity of the hit.
Damage Modifiers
Assets and weapons in the game have each their own adjusted damage modifiers, where a subset of vehicles, aerospace and components are more or less durable to different weapons than others.
Average Total Damage
To infer a generally applicable number, the Average Total Damage is an average of a weapons performance across every enemy you could see on the field- adjusted by its Damage Modifiers.
Damage per ton of Ammo
The maximum damage potential carried by one ton of ammo; be it the default of what's stored in your fresh mech, or bought to fill it's free tons. This value does not take into account any modifiers.
Weapon Overheat (Jam) And Time Ratios
When firing a burst-fire weapon, every shot instantly produces a characteristic amount of "overheat" that is internal to the weapon only in addition to the heat transferred to the asset's internals. This weapon overheat begins to dissipate quickly when the weapon stops firing. Once a certain threshold is reached the weapon overheat causes the weapon to stop firing (or jam). For the weapon to come back online a certain amount of time needs to pass. The time to recover from a single or short burst of fire is not the same as the time to recover from an overheat (jam).
- On UAC and RAC type AutoCannons it takes more time to un-jam than to cool down from an overheat, as can be observed by the indicators on the weapon HUD section.
- On HAG type weapons, on the other hand, it takes less time to un-jam than to cool down from an overheat, due to the different nature of the weapon system and it's internal mechanic.
Weapon Overheat/Jam Time Ratios
The ratio of the time spent shooting versus in a jammed state is the Jam Time Ratio, while the time spent firing as much as possible and waiting to cool down without ever being jammed is the Overheat Time Ratio. These two ratios play a significant role in numerically evaluating any burst-fire weapon, thus it is of importance we shed some light to how those come to be and are calculated.
Sustained DPS's Fire Rate
The fire rate a clip can be fired on average, taking into account overheat jams but not heat dissipation.
Clip Reload Time Ratio
The time to reload a clip versus the time to shoot a clip at Sustained DPS's fire rate without any regards for heat dissipation.
Jamming
Note that, while not actually having a real jam mechanic, MW:LL accounts for jam quirks by the introduction of weapon-local "overheat mechanic", that unluckily overlaps in naming convention with the weapon-to-asset "heat mechanic". We will call it jam onward for the purpose of clarity.
In Battletech and Mechwarrior games we understand that there are some so-called "basic" weapons, the loadouts of the "lostech" era. These are the standard Inner Sphere Lasers, Autocannons, SRM, MRM, and LRM missiles. These weapons generally don't have jam constrains and usually are delivering more hurt than heat. Calculating DPS for those weapons usually involves only the fire rate and damage per shot. The same applies for LB-X Autocannons.
Enter Ultra Autocannons:
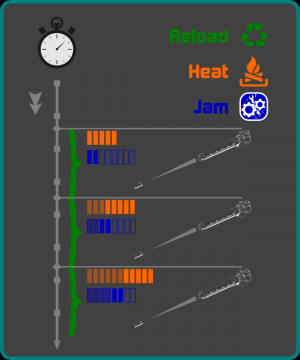
Everyone who ever fired an Ultra AutoCannon knows the delight of it's almost double both rate of fire and damage output. Alas, the delight that has to end every so often as the weapon jams up and ceases to deliver the hurt. The number of shots fired, or rather the time spent non-stop firing until fully jammed we call the jam time or time-to-jam. To the right is a visual representation of this mechanic.
Typically there are 4 to 6 salvos to be fired before a jam. In the image to the right those salvos are represented by the blue tokens - the empty ones are shots left before the jam, the pale ones are shots that still count as fired in close succession. As time lapses, the pale shots might deplete and allow for more shots to be fired. This spoils the DPS calculations however, as we are trying to shoot as much as possible and as soon as possible.
Additionally, not only does the jam probability build up while firing in quick succession, each shot also produces heat. That heat is transferred to the assets internals and has to be dissipated via the heatsinks present on the asset. This mechanism is represented in orange on the image to the right. We see that each successive shot adds approximately 5 tokens, but on the next shot only 3 of them remain as pale tokens, while 2 have "gone missing". Those tokens are dissipated via the heatskins by the time the next shot is fired. Should the asset build up too much heat by carelessly firing too many weapons or too many times in succession, adverse effects and conditions might rise to be and reduce the DPS further. In effect that means that besides the Burst DPS, which lasts only so long, we have some other, Sustained DPS, if we want to account for all the jams and heat buildups.
Rotary Autocannons:
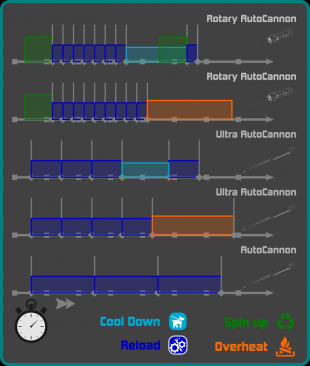
The sheer firepower of the RAC class autocannons comes at a price. To start delivering the damage, it has to endure a spin up delay. This drawback, while probably not unexpected, makes the calculations of the average values somewhat less obvious and even more complex.
Not only does the RAC suffer the spin up at the beginning of the engagement, but also each subsequent cooldown or overheat mandates another spin up to lapse before the next shooting can take place.
This behavior is the root cause of the significant Burst DPS versus Sustained DPS discrepancy of RAC class autocannons.
Players seeking to advance their firepower should note, for the duration of the spin up the cool down continues until the instant the gun starts firing again - you can initiate the spin up in advance of the intended cool down level of the weapon.
Hyper Assault Gauss:
We aren't really done with the jam and butter of this game until we don't know the difference of HAG to RAC. Both have high fire rate, can be used in tactical assault tasks and have jams and cool downs.
The HAG in contrast to RAC does not have spin up - due to the different build up of the weapon. Further on, it's jam time is shorter than the cool down time, also in stark opposition to the RAC.
This, in effect, means that he player is to empty the HAG until it "jams", and try get out of the harms way for the duration of the "un-jam". The HAG doesn't get actually jammed, lore wise, but it is reloading instead. A partial reload (called cool down on RAC) is reportedly somewhat more complicated for the gun's automatic thus takes longer time to finish.
Another note worthy difference is the almost double range of the HAG compared to the RAC - this comes at the cost of somewhat larger shot spread at the far extreme.


