Difference between revisions of "Mauler"
(port) |
Bird Thing (talk | contribs) m (infobox stats update pass (0.16.1), readability, var C fluff needs update) |
||
| (70 intermediate revisions by 13 users not shown) | |||
| Line 1: | Line 1: | ||
{{Mech| | {{Mech| | ||
| − | | Image= | + | | Image = File:Mauler.png |
| − | | | + | | ImageGif = File:Mauler_spinning_350px.gif |
| − | | Class=Assault | + | | Class = Assault |
| − | | Faction=Inner Sphere | + | | Faction = Inner Sphere |
| − | | Tickets=12 | + | | Tickets = 12 |
| − | | Speed =54 | + | | Tier = 13 |
| − | | Rotation = | + | | Tonnage = 90 |
| + | | Speed = 54 | ||
| + | | Rotation = 270 | ||
| PitchStand = -34° to +50° | | PitchStand = -34° to +50° | ||
| PitchCrouch = -34° to +60° | | PitchCrouch = -34° to +60° | ||
| − | | Prime = | + | | Price Prime = 94 900 |
| − | + | | ArmorT Prime = 76 729 | |
| − | + | | Engine Prime = Hermes 270 XL | |
| − | + | | Weapons Prime = <ul> | |
| − | | | + | <li>2x [[ERLL]] |
| − | + | <li>2x [[LRM15]] | |
| − | + | <li>4x [[UAC2]] | |
| − | + | </ul> | |
| − | + | | Equip Prime = <ul> | |
| + | <li>[[EOptics]] | ||
| + | <li>4 [[DHS]] | ||
| + | <li>4 [[free tons]] | ||
| + | <li>16t [[Armor]] | ||
| + | </ul> | ||
| − | | A = | + | | Price A = 112 300 |
| − | + | | ArmorT A = 73 145 | |
| − | + | | Engine A = Hermes 270 XL | |
| − | + | | Weapons A = <ul> | |
| − | + | <li>1x [[HPPC]] | |
| − | + | <li>1x [[Gauss]] | |
| − | + | <li>2x [[LRM20]] | |
| − | | | + | <li>2x [[SXPL]] |
| − | + | <li>2x [[ERSL]] | |
| − | + | <li>1x [[B-Pod]] | |
| − | + | </ul> | |
| − | + | | Equip A = <ul> | |
| + | <li>[[EOptics]] | ||
| + | <li>[[GECM]] | ||
| + | <li>4 [[DHS]] | ||
| + | <li>3 [[free tons]] | ||
| + | <li>15t [[Armor]] | ||
| + | </ul> | ||
| − | | B = | + | | Price B = 102 500 |
| − | + | | ArmorT B = 73 145 | |
| − | + | | Engine B = Hermes 270 XL | |
| − | + | | Weapons B = <ul> | |
| − | | | + | <li>2x [[PPC]] |
| − | + | <li>4x [[LL]] | |
| − | + | <li>2x [[LRM10]] | |
| − | + | </ul> | |
| − | + | | Equip B = <ul> | |
| + | <li>[[EOptics]] | ||
| + | <li>11 [[DHS]] | ||
| + | <li>0 [[free tons]] | ||
| + | <li>15t [[Armor]] | ||
| + | </ul> | ||
| − | | C = | + | | Price C = 102 100 |
| − | + | | ArmorT C = 80 311 | |
| − | + | | Engine C = Hermes 270 XL | |
| − | + | | Weapons C = <ul> | |
| − | | | + | <li>2x [[AC20]] |
| − | + | <li>1x [[MRM30]] | |
| − | + | <li>4x [[SRM2]] | |
| − | + | <li>1x [[SRM6]] | |
| − | + | <li>1x [[B-Pod]] | |
| + | </ul> | ||
| + | | Equip C = <ul> | ||
| + | <li>[[GECM]] | ||
| + | <li>2 [[DHS]] | ||
| + | <li>2 [[free tons]] | ||
| + | <li>16.5t [[Armor]] | ||
| + | </ul> | ||
| − | | D = | + | | Price D = 106 500 |
| − | + | | ArmorT D = 80 311 | |
| − | + | | Engine D = Hermes 270 XL | |
| − | + | | Weapons D = <ul> | |
| − | | | + | <li>2x [[PPC]] |
| − | + | <li>2x [[MRM40]] | |
| − | + | <li>4x [[SXPL]] | |
| − | + | </ul> | |
| − | + | | Equip D = <ul> | |
| + | <li>[[EOptics]] | ||
| + | <li>7 [[DHS]] | ||
| + | <li>2 [[free tons]] | ||
| + | <li>16.5t [[Armor]] | ||
| + | </ul> | ||
| − | | E = | + | | Price E = 102 500 |
| − | + | | ArmorT E = 80 311 | |
| − | + | | Engine E = Hermes 270 XL | |
| − | + | | Weapons E = <ul> | |
| − | + | <li>1x [[LtGauss]] | |
| − | | | + | <li>4x [[AC2]] |
| − | + | <li>2x [[ELRM15]] | |
| − | + | <li>1x [[ERPPC]] | |
| − | + | </ul> | |
| − | + | | Equip E = <ul> | |
| − | + | <li>[[EOptics]] | |
| + | <li>[[GECM]] | ||
| + | <li>2 [[DHS]] | ||
| + | <li>5 [[free tons]] | ||
| + | <li>15t [[Armor]] | ||
| + | </ul> | ||
| − | | F = | + | | Price F = 101 750 |
| − | + | | ArmorT F = 73 145 | |
| − | + | | Engine F = Hermes 270 XL | |
| − | + | | Weapons F = <ul> | |
| − | | | + | <li>2x [[ERLL]] |
| − | + | <li>4x [[UAC5]] | |
| − | + | <li>2x [[TBolt5]] | |
| − | + | </ul> | |
| − | + | | Equip F = <ul> | |
| − | + | <li>[[EOptics]] | |
| − | + | <li>[[GECM]] | |
| + | <li>[[BAP]] | ||
| + | <li>2 [[DHS]] | ||
| + | <li>4 [[free tons]] | ||
| + | <li>15t [[Armor]] | ||
| + | </ul> | ||
| − | | G = | + | | Price G = 104 500 |
| − | + | | ArmorT G = 69 562 | |
| − | + | | Engine G = Hermes 270 XL | |
| − | + | | Weapons G = <ul> | |
| − | | | + | <li>4x [[Standard_AutoCannons|LAC5]] |
| − | + | <li>2x [[LL]] | |
| − | + | <li>2x [[LRM20]] | |
| − | + | </ul> | |
| − | + | | Equip G = <ul> | |
| + | <li>[[EOptics]] | ||
| + | <li>[[GECM]] | ||
| + | <li>4 [[DHS]] | ||
| + | <li>4 [[free tons]] | ||
| + | <li>14.5t [[Armor]] | ||
| + | </ul> | ||
| Armor H = 2760 | | Armor H = 2760 | ||
| − | | Armor CT = | + | | Armor CT = 11248 |
| − | | Armor LRT = | + | | Armor LRT = 9466 |
| − | | Armor B = | + | | Armor B = 6125 |
| − | | Armor LRA = | + | | Armor LRA = 5290 |
| − | | Armor LRL = | + | | Armor LRL = 8464 |
| + | | Armor INT = 5078 | ||
| + | |||
| + | | Version153 = 0.16.1 | ||
}} | }} | ||
| − | |||
| − | |||
| − | |||
| − | Mauler | + | The '''Mauler''' is an [[Inner Sphere]] [[Assault Mech]], normally specialized as a long-range fire support. While having least [[armor]] in its class and being one of the slowest Mechs, the Mauler is relatively cheap and packs tremendous firepower, allowing it to quickly disable or destroy almost any opponent. Like other Assault Mechs, the Mauler suffers from extremely slow speed, leaving it vulnerable to attacks by more agile foes, so it should rarely be deployed on the front lines, but if it must be, wise pilots would do so with an escort of lighter Mechs to provide support against speedier assets as well as to distract foes so the Mauler can unleash its firepower without being destroyed first. The Mauler does enjoy some of the faster turn speeds, wider torso [[yaw]], higher torso [[pitch]], and only slight speed loss (-26%) when in reverse when compared with similarly sized Mechs (-53% for the [[Atlas]]). |
| + | |||
==Roles and Gameplay Hints== | ==Roles and Gameplay Hints== | ||
| − | |||
===Prime=== | ===Prime=== | ||
| − | The Mauler Prime is the cheapest Mauler variant, but is no less of a threat. Armed with 2 [[LRM15]]'s and 2 [[ | + | The Mauler Prime is the cheapest Mauler variant, but is no less of a threat. Armed with 2 [[LRM15]]'s and 2 [[ERLL]]'s, the Prime variant packs a powerful and accurate long-range attack capable of disabling or destroying any targets it can find. 4 [[UAC2]]'s give it a fearsome backup array of weapons, capable of shredding lighter Mechs and [[Vehicles]], as well as giving the Mauler Prime limited anti aircraft capabilities. [[Eoptics]] allows it to accurately target and engage long range foes. 4 [[free tons]] of ammo are best used for the long range missile launchers as they will run out far more quickly than the UAC2s. Though packing quite a long range punch, the Mauler Prime only has average heat management - four [[DHS|double heat sinks]] can somewhat manage the combined heat from the ERLL and ultra autocannons. |
| − | ===Variant A=== | + | ===Variant A - ''"Yamato"''=== |
| − | + | Emphasized for longer range assault with somewhat meager close range defense, the Mauler A carries an array of very powerful weapons. Under the radar concealment of [[GECM]], the Yamato will initially surprise many foes with a massive opening volley of 40 missiles from its two [[LRM20]]s while also being hit by accurately fired high speed [[Gauss]] slugs aided by [[eoptics]]. Enemy mechs that try to close the distance under 650m will only get hit by staggering blasts from the rare [[HPPC|Heavy PPC]] that does twice the damage of a regular PPC. Backup weapons are dual [[SXPL|small X-pulse lasers]] and twin [[ERSL|ER small lasers]] that will give some protection against [[Battle Armor]], along with its [[B-Pod]]. 3 [[free tons]] of ammo give each ammo dependent weapon a reload, ensuring longer time on the contested battlefield. The 4 [[DHS|double heat sinks]] are not enough for continuous weaponry firing, so mechwarriors will have to keep a careful eye on the heat levels. The Mauler A's fearsome long range alphastrike can heavily damage even the toughest assaults in only two volleys while being able to core anything lighter. | |
===Variant B=== | ===Variant B=== | ||
| − | + | In order to conserve [[heat]], the Mauler B forgoes the usual [[ERLL]]s in favor of 4 [[LL]]s which, combined with two [[PPC]]s, places the majority of the Mauler B's firepower solidly focused at 700m. It can still can reach targets up to 1000m with a pair of [[LRM10]]s. The damage dealt at that range will antagonize shorter-ranged enemies into coming in closer. Once they do, the B's dual PPCs can be brought to bear on them, blasting them with [[screen shake]] making it more difficult for them to return fire. During that time, the B can unleash a barrage of pinpoint laser strikes from its four [[LL|Long Range Lasers]]. Despite having 11 [[DHS]], the B struggles with heat. Even on relatively cool [[map]]s, the B can't [[alpha strike]], and even when using [[chain fire]], it requires [[coolant]]. Because of this, even though the B's weapons are mostly energy-based and it requires little ammo to operate effectively, the B benefits from maps with high [[logistics|logistical]] support in order to refuel its coolant. On colder maps and maps with easy access to [[water]], the B has much more staying power. | |
| − | ===Variant C=== | + | ===Variant C - ''"Broadside"''=== |
| − | The C variant deviates from the standard long-range fire support role emphasized in the other variants and focuses on close-range fire. Armed with | + | {{Section out of date|0.16.1}} |
| + | The C variant, popularly known as ''Broadside'', deviates from the standard long-range fire support role emphasized in the other variants and focuses on close-range fire with a multitude of ammo dependent weaponry. Armed with a rapid firing [[UAC20]], a shotgun [[LBX20]], a heavy hitting [[MRM30]] and backed up by no less than 5 short range missile launchers (4 [[SRM2]]s, 1 [[SRM6]]) the Mauler C has incredible firepower, on par with that of much more expensive Assault Mechs, making it capable of quickly and easily destroying [[Light Mechs]], and will cause severe damage to anything that survives the the initial barrage. Unfortunately, this dizzying array of different weaponry all require different target leading due to distinct shell speeds, making it difficult to successfully alphastrike all but the slowest mechs. Also, the two free tons of ammo provide insufficient ammo for all of the ''Broadside's'' weapons, causing some of its weapons to run dry earlier than expected. As it lacks any long range weapons, defensive equipment and moves at a slow pace, mechwarriors should never find themselves on the open battlefield alone. Going into battle with a teammate that can provide electronic warfare will help its survivability. | ||
===Variant D=== | ===Variant D=== | ||
| − | The D variant is a hard hitting mid- | + | The D variant is a hard hitting close to mid-ranged mech. The dual [[PPC]]s allow it to mash enemies from afar, while the dual MRM-40s pound anything that dares to approach it. Quad [[X-Pulse_Lasers|small x-pulse lasers]] protect it from [[Battle Armor]] and fast mechs. The mech's 7 [[DHS]] struggle to handle the combined heat for its weapons load, making it overheat if the mechwarrior doesn't watch it. Its been blessed with an extra armor, making it considerably tougher than the other variants which can catch opponents off guard. 2 [[free tons]] of ammo help this slow mech stay in the midst of battle for a while. |
| − | ===Variant E=== | + | ===Variant E - ''"Rain Rain"''=== |
| − | + | An extreme range combatant, the Mauler E sacrifices all close range firepower for maximum poking potential. A [[Light Gauss]] and 4 [[AC2]] allow it to continuously annoy targets from beyond traditional weapon range, while its [[ERPPC]] and twin [[ELRM15]] allow it to inflict real damage. It'll do all this under the radar cover of [[GECM]], immensely frustrating enemies as they get hit by shots they can't even acquire visually or electronically. 5 [[free tons]] are available for spare ammo; pilots are recommended to dedicate most of it to the hungry ELRM launchers. | |
| − | |||
| − | ===Variant F=== | + | ===Variant F - ''"Great Fox"''=== |
| + | The Mauler F is the bigger, meaner, and uglier brother to the [[Rifleman#Variant A|Rifleman A]], carrying four [[UAC5]] as its primary armament. Two [[ERLL]] give it precision long-range damage, and twin [[Tbolt5]] give it some minor screen-shake power. It carries both [[BAP]] and [[GECM]] allow it to slink about, and 4 [[free tons]] are available for ammo. As with the Rifleman, it is best suited to sitting at its max range, stripping off enemy limbs. | ||
===Variant G=== | ===Variant G=== | ||
| − | + | While the Mauler G fits into the same range bracket as the Mauler B, it accomplishes a different role. Carrying a full additional 20 LRMs over the B, the Mauler G mounts two [[LRM20]]s. Its pair of [[LL]]s and set of four [[Standard_AutoCannons|LAC5]] are perfect medium-[[range]] [[pinpoint damage]]. When enemies force the G into a brawl, the heat issue from its LRM20s disappear. In mid range confrontations, where all of the B's weapons can be brought to bear, [[heat]] can be a real issue. To avoid heat issues, the pilot can [[chain fire]] the LLs, using them only sporadically. Alternatively, the pilot can use [[coolant]], but keeping all weapons firing constantly on the G will cause coolant to empty quickly. Beware of the LRM20s' long [[lock on]] time. While the G can stay in [[active radar]] mode more easily than most, thanks to its [[GECM]], a lack of its own additional [[targeting equipment]] means that the G works best with supporting [[NARC]] or [[TAG]]. | |
| − | |||
| − | |||
| − | |||
| − | |||
| − | |||
| − | |||
| − | |||
| − | |||
| − | |||
| − | |||
| − | |||
| − | |||
| − | |||
| − | |||
| − | |||
| − | |||
| − | |||
| − | |||
| − | |||
| − | |||
| − | |||
| − | |||
| − | |||
| − | |||
| − | |||
| − | |||
| − | |||
| − | |||
| − | |||
| − | |||
| − | |||
| − | |||
| − | |||
| − | |||
| − | |||
| − | |||
| − | |||
| − | |||
| − | |||
| − | |||
| − | |||
| − | |||
| − | |||
| − | |||
| − | |||
| − | |||
| − | |||
| − | |||
| − | |||
| − | |||
| − | |||
| − | |||
| − | |||
| − | |||
| − | |||
| − | |||
| − | |||
| − | |||
| − | |||
| − | |||
| − | |||
| − | |||
| − | |||
| − | |||
| − | |||
| − | |||
| − | |||
| − | |||
| − | |||
| − | |||
| − | |||
| − | |||
| − | |||
| − | |||
| − | |||
| − | |||
| − | |||
| − | |||
| − | |||
| − | |||
| − | |||
| − | |||
| − | |||
| − | |||
| − | |||
| − | |||
| − | |||
| − | |||
| − | |||
| − | |||
| − | |||
| − | |||
| − | |||
| − | |||
| − | |||
| − | |||
| − | |||
| − | |||
| − | |||
| − | |||
| − | |||
| − | |||
| − | |||
| − | |||
| − | |||
| − | |||
| − | |||
| − | |||
| − | |||
| − | |||
| − | |||
| − | |||
| − | |||
| − | |||
| − | |||
| − | |||
| − | |||
| − | |||
| − | |||
| − | |||
| − | |||
| − | |||
| − | |||
| − | |||
| − | |||
| − | |||
| − | |||
| − | |||
| − | |||
| − | |||
| − | |||
| − | |||
| − | |||
| − | |||
| − | |||
| − | |||
==Canon== | ==Canon== | ||
Created by Luthien Armor Works in the Draconis Combine, the ''Mauler'' was first seen in 3050. It is actually a complete overhaul of an earlier design, the ''Daboku'', itself adapted from a House Liao design called the ''Linesman'', which was plagued by flaws in every major component. After improving every aspect of the older design, they renamed it with the designation given to it by Davion units during the War of 3039 to avoid the stigma around the ''Daboku''. Everything about the ''Mauler'' is geared towards long range battle; the AC/2s allow for a constant barrage of AutoCannon fire in addition to the long-range reach of it's two LRM launchers. | Created by Luthien Armor Works in the Draconis Combine, the ''Mauler'' was first seen in 3050. It is actually a complete overhaul of an earlier design, the ''Daboku'', itself adapted from a House Liao design called the ''Linesman'', which was plagued by flaws in every major component. After improving every aspect of the older design, they renamed it with the designation given to it by Davion units during the War of 3039 to avoid the stigma around the ''Daboku''. Everything about the ''Mauler'' is geared towards long range battle; the AC/2s allow for a constant barrage of AutoCannon fire in addition to the long-range reach of it's two LRM launchers. | ||
| − | + | Date Introduced 3048 during the Era known as "Late Succession War - Renaissance" (3020 - 3049) - Unit Role: Sniper | |
| + | |||
<br>[http://www.sarna.net/wiki/Mauler BattleTech Reference] | <br>[http://www.sarna.net/wiki/Mauler BattleTech Reference] | ||
| − | |||
| − | |||
{{Template:Navbox_Assets_IS}} | {{Template:Navbox_Assets_IS}} | ||
Latest revision as of 19:20, 27 July 2023
| Mauler | ||
|---|---|---|

| ||
| Class: | Assault Mech | |
| Faction: | Inner Sphere | |
| Ticket cost: | 12 upon destruction | |
| Tier: | 13 | |
| Tonnage: | 90 tons | |
| Speed: | 54 km/h | |
| Torso yaw: | 270° | |
| Torso pitch: | -34° to +50° while standing. -34° to +60° while crouching. | |
| Variant Armament | ||
| Variant | Weapons | Equipment |
| Prime: Price: 94 900 CBills Total armor: 76 729 Engine Size: Hermes 270 XL |
||
| A: Price: 112 300 CBills Total armor: 73 145 Engine Size: Hermes 270 XL |
||
| B: Price: 102 500 CBills Total armor: 73 145 Engine Size: Hermes 270 XL |
||
| C: Price: 102 100 CBills Total armor: 80 311 Engine Size: Hermes 270 XL |
||
| D: Price: 106 500 CBills Total armor: 80 311 Engine Size: Hermes 270 XL |
||
| E: Price: 102 500 CBills Total armor: 80 311 Engine Size: Hermes 270 XL |
||
| F: Price: 101 750 CBills Total armor: 73 145 Engine Size: Hermes 270 XL |
||
| G: Price: 104 500 CBills Total armor: 69 562 Engine Size: Hermes 270 XL |
||
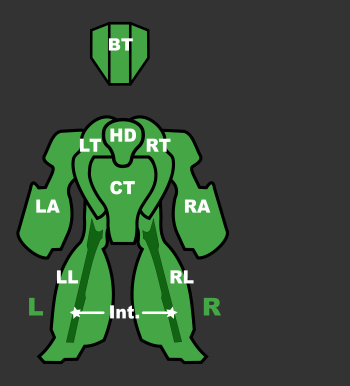
| Armor Points Distribution | ||
|
| ||
All stats current as of release 0.16.1
The Mauler is an Inner Sphere Assault Mech, normally specialized as a long-range fire support. While having least armor in its class and being one of the slowest Mechs, the Mauler is relatively cheap and packs tremendous firepower, allowing it to quickly disable or destroy almost any opponent. Like other Assault Mechs, the Mauler suffers from extremely slow speed, leaving it vulnerable to attacks by more agile foes, so it should rarely be deployed on the front lines, but if it must be, wise pilots would do so with an escort of lighter Mechs to provide support against speedier assets as well as to distract foes so the Mauler can unleash its firepower without being destroyed first. The Mauler does enjoy some of the faster turn speeds, wider torso yaw, higher torso pitch, and only slight speed loss (-26%) when in reverse when compared with similarly sized Mechs (-53% for the Atlas).
Contents
Roles and Gameplay Hints
Prime
The Mauler Prime is the cheapest Mauler variant, but is no less of a threat. Armed with 2 LRM15's and 2 ERLL's, the Prime variant packs a powerful and accurate long-range attack capable of disabling or destroying any targets it can find. 4 UAC2's give it a fearsome backup array of weapons, capable of shredding lighter Mechs and Vehicles, as well as giving the Mauler Prime limited anti aircraft capabilities. Eoptics allows it to accurately target and engage long range foes. 4 free tons of ammo are best used for the long range missile launchers as they will run out far more quickly than the UAC2s. Though packing quite a long range punch, the Mauler Prime only has average heat management - four double heat sinks can somewhat manage the combined heat from the ERLL and ultra autocannons.
Variant A - "Yamato"
Emphasized for longer range assault with somewhat meager close range defense, the Mauler A carries an array of very powerful weapons. Under the radar concealment of GECM, the Yamato will initially surprise many foes with a massive opening volley of 40 missiles from its two LRM20s while also being hit by accurately fired high speed Gauss slugs aided by eoptics. Enemy mechs that try to close the distance under 650m will only get hit by staggering blasts from the rare Heavy PPC that does twice the damage of a regular PPC. Backup weapons are dual small X-pulse lasers and twin ER small lasers that will give some protection against Battle Armor, along with its B-Pod. 3 free tons of ammo give each ammo dependent weapon a reload, ensuring longer time on the contested battlefield. The 4 double heat sinks are not enough for continuous weaponry firing, so mechwarriors will have to keep a careful eye on the heat levels. The Mauler A's fearsome long range alphastrike can heavily damage even the toughest assaults in only two volleys while being able to core anything lighter.
Variant B
In order to conserve heat, the Mauler B forgoes the usual ERLLs in favor of 4 LLs which, combined with two PPCs, places the majority of the Mauler B's firepower solidly focused at 700m. It can still can reach targets up to 1000m with a pair of LRM10s. The damage dealt at that range will antagonize shorter-ranged enemies into coming in closer. Once they do, the B's dual PPCs can be brought to bear on them, blasting them with screen shake making it more difficult for them to return fire. During that time, the B can unleash a barrage of pinpoint laser strikes from its four Long Range Lasers. Despite having 11 DHS, the B struggles with heat. Even on relatively cool maps, the B can't alpha strike, and even when using chain fire, it requires coolant. Because of this, even though the B's weapons are mostly energy-based and it requires little ammo to operate effectively, the B benefits from maps with high logistical support in order to refuel its coolant. On colder maps and maps with easy access to water, the B has much more staying power.
Variant C - "Broadside"
The C variant, popularly known as Broadside, deviates from the standard long-range fire support role emphasized in the other variants and focuses on close-range fire with a multitude of ammo dependent weaponry. Armed with a rapid firing UAC20, a shotgun LBX20, a heavy hitting MRM30 and backed up by no less than 5 short range missile launchers (4 SRM2s, 1 SRM6) the Mauler C has incredible firepower, on par with that of much more expensive Assault Mechs, making it capable of quickly and easily destroying Light Mechs, and will cause severe damage to anything that survives the the initial barrage. Unfortunately, this dizzying array of different weaponry all require different target leading due to distinct shell speeds, making it difficult to successfully alphastrike all but the slowest mechs. Also, the two free tons of ammo provide insufficient ammo for all of the Broadside's weapons, causing some of its weapons to run dry earlier than expected. As it lacks any long range weapons, defensive equipment and moves at a slow pace, mechwarriors should never find themselves on the open battlefield alone. Going into battle with a teammate that can provide electronic warfare will help its survivability.
Variant D
The D variant is a hard hitting close to mid-ranged mech. The dual PPCs allow it to mash enemies from afar, while the dual MRM-40s pound anything that dares to approach it. Quad small x-pulse lasers protect it from Battle Armor and fast mechs. The mech's 7 DHS struggle to handle the combined heat for its weapons load, making it overheat if the mechwarrior doesn't watch it. Its been blessed with an extra armor, making it considerably tougher than the other variants which can catch opponents off guard. 2 free tons of ammo help this slow mech stay in the midst of battle for a while.
Variant E - "Rain Rain"
An extreme range combatant, the Mauler E sacrifices all close range firepower for maximum poking potential. A Light Gauss and 4 AC2 allow it to continuously annoy targets from beyond traditional weapon range, while its ERPPC and twin ELRM15 allow it to inflict real damage. It'll do all this under the radar cover of GECM, immensely frustrating enemies as they get hit by shots they can't even acquire visually or electronically. 5 free tons are available for spare ammo; pilots are recommended to dedicate most of it to the hungry ELRM launchers.
Variant F - "Great Fox"
The Mauler F is the bigger, meaner, and uglier brother to the Rifleman A, carrying four UAC5 as its primary armament. Two ERLL give it precision long-range damage, and twin Tbolt5 give it some minor screen-shake power. It carries both BAP and GECM allow it to slink about, and 4 free tons are available for ammo. As with the Rifleman, it is best suited to sitting at its max range, stripping off enemy limbs.
Variant G
While the Mauler G fits into the same range bracket as the Mauler B, it accomplishes a different role. Carrying a full additional 20 LRMs over the B, the Mauler G mounts two LRM20s. Its pair of LLs and set of four LAC5 are perfect medium-range pinpoint damage. When enemies force the G into a brawl, the heat issue from its LRM20s disappear. In mid range confrontations, where all of the B's weapons can be brought to bear, heat can be a real issue. To avoid heat issues, the pilot can chain fire the LLs, using them only sporadically. Alternatively, the pilot can use coolant, but keeping all weapons firing constantly on the G will cause coolant to empty quickly. Beware of the LRM20s' long lock on time. While the G can stay in active radar mode more easily than most, thanks to its GECM, a lack of its own additional targeting equipment means that the G works best with supporting NARC or TAG.
Canon
Created by Luthien Armor Works in the Draconis Combine, the Mauler was first seen in 3050. It is actually a complete overhaul of an earlier design, the Daboku, itself adapted from a House Liao design called the Linesman, which was plagued by flaws in every major component. After improving every aspect of the older design, they renamed it with the designation given to it by Davion units during the War of 3039 to avoid the stigma around the Daboku. Everything about the Mauler is geared towards long range battle; the AC/2s allow for a constant barrage of AutoCannon fire in addition to the long-range reach of it's two LRM launchers.
Date Introduced 3048 during the Era known as "Late Succession War - Renaissance" (3020 - 3049) - Unit Role: Sniper