Difference between revisions of "Sunder"
m (→Variant G) |
Bird Thing (talk | contribs) m (infobox stats update pass (0.16.1), readability) |
||
| (39 intermediate revisions by 5 users not shown) | |||
| Line 1: | Line 1: | ||
| − | |||
{{Mech| | {{Mech| | ||
| Image = File:Sunder.png | | Image = File:Sunder.png | ||
| Line 9: | Line 8: | ||
| Tonnage = 90 | | Tonnage = 90 | ||
| Speed = 65 | | Speed = 65 | ||
| − | | Rotation = | + | | Rotation = 220 |
| PitchStand = -20° to +35° | | PitchStand = -20° to +35° | ||
| PitchCrouch = -20° to +45° | | PitchCrouch = -20° to +45° | ||
| − | | Price Prime = | + | | Price Prime = 100 600 |
| − | | ArmorT Prime = | + | | ArmorT Prime = 83 113 |
| Engine Prime = Hermes 360 XL | | Engine Prime = Hermes 360 XL | ||
| Weapons Prime = <ul> | | Weapons Prime = <ul> | ||
<li>1x [[AC20]] | <li>1x [[AC20]] | ||
<li>2x [[LL]] | <li>2x [[LL]] | ||
| − | <li>2x [[ | + | <li>2x [[ERSL]] |
<li>3x [[SRM4]] | <li>3x [[SRM4]] | ||
<li>1x [[B-Pod]] | <li>1x [[B-Pod]] | ||
</ul> | </ul> | ||
| Equip Prime = <ul> | | Equip Prime = <ul> | ||
| − | |||
<li>[[EOptics]] | <li>[[EOptics]] | ||
| − | <li> | + | <li>[[iJJ]] |
| + | <li>5 [[DHS]] | ||
<li>1 [[free tons]] | <li>1 [[free tons]] | ||
| − | <li> | + | <li>17t [[Armor]] |
</ul> | </ul> | ||
| − | | Price A = 104 | + | | Price A = 104 100 |
| − | | ArmorT A = | + | | ArmorT A = 84 718 |
| Engine A = Hermes 360 XL | | Engine A = Hermes 360 XL | ||
| Weapons A = <ul> | | Weapons A = <ul> | ||
| Line 40: | Line 39: | ||
</ul> | </ul> | ||
| Equip A = <ul> | | Equip A = <ul> | ||
| + | <li>[[EOptics]] | ||
<li>[[iJJ]] | <li>[[iJJ]] | ||
| − | <li> | + | <li>5 [[DHS]] |
| − | |||
<li>1 [[free tons]] | <li>1 [[free tons]] | ||
| − | <li> | + | <li>17.5t [[Armor]] |
</ul> | </ul> | ||
| − | | Price B = | + | | Price B = 113 200 |
| − | | ArmorT B = | + | | ArmorT B = 81 503 |
| Engine B = Hermes 360 XL | | Engine B = Hermes 360 XL | ||
| Weapons B = <ul> | | Weapons B = <ul> | ||
| − | <li> | + | <li>2x [[HPPC]] |
| − | <li>2x [[ | + | <li>2x [[ML]] |
| − | <li>3x [[ | + | <li>2x [[ERSL]] |
| + | <li>3x [[SRM2]] | ||
</ul> | </ul> | ||
| Equip B = <ul> | | Equip B = <ul> | ||
| + | <li>[[EOptics]] | ||
| + | <li>[[LAMS]] | ||
<li>[[iJJ]] | <li>[[iJJ]] | ||
| − | <li> | + | <li>12 [[DHS]] |
| − | |||
<li>0 [[free tons]] | <li>0 [[free tons]] | ||
| − | <li> | + | <li>16.5t [[Armor]] |
</ul> | </ul> | ||
| − | | Price C = | + | | Price C = 108 300 |
| − | | ArmorT C = | + | | ArmorT C = 84 718 |
| Engine C = Hermes 360 XL | | Engine C = Hermes 360 XL | ||
| Weapons C = <ul> | | Weapons C = <ul> | ||
| − | <li>2x [[ | + | <li>2x [[UAC5]] |
<li>6x [[SL]] | <li>6x [[SL]] | ||
| − | <li> | + | <li>3x [[SSRM6]] |
</ul> | </ul> | ||
| Equip C = <ul> | | Equip C = <ul> | ||
| + | <li>[[EOptics]] | ||
| + | <li>[[GECM]] | ||
<li>[[iJJ]] | <li>[[iJJ]] | ||
| − | |||
<li>2 [[DHS]] | <li>2 [[DHS]] | ||
| − | <li> | + | <li>3 [[free tons]] |
| − | <li> | + | <li>17.5t [[Armor]] |
</ul> | </ul> | ||
| − | | Price D = | + | | Price D = 108 300 |
| − | | ArmorT D = | + | | ArmorT D = 83 113 |
| Engine D = Hermes 360 XL | | Engine D = Hermes 360 XL | ||
| Weapons D = <ul> | | Weapons D = <ul> | ||
<li>2x [[PPC]] | <li>2x [[PPC]] | ||
| − | <li> | + | <li>2x [[MPL]] |
| + | <li>2x [[ERSL]] | ||
<li>1x [[MRM30]] | <li>1x [[MRM30]] | ||
</ul> | </ul> | ||
| Equip D = <ul> | | Equip D = <ul> | ||
| + | <li>[[EOptics]] | ||
<li>[[AECM]] | <li>[[AECM]] | ||
| − | <li> | + | <li>[[LAMS]] |
<li>[[JJ]] | <li>[[JJ]] | ||
| − | <li> | + | <li>7 [[DHS]] |
| − | |||
<li>1 [[free tons]] | <li>1 [[free tons]] | ||
| − | <li> | + | <li>17t [[Armor]] |
</ul> | </ul> | ||
| − | | Price E = | + | | Price E = 104 600 |
| − | | ArmorT E = | + | | ArmorT E = 81 503 |
| Engine E = Hermes 360 XL | | Engine E = Hermes 360 XL | ||
| Weapons E = <ul> | | Weapons E = <ul> | ||
<li>1x [[HGauss]] | <li>1x [[HGauss]] | ||
| − | <li> | + | <li>4x [[LPPC]] |
| − | <li> | + | <li>4x [[HMG]] |
</ul> | </ul> | ||
| Equip E = <ul> | | Equip E = <ul> | ||
| + | <li>[[EOptics]] | ||
<li>[[JJ]] | <li>[[JJ]] | ||
| − | |||
<li>4 [[DHS]] | <li>4 [[DHS]] | ||
<li>2 [[free tons]] | <li>2 [[free tons]] | ||
| − | <li> | + | <li>16.5t [[Armor]] |
</ul> | </ul> | ||
| − | | Price F = | + | | Price F = 104 400 |
| − | | ArmorT F = | + | | ArmorT F = 81 503 |
| Engine F = Hermes 360 XL | | Engine F = Hermes 360 XL | ||
| Weapons F = <ul> | | Weapons F = <ul> | ||
| − | <li> | + | <li>2x [[LBX10]] |
<li>3x [[ERML]] | <li>3x [[ERML]] | ||
<li>3x [[TBolt5]] | <li>3x [[TBolt5]] | ||
| − | |||
<li>1x [[B-Pod]] | <li>1x [[B-Pod]] | ||
</ul> | </ul> | ||
| Equip F = <ul> | | Equip F = <ul> | ||
<li>[[EOptics]] | <li>[[EOptics]] | ||
| − | <li> | + | <li>[[GECM]] |
| − | <li> | + | <li>[[JJ]] |
| − | <li> | + | <li>3 [[DHS]] |
| + | <li>0 [[free tons]] | ||
| + | <li>16.5t [[Armor]] | ||
</ul> | </ul> | ||
| − | | Price G = | + | | Price G = 98 500 |
| − | | ArmorT G = | + | | ArmorT G = 81 503 |
| Engine G = Hermes 360 XL | | Engine G = Hermes 360 XL | ||
| Weapons G = <ul> | | Weapons G = <ul> | ||
<li>1x [[Gauss]] | <li>1x [[Gauss]] | ||
| − | <li> | + | <li>2x [[AC5]] |
| − | <li> | + | <li>3x [[AC2]] |
</ul> | </ul> | ||
| Equip G = <ul> | | Equip G = <ul> | ||
| + | <li>[[EOptics]] | ||
<li>[[GECM]] | <li>[[GECM]] | ||
| − | <li>[[ | + | <li>[[JJ]] |
| − | <li> | + | <li>2 [[DHS]] |
| − | <li>1 [[free | + | <li>1 [[free ton]] |
| − | <li> | + | <li>16.5t [[Armor]] |
</ul> | </ul> | ||
| − | |||
| Armor H = 2760 | | Armor H = 2760 | ||
| − | | Armor CT = | + | | Armor CT = 13602 |
| − | | Armor LRT = | + | | Armor LRT = 8347 |
| − | | Armor B = | + | | Armor B = 7419 |
| − | | Armor LRA = | + | | Armor LRA = 6183 |
| − | + | | Armor LRL = 9460 | |
| − | | Armor LRL = | + | | Armor INT = 5676 |
| − | | Armor | ||
| − | |||
| − | | | + | | Version153 = 0.16.1 |
}} | }} | ||
| − | '''Sunder''' is an [[Inner Sphere]] OmniMech [[Assault Mech]]. | + | '''Sunder''' is an [[Inner Sphere]] OmniMech [[Assault Mech]]. Don't be misled by it's boxy configuration as by using information gleaned from captured Clan Loki and Thor chassis, Draconis Combine scientists were able to re-engineer an OmniMech designed to perform in similar roles as those Clan ’Mechs. Actuator wear and missile exhaust issues prevented widespread Sunder deployment until late in 3056. |
While the Sunder is capable of carrying 36 tons of pod-mounted equipment, its slower speed and the inherent quality difference between Inner Sphere and Clan technology allows it to accomplish its intended tasks marginally well. | While the Sunder is capable of carrying 36 tons of pod-mounted equipment, its slower speed and the inherent quality difference between Inner Sphere and Clan technology allows it to accomplish its intended tasks marginally well. | ||
| Line 166: | Line 168: | ||
==Roles and Gameplay Hints== | ==Roles and Gameplay Hints== | ||
===Prime=== | ===Prime=== | ||
| − | The Prime configuration concentrates almost its entire | + | The Prime configuration concentrates almost its entire load-out on short-[[range]] firepower, featuring an [[AC20]] with a brace of three [[SRM4]]s. Several lasers support this weaponry should ammunition run out, two [[LL|Large Lasers]] and two [[ERSL]]s plus a [[B-Pod]] to disrupt [[Battle Armor]]. [[JJ|Improved Jump Jets]], a [[Free ton]] of ammo and 5 [[DHS]] round out the package. Thanks to the relatively low heat of standard Large Lasers, the Prime is able to run with only moderate [[heat]] buildup, sipping [[coolant]] anytime it needs to jump while in combat. The Prime is relatively flexible [[brawler]] since it can provide some modest [[poke]] damage at medium-range and, once in short-range, the Prime's weapons are capable of executing a [[damage spreading]]/[[group fire]]/[[torso twist]]ing tactic, although if the Prime's SRMs and AC20 are [[chain fired]], the resulting [[screen shake]] enables the [[staring]] tactic. |
===Variant A=== | ===Variant A=== | ||
| − | + | The Sunder A is the [[Inner Sphere]] counterpart to the [[Clan]] [[Novacat#Variant_E|Novacat E]]. The A's configuration mounts a devastating [[UAC20|Ultra 20 AutoCannon]] for close range, supported by two [[ERPPC|Extended Range PPCs]] for long-range barrages and six [[MG]]s to whittle away armor. For mobility, instead of [[MASC]] like the Novacat, the Sunder A is equipped with [[iJJ|Improved Jump Jets]] allowing it to [[poptart]] and get to hard to reach places. One [[Free_tons|Free ton]] to feed the hungry UAC20. | |
| − | ===Variant B - ''" | + | ===Variant B - ''"King of Hearts"''=== |
| − | + | The Sunder B, the "King of Hearts," is a mid- to short-[[range]] assault mech. Even with the King's 12 [[DHS]], its two [[HPPC]]s should be [[chain fired]] - although in cool conditions when reactor temperature is below 50° C, it can fire both without an overheat. When chain firing with all weapons constantly in combat, under normal temperatures, the King cannot make use of both of its HPPCs unless it uses some [[coolant]]. When [[poptarting]], even while chain firing, the King must also use coolant in order to fire both of its HPPCs. Remember: If the King is already hot, use some coolant immediately '''before''' firing the second HPPC, otherwise it will take heat sink damage or even [[armor]] damage. Once in brawling range, the King has options. It can [[twist]] to [[damage spread]] and focus on using its HPPCs, or it can focus on its brawling weapons: two [[ERSL]]s, two [[ML]]s, and three [[SRM2]]s. Due to the diverse recycle times for these weapons, the King can choose to [[stare]] to maximize [[DPS]] or wait for them all to recycle before firing again to optimize survival and damage spreading. | |
| − | |||
| − | |||
| − | |||
===Variant C=== | ===Variant C=== | ||
| − | + | The Sunder C may have some medium range weapons, in the form of two [[UAC5]]s, but it functions much more effectively as a [[brawler]]. UAC5s require the user to stare at their target for a bit of time, to reduce return fire from one's enemy, the C's three [[SSRM6]]s should be [[chain fire|chain fired]] to maximize [[screen shake]]. [[GECM]] helps the C avoid being detected until it gets into close combat. Six [[SL]]s function as more than adequate backup weapons, their [[DPS]] is nothing to scoff at so long as they are fired repeatedly and often. The C can use its [[iJJ|Improved Jump Jets]] to retreat to cover whenever its UAC5s overheat, or simply to rocket into the sky to deny one's opponent of line of sight for a few seconds. The C has a hefty 17.5 tons of armor, three [[spare tons]] of ammo for either its UAC5s or SSRM6s (not both), but only 2 [[DHS]]. Players may find themselves drinking [[coolant]] if they use their jump jets in combat. | |
| − | |||
| − | |||
| − | |||
===Variant D=== | ===Variant D=== | ||
| − | + | The Sunder D allows a player to bring [[AECM|Angel ECM]] onto the battlefield with the armor of an assault mech, without the low speed of an [[Atlas]]. The D is also one of only two mechs in the game with AECM and [[Jump Jets]]. A single [[LAMS]] gives further incentive to run the D in [[active radar|active radar mode]] and makes it an even better support mech. It's dual [[PPC]]s and its [[MRM30]] allow it to cause violent [[screenshake|screen shaking]], especially against larger targets, and, although the D is not as efficient as the F, it is perfectly capable of [[Poptarting]]. If the D finds itself in closer combat, its two [[MPL|Medium Pulse Lasers]] and its two [[ERSL|Extended Range Small Lasers]] function as modest backup weapons. If the D gets in too close, it can avoid the [[minimum range]] of its MRM30 by jumping backwards with its [[JJ|Standard Jump Jets]]. The D is rounded out by one [[Free_ton|free ton]] of Ammo and a whopping seven [[DHS]] allowing for cool operation. | |
===Variant E - ''"El Diablo"''=== | ===Variant E - ''"El Diablo"''=== | ||
| − | This unit barely breaks the definition of an jump sniper. [[JJ|Standard Assault Class Jump Jets]], the [[HGauss|Heavy Gauss Rifle]] and the compliment of backup weapons. While the Gauss is on paper capable of reaching full 700 meter, it is worth noting the full damage reaches up to only 450 meter and drops to about half at the extreme end. That fact coupled with the | + | This unit barely breaks the definition of an jump sniper. [[JJ|Standard Assault Class Jump Jets]], the [[HGauss|Heavy Gauss Rifle]] and the compliment of backup weapons. While the Gauss is on paper capable of reaching full 700 meter, it is worth noting the full damage reaches up to only 450 meter and drops to about half at the extreme end. That fact coupled with the 450 meter range of the [[LPPC|Light PPC array]] and 250 meter maximum effective range of the [[HMG|Heavy Machine Gun array]] means staying up close and intimate to the enemy pays in best effect on target.<br> |
Further attention is to be paid to plan for prolonged "ballet" during the somewhat longer weapon reloads - in the sense to spread damage across as much armor as practically possible, instead of futile staring at the target while soaking up damage on a single section or component.<br> | Further attention is to be paid to plan for prolonged "ballet" during the somewhat longer weapon reloads - in the sense to spread damage across as much armor as practically possible, instead of futile staring at the target while soaking up damage on a single section or component.<br> | ||
| − | Short range means brawling, Jump Jets mean ambush, ample escape opportunities and additional heat-load this unit can bear with ease. | + | Short range means brawling, Jump Jets mean ambush, ample escape opportunities and additional heat-load this unit can bear with ease. |
===Variant F - ''"Big-O"''=== | ===Variant F - ''"Big-O"''=== | ||
| − | + | Although only equipped with standard [[Jump Jets|jump jets]], the Sunder F is an amazing mid-range [[Poptarting|jump sniper]]. The F is capable of dealing considerable burst damage out to 700m, with its twin [[LBX10]]s and triple [[Tbolt5]]s. [[GECM]] helps prevent the enemy from detecting the player while searching for, and [[lock on|locking on]] to, targets in [[active radar|active radar mode]]. Although it risks being detected at closer ranges, the F can bring even more mid-range firepower to bear once it's within 600m with a set of three [[ERML]]s. The F can [[chain fire]] its Tbolt5s to conserve heat and increase screen shake, or [[Group fire|group fire]] them to help evade enemy [[LAMS]]. Group firing the F's LBX10s and ERMLs is ideal for poptarting, but chain firing them can help deal with enemy [[BA]] at medium to short ranges. Once the BA is within 10m, the Sunder is unable to aim its weapons down far enough and will have to rely on its [[B-Pod]]. | |
| − | |||
| − | |||
===Variant G=== | ===Variant G=== | ||
| − | + | The Sunder G is a stealthy [[jump sniper]]. [[GECM]] helps keep the G hidden while it searches for targets. [[Standard Jump Jets]] let the G [[poke|out-poke]] extreme range snipers with its [[AC2| Three Auto Cannon Twos]]. As it closes in, it can fire its [[Gauss Rifle]] out to 900m, supported by an [[Free_ton|Extra Ton of Ammo]], followed by a pair of [[AC5|Auto Cannon Fives]] at 800m. Its [[EOptics|Extended Optics]] help it aim at long range. Players are advised to [[torso twist]] or seek cover while the G's weapons reload in order to avoid taking unnecessary damage. The [[pinpoint damage]], damage multipliers, and high projectile speed of the G's weapons make it an excellent choice against [[Vehicles]] and [[Aircraft]]. | |
==Canon== | ==Canon== | ||
| − | The Sunder is the product of what was learned from captured Loki and Thor OmniMechs. The Sunder weighs ninety tons and uses a Hermes 360 XL Engine to save weight while giving the 'Mech a top speed of 65 km/h, a respectable speed for a ninety ton 'Mech. The Sunder carries sixteen and a half tons of armor protection and fifteen double heat sinks to handle the assault 'Mech's heavy heat load. The Sunder | + | The Sunder is the product of what was learned from captured Loki and Thor OmniMechs. The Sunder weighs ninety tons and uses a Hermes 360 XL Engine to save weight while giving the 'Mech a top speed of 65 km/h, a respectable speed for a ninety ton 'Mech. The Sunder carries sixteen and a half tons of armor protection and fifteen double heat sinks to handle the assault 'Mech's heavy heat load. The Sunder houses a chaotic and powerful mix of weapons and equipment in all of its configurations. It has proven itself time and again against both Clan and Inner Sphere adversaries. |
| + | |||
| + | Notable pilots include: TheSpaceJew - MERC, [12vr]Hammerzeitgeist - MERC, Warlord Kentax}12VR{ - MERC, firestorm - MERC and ouch "OEM" | ||
Date Introduced 3056 during the Era known as "Clan Invasion" (3050 - 3061) - Unit Role: OmniMech Assault | Date Introduced 3056 during the Era known as "Clan Invasion" (3050 - 3061) - Unit Role: OmniMech Assault | ||
Latest revision as of 19:37, 27 July 2023
| Sunder | ||
|---|---|---|

| ||
| Class: | Assault Mech | |
| Faction: | Inner Sphere | |
| Ticket cost: | 13 upon destruction | |
| Tier: | 14 | |
| Tonnage: | 90 tons | |
| Speed: | 65 km/h | |
| Torso yaw: | 220° | |
| Torso pitch: | -20° to +35° while standing. -20° to +45° while crouching. | |
| Variant Armament | ||
| Variant | Weapons | Equipment |
| Prime: Price: 100 600 CBills Total armor: 83 113 Engine Size: Hermes 360 XL |
||
| A: Price: 104 100 CBills Total armor: 84 718 Engine Size: Hermes 360 XL |
||
| B: Price: 113 200 CBills Total armor: 81 503 Engine Size: Hermes 360 XL |
||
| C: Price: 108 300 CBills Total armor: 84 718 Engine Size: Hermes 360 XL |
||
| D: Price: 108 300 CBills Total armor: 83 113 Engine Size: Hermes 360 XL |
||
| E: Price: 104 600 CBills Total armor: 81 503 Engine Size: Hermes 360 XL |
||
| F: Price: 104 400 CBills Total armor: 81 503 Engine Size: Hermes 360 XL |
||
| G: Price: 98 500 CBills Total armor: 81 503 Engine Size: Hermes 360 XL |
||
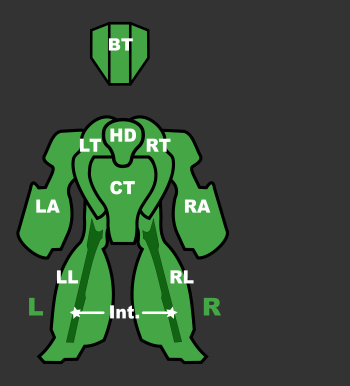
| Armor Points Distribution | ||
|
| ||
All stats current as of release 0.16.1
Sunder is an Inner Sphere OmniMech Assault Mech. Don't be misled by it's boxy configuration as by using information gleaned from captured Clan Loki and Thor chassis, Draconis Combine scientists were able to re-engineer an OmniMech designed to perform in similar roles as those Clan ’Mechs. Actuator wear and missile exhaust issues prevented widespread Sunder deployment until late in 3056. While the Sunder is capable of carrying 36 tons of pod-mounted equipment, its slower speed and the inherent quality difference between Inner Sphere and Clan technology allows it to accomplish its intended tasks marginally well.
Contents
Roles and Gameplay Hints
Prime
The Prime configuration concentrates almost its entire load-out on short-range firepower, featuring an AC20 with a brace of three SRM4s. Several lasers support this weaponry should ammunition run out, two Large Lasers and two ERSLs plus a B-Pod to disrupt Battle Armor. Improved Jump Jets, a Free ton of ammo and 5 DHS round out the package. Thanks to the relatively low heat of standard Large Lasers, the Prime is able to run with only moderate heat buildup, sipping coolant anytime it needs to jump while in combat. The Prime is relatively flexible brawler since it can provide some modest poke damage at medium-range and, once in short-range, the Prime's weapons are capable of executing a damage spreading/group fire/torso twisting tactic, although if the Prime's SRMs and AC20 are chain fired, the resulting screen shake enables the staring tactic.
Variant A
The Sunder A is the Inner Sphere counterpart to the Clan Novacat E. The A's configuration mounts a devastating Ultra 20 AutoCannon for close range, supported by two Extended Range PPCs for long-range barrages and six MGs to whittle away armor. For mobility, instead of MASC like the Novacat, the Sunder A is equipped with Improved Jump Jets allowing it to poptart and get to hard to reach places. One Free ton to feed the hungry UAC20.
Variant B - "King of Hearts"
The Sunder B, the "King of Hearts," is a mid- to short-range assault mech. Even with the King's 12 DHS, its two HPPCs should be chain fired - although in cool conditions when reactor temperature is below 50° C, it can fire both without an overheat. When chain firing with all weapons constantly in combat, under normal temperatures, the King cannot make use of both of its HPPCs unless it uses some coolant. When poptarting, even while chain firing, the King must also use coolant in order to fire both of its HPPCs. Remember: If the King is already hot, use some coolant immediately before firing the second HPPC, otherwise it will take heat sink damage or even armor damage. Once in brawling range, the King has options. It can twist to damage spread and focus on using its HPPCs, or it can focus on its brawling weapons: two ERSLs, two MLs, and three SRM2s. Due to the diverse recycle times for these weapons, the King can choose to stare to maximize DPS or wait for them all to recycle before firing again to optimize survival and damage spreading.
Variant C
The Sunder C may have some medium range weapons, in the form of two UAC5s, but it functions much more effectively as a brawler. UAC5s require the user to stare at their target for a bit of time, to reduce return fire from one's enemy, the C's three SSRM6s should be chain fired to maximize screen shake. GECM helps the C avoid being detected until it gets into close combat. Six SLs function as more than adequate backup weapons, their DPS is nothing to scoff at so long as they are fired repeatedly and often. The C can use its Improved Jump Jets to retreat to cover whenever its UAC5s overheat, or simply to rocket into the sky to deny one's opponent of line of sight for a few seconds. The C has a hefty 17.5 tons of armor, three spare tons of ammo for either its UAC5s or SSRM6s (not both), but only 2 DHS. Players may find themselves drinking coolant if they use their jump jets in combat.
Variant D
The Sunder D allows a player to bring Angel ECM onto the battlefield with the armor of an assault mech, without the low speed of an Atlas. The D is also one of only two mechs in the game with AECM and Jump Jets. A single LAMS gives further incentive to run the D in active radar mode and makes it an even better support mech. It's dual PPCs and its MRM30 allow it to cause violent screen shaking, especially against larger targets, and, although the D is not as efficient as the F, it is perfectly capable of Poptarting. If the D finds itself in closer combat, its two Medium Pulse Lasers and its two Extended Range Small Lasers function as modest backup weapons. If the D gets in too close, it can avoid the minimum range of its MRM30 by jumping backwards with its Standard Jump Jets. The D is rounded out by one free ton of Ammo and a whopping seven DHS allowing for cool operation.
Variant E - "El Diablo"
This unit barely breaks the definition of an jump sniper. Standard Assault Class Jump Jets, the Heavy Gauss Rifle and the compliment of backup weapons. While the Gauss is on paper capable of reaching full 700 meter, it is worth noting the full damage reaches up to only 450 meter and drops to about half at the extreme end. That fact coupled with the 450 meter range of the Light PPC array and 250 meter maximum effective range of the Heavy Machine Gun array means staying up close and intimate to the enemy pays in best effect on target.
Further attention is to be paid to plan for prolonged "ballet" during the somewhat longer weapon reloads - in the sense to spread damage across as much armor as practically possible, instead of futile staring at the target while soaking up damage on a single section or component.
Short range means brawling, Jump Jets mean ambush, ample escape opportunities and additional heat-load this unit can bear with ease.
Variant F - "Big-O"
Although only equipped with standard jump jets, the Sunder F is an amazing mid-range jump sniper. The F is capable of dealing considerable burst damage out to 700m, with its twin LBX10s and triple Tbolt5s. GECM helps prevent the enemy from detecting the player while searching for, and locking on to, targets in active radar mode. Although it risks being detected at closer ranges, the F can bring even more mid-range firepower to bear once it's within 600m with a set of three ERMLs. The F can chain fire its Tbolt5s to conserve heat and increase screen shake, or group fire them to help evade enemy LAMS. Group firing the F's LBX10s and ERMLs is ideal for poptarting, but chain firing them can help deal with enemy BA at medium to short ranges. Once the BA is within 10m, the Sunder is unable to aim its weapons down far enough and will have to rely on its B-Pod.
Variant G
The Sunder G is a stealthy jump sniper. GECM helps keep the G hidden while it searches for targets. Standard Jump Jets let the G out-poke extreme range snipers with its Three Auto Cannon Twos. As it closes in, it can fire its Gauss Rifle out to 900m, supported by an Extra Ton of Ammo, followed by a pair of Auto Cannon Fives at 800m. Its Extended Optics help it aim at long range. Players are advised to torso twist or seek cover while the G's weapons reload in order to avoid taking unnecessary damage. The pinpoint damage, damage multipliers, and high projectile speed of the G's weapons make it an excellent choice against Vehicles and Aircraft.
Canon
The Sunder is the product of what was learned from captured Loki and Thor OmniMechs. The Sunder weighs ninety tons and uses a Hermes 360 XL Engine to save weight while giving the 'Mech a top speed of 65 km/h, a respectable speed for a ninety ton 'Mech. The Sunder carries sixteen and a half tons of armor protection and fifteen double heat sinks to handle the assault 'Mech's heavy heat load. The Sunder houses a chaotic and powerful mix of weapons and equipment in all of its configurations. It has proven itself time and again against both Clan and Inner Sphere adversaries.
Notable pilots include: TheSpaceJew - MERC, [12vr]Hammerzeitgeist - MERC, Warlord Kentax}12VR{ - MERC, firestorm - MERC and ouch "OEM"
Date Introduced 3056 during the Era known as "Clan Invasion" (3050 - 3061) - Unit Role: OmniMech Assault