Difference between revisions of "Black Lanner"
RickHunter (talk | contribs) m (→Variant D) |
(→Variant B - "SunnyD") |
||
| (51 intermediate revisions by 10 users not shown) | |||
| Line 1: | Line 1: | ||
{{Mech| | {{Mech| | ||
| − | | Image = File: | + | | Image = File:Black_Lanner.png |
| + | | ImageGif = File:Black_Lanner_spin.gif | ||
| Class = Medium | | Class = Medium | ||
| Faction = Clan | | Faction = Clan | ||
| − | | Tickets = | + | | Tickets = 10 |
| − | | Tier = | + | | Tier = 10 |
| Tonnage = 55 | | Tonnage = 55 | ||
| Speed = 119 | | Speed = 119 | ||
| SpeedWithMasc = 166 | | SpeedWithMasc = 166 | ||
| Rotation = 360 | | Rotation = 360 | ||
| − | | PitchStand = - | + | | PitchStand = -30° to +50° |
| − | | PitchCrouch = - | + | | PitchCrouch = -30° to +60° |
| Price Prime = 79 600 | | Price Prime = 79 600 | ||
| − | | ArmorT Prime = | + | | ArmorT Prime = 48 019 |
| Engine Prime = 385 JF Extralight | | Engine Prime = 385 JF Extralight | ||
| Weapons Prime = <ul> | | Weapons Prime = <ul> | ||
| − | <li> | + | <li>2x [[CERML]] |
| − | <li> | + | <li>1x [[CERLL]] |
<li>1x [[CLRM10]] | <li>1x [[CLRM10]] | ||
<li>1x [[CSRM6]] | <li>1x [[CSRM6]] | ||
</ul> | </ul> | ||
| Equip Prime = <ul> | | Equip Prime = <ul> | ||
| + | <li>[[EOptics]] | ||
<li>[[GECM]] | <li>[[GECM]] | ||
<li>[[MASC]] | <li>[[MASC]] | ||
| − | |||
<li>5 [[DHS]] | <li>5 [[DHS]] | ||
<li>0 [[free tons]] | <li>0 [[free tons]] | ||
| Line 30: | Line 31: | ||
</ul> | </ul> | ||
| − | | Price A = | + | | Price A = 76 200 |
| − | | ArmorT A = | + | | ArmorT A = 48 019 |
| Engine A = 385 JF Extralight | | Engine A = 385 JF Extralight | ||
| Weapons A = <ul> | | Weapons A = <ul> | ||
| + | <li>2x [[CERML]] | ||
| + | <li>2x [[CLRM5]] | ||
<li>1x [[CERPPC]] | <li>1x [[CERPPC]] | ||
| − | |||
| − | |||
</ul> | </ul> | ||
| Equip A = <ul> | | Equip A = <ul> | ||
| + | <li>[[Eoptics]] | ||
<li>[[MASC]] | <li>[[MASC]] | ||
| − | |||
<li>7 [[DHS]] | <li>7 [[DHS]] | ||
<li>0 [[free tons]] | <li>0 [[free tons]] | ||
| Line 47: | Line 48: | ||
| Price B = 75 200 | | Price B = 75 200 | ||
| − | | ArmorT B = | + | | ArmorT B = 48 019 |
| Engine B = 385 JF Extralight | | Engine B = 385 JF Extralight | ||
| Weapons B = <ul> | | Weapons B = <ul> | ||
| + | <li>6x [[HSL]] | ||
<li>1x [[HML]] | <li>1x [[HML]] | ||
| − | |||
<li>1x [[ATM6#High Explosive|ATM6 (HE)]] | <li>1x [[ATM6#High Explosive|ATM6 (HE)]] | ||
</ul> | </ul> | ||
| Line 63: | Line 64: | ||
| Price C = 73 800 | | Price C = 73 800 | ||
| − | | ArmorT C = | + | | ArmorT C = 48 019 |
| Engine C = 385 JF Extralight | | Engine C = 385 JF Extralight | ||
| Weapons C = <ul> | | Weapons C = <ul> | ||
| + | <li>4x [[CERSL]] | ||
| + | <li>1x [[CDSSRM4]] | ||
<li>1x [[CUAC5]] | <li>1x [[CUAC5]] | ||
| − | |||
| − | |||
</ul> | </ul> | ||
| Equip C = <ul> | | Equip C = <ul> | ||
| Line 78: | Line 79: | ||
</ul> | </ul> | ||
| − | | Price D = | + | | Price D = 75 600 |
| − | | ArmorT D = | + | | ArmorT D = 46 092 |
| Engine D = 385 JF Extralight | | Engine D = 385 JF Extralight | ||
| Weapons D = <ul> | | Weapons D = <ul> | ||
| − | <li> | + | <li>2x [[CMPL]] |
| − | <li> | + | <li>1x [[ATM6#High Explosive|ATM6 (HE)]] |
| − | <li>1x [[ | + | <li>1x [[CLRM15]] |
<li>1x [[CNARC]] | <li>1x [[CNARC]] | ||
</ul> | </ul> | ||
| Equip D = <ul> | | Equip D = <ul> | ||
| + | <li>[[EOptics]] | ||
<li>[[MASC]] | <li>[[MASC]] | ||
| − | <li> | + | <li>5 [[DHS]] |
| − | + | <li>0 [[free tons]] | |
| − | <li> | + | <li>9.5t [[Armor]] |
| − | <li> | ||
</ul> | </ul> | ||
| Price E = 73 300 | | Price E = 73 300 | ||
| − | | ArmorT E = | + | | ArmorT E = 48 019 |
| Engine E = 385 JF Extralight | | Engine E = 385 JF Extralight | ||
| Weapons E = <ul> | | Weapons E = <ul> | ||
| + | <li>4x [[MG]] | ||
| + | <li>2x [[ATM3#Extended Range|ATM3 (ER)]] | ||
<li>1x [[HAG20]] | <li>1x [[HAG20]] | ||
| − | |||
| − | |||
</ul> | </ul> | ||
| Equip E = <ul> | | Equip E = <ul> | ||
| + | <li>[[EOptics]] | ||
<li>[[MASC]] | <li>[[MASC]] | ||
| − | |||
<li>2 [[DHS]] | <li>2 [[DHS]] | ||
| − | <li>1 [[free | + | <li>1 [[free ton]] |
<li>10t [[Armor]] | <li>10t [[Armor]] | ||
</ul> | </ul> | ||
| − | | Price F = | + | | Price F = 71 300 |
| − | | ArmorT F = | + | | ArmorT F = 48 019 |
| Engine F = 385 JF Extralight | | Engine F = 385 JF Extralight | ||
| Weapons F = <ul> | | Weapons F = <ul> | ||
| + | <li>2x [[HML]] | ||
<li>1x [[CUAC10]] | <li>1x [[CUAC10]] | ||
<li>1x [[CSRM4]] | <li>1x [[CSRM4]] | ||
| − | |||
</ul> | </ul> | ||
| Equip F = <ul> | | Equip F = <ul> | ||
| + | <li>[[EOptics]] | ||
<li>[[MASC]] | <li>[[MASC]] | ||
| − | |||
<li>2 [[DHS]] | <li>2 [[DHS]] | ||
<li>1 [[free ton]] | <li>1 [[free ton]] | ||
| Line 127: | Line 128: | ||
</ul> | </ul> | ||
| − | | Price G = | + | | Price G = 83 050 |
| − | | ArmorT G = | + | | ArmorT G = 49 943 |
| Engine G = 385 JF Extralight | | Engine G = 385 JF Extralight | ||
| Weapons G = <ul> | | Weapons G = <ul> | ||
| − | <li>1x [[ | + | <li>2x [[CDSRM4]] |
| + | <li>1x [[CSRM6]] | ||
| + | <li>3x [[Flamer]] | ||
<li>1x [[TAG]] | <li>1x [[TAG]] | ||
| − | |||
| − | |||
| − | |||
</ul> | </ul> | ||
| Equip G = <ul> | | Equip G = <ul> | ||
| + | <li>[[EOptics]] | ||
<li>[[MASC]] | <li>[[MASC]] | ||
| − | <li>[[ | + | <li>5 [[DHS]] |
| − | + | <li>3 [[free tons]] | |
| − | <li>3 | + | <li>10.5t [[Armor]] |
| − | |||
| − | <li> | ||
</ul> | </ul> | ||
| Armor H = 2760 | | Armor H = 2760 | ||
| − | | Armor CT = | + | | Armor CT = 6999 |
| − | | Armor LRT = | + | | Armor LRT = 4550 |
| − | | Armor B = | + | | Armor B = 4200 |
| − | | Armor LRA = | + | | Armor LRA = 4025 |
| − | | Armor INT = | + | | Armor LRL = 5284 |
| − | | | + | | Armor INT = 3171 |
| + | |||
| + | | Version153 = 0.16.1 | ||
}} | }} | ||
| − | + | ||
| − | + | ||
| − | The '''Black Lanner''' is a fast medium | + | The '''Black Lanner''' (aka "Blanner") is a fast medium OmniMech built by the [[Clans]] with [[MASC]] installed on all chassis, excelling at harassment and scouting. The weapons loadout may seem disappointing compared to similar mechs in its weightclass- but that limited firepower is devastating in the hands of a pilot who can leverage this mech's incredible mobility. |
==Roles and Gameplay Hints== | ==Roles and Gameplay Hints== | ||
| − | |||
===Prime=== | ===Prime=== | ||
| − | Being quite fast and sporting a diverse array of weapons, the Prime version is a great harasser unit, | + | Being quite fast and sporting a diverse array of weapons, the Prime version is a great harasser unit, damaging enemies from long range with the [[LRM10]] and the [[cERLL|ER Large Laser]], but also able to somewhat defend itself at shorter distances with twin [[cERML|ER Medium Lasers]] and the [[SRM6]]. Its a proficient scout, with a [[GECM]] suite that makes detection difficult and, like all Black Lanners, a [[MASC]] for quick tactical repositioning. |
===Variant A=== | ===Variant A=== | ||
| − | The best harasser among the Black Lanner variants, it has | + | The best harasser among the Black Lanner variants, it has long range, and it can use its speed to perform hit-and-run tactics. Its equipped with a [[cERPPC]] amd twin [[cLRM5]]s. Two [[cERML|extended range medium lasers]] can be used for short-range defense and medium to long range attacking, 7 Double Heatsinks help to keep some of the heat in check. In packs or along with other similar-equipped 'Mechs it can cause serious damage. |
| + | |||
| + | ===Variant B - ''"SunnyD"''=== | ||
| + | The SunnyD is an [[Energy_Weapons|energy]]-focused Black Lanner that wants to come in close and personal. With 7 [[Double Heat Sinks]], the SunnyD can run quickly for longer than nearly any other Black Lanner when using [[MASC]] making it an excellent [[back capper]]. It is quite fast and generally well-suited for [[seek-and-destroy]] missions, except that it can't do so very stealthily because its [[c3]] unit creates a stronger [[radar signature]] when the SunnyD is in [[Passive Radar]] mode. Under hot conditions, the SunnyD should focus on using its [[ATM6|ATM 6 High Explosive]] since it is the SunnyD's more heat-efficient weapon. During the beginning of combat, so long as the SunnyD wasn't already running hot from using MASC, the SunnyD can afford to [[group fire]] all of its six [[cHSL|Heavy Small Lasers]] and one [[cHML|Heavy Medium Laser]], but after that, the SunnyD typically performs best using [[chain fire]] in order to spread out the heat | ||
| − | = | + | {{Commentbox |
| − | + | | Comment1=The SunnyD is the most evil mech in the game. It's the best [[back capping|back capper]] because it is the second fastest Black Lanner since it has only one fewer heatsink than the Black Lanner A and enough weapons to challenge nearly any medium or heavy mech for a post in Terrain control. Sure, its not the stealthiest choice of a Black Lanner, the Prime or one of the brawler Lanners is a better choice for stealth, but the SunnyD doesn't really need stealth with how much speed it can put out. Thanks to the the Lanner's 360 torso and the flexible nature of having 7 Heavy Lasers as well as a high [[splash damage]] HEATM6 finisher, The SunnyD can also easily switch between a group fire twist-fight or a max DPS stare mode as long as the pilot has enough weapon groups set up. During a group fire twist fight, any moment that the enemy isn't exposing whatever component the pilot has chosen to target, is a moment that the SunnyD can cool down, waiting for the perfect moment to unleash all of its heavy lasers. | |
| + | | Writer1= - Warlord Kentax }} | ||
===Variant C=== | ===Variant C=== | ||
| − | A | + | A multirole support variant, this unit comes equipped with [[AECM]] which obfuscates nearby allies. An [[UAC5|Ultra Autocannon 5]] in the right arm provides precise, long-range burst damage that remains functional in close quarters while a [[cDSSRM4|Dual Streak SRM4 launcher]] mounted in the left torso grants this variant a potent close-range punch. A quartet of [[Extended Range Lasers|small lasers]] spread across the right torso and left arm round out this variant's loadout with a backup weapon system. 2 free tons are available for storing extra reloads. |
| + | |||
| + | {{Commentbox | ||
| + | | Comment1=The main selling point of this variant is the AECM, and it is very much dependent on having good coordination with your team mates. It is only able to reliably win 1-on-1 brawls with assets smaller than itself. | ||
| + | When moving with a group of allies, slow down and make sure everyone is in your AECM bubble. The UAC5 allows you to plink at enemies to either force them into cover, or just add insult to injury if your allies have long range loadouts. As you close in on enemies, you should exploit its high speed and MASC to break formation and charge right behind your enemies. With any luck, they'd be caught off guard by your allies who will hopefully arrive shortly. | ||
| + | |||
| + | Due to the high ammo consumption of both of its hard-hitting weapons, even extra reloads can be burnt through rapidly. Users should be mindful of their current ammo and rearm often. | ||
| + | |||
| + | The sheer mobility afforded by the Black Lanner's chassis means that you should always try to stay behind your target when brawling. | ||
| + | |||
| + | | Writer1= - Toriate/Jingaku | ||
| + | |||
| + | | Comment2= | ||
| + | The fastest AECM unit in the game! Perfect for rapid flanks and for bringing popup ambush capability to any point on the map, no matter how slow or heavy your teammates may be. A cool AECM tactic that your mobility plays to is initiating a brawl while slightly apart from your teammates in the AECM bubble - keep your teammates in the bubble as your group approaches, but towards the edge relative to you. The enemy may start tracking you instead of the real firepower, leaving them open to a flank. You'll be fast enough to run to your allies for safety when the shooting starts, but you're not just a radar bubble. Your AECM cover is your most important contribution to a fight and staying alive should be your top priority, but your kit does a significant amount of damage over time and you should leverage it whenever possible. The Charlie's DSSRM4 does a lot of damage and splash but chews through ammo exceptionally quickly, so it's usually worth spending both of your spare tons on it if you're planning on running in with your team (which you should!). Don't neglect the four CERSLs, too - each does about equivalent DPS to an IS medium laser, and the four together deal considerably more DPS than your UAC5! | ||
| + | |||
| + | | Writer2= - [CJF] DireWolf2K | ||
| + | }} | ||
===Variant D=== | ===Variant D=== | ||
| − | The ultimate drive-by support mech. | + | {{Section out of date|0.16.1}} |
| + | The ultimate drive-by support mech housing [[EOptics]] & 5 [[DHS]]. The tip of the spear is the [[NARC|CNARC]] launcher, allowing allied missile boats to engage out of the enemy line of fire, making this Black Lanner an important support asset. Offensively, it mounts a single [[CLRM10]], 2 [[CMPL]]s, and a single [[CLPL]], giving it a moderate amount of firepower. Although it can intercept and run down most mechs, it can't dish out enough damage in a prolonged combat. Pilots are urged to use the extra ton of ammo for the NARC launcher. | ||
| − | ===Variant E=== | + | ===Variant E - ''"Airsoft"''=== |
| − | Newly remodeled, the Black Lanner E variant now mounts a good one-two punch with | + | Newly remodeled, the Black Lanner E variant now mounts a good one-two ultra long range punch with twin [[ATM3#Extended_Range|ATM3 (ER)]] and a [[HAG20]], reaching over 1200m. When caught in close range, it can utilize MASC to break distance, and resume long range offensive operations. Four [[Mgun|Machine guns]] give the mech some anti-Battlearmor and anti-aircraft utility. The E variant also fully uses [[EOptics]], allowing for greater accuracy at long ranges. |
===Variant F=== | ===Variant F=== | ||
| − | Operating at medium range, the Black Lanner F is able to bring a [[ | + | Operating at medium range, the Black Lanner F is able to bring a [[cUAC10|Ultra Autocannon 10]] and twin [[cHML|heavy medium lasers]]. At close range, a single [[cSRM4|SRM4]] launcher can help dispatch battlearmor with its splash damage. Being the least expensive Black Lanner, it does best when keeping its opponents at medium range, maximizing its survival chance by being a more difficult target to hit due to its high speed. |
===Variant G=== | ===Variant G=== | ||
| − | + | The Black Lanner G is a unique Black Lanner in that it comes with an extra half ton of [[armor]] and is the only Black Lanner with support for allied missile guidance in the form of [[TAG]]. The G was born to [[brawl]], with absolutely no weaponry reaching beyond 350m. Terrifying on the battlefield, the G can easily [[heat|heat up]], melt, or shut down most other ground assets with its three [[Flamers]]. Then with a frighteningly powerful [[alpha strike]], the G can unload its staggering 22 SRM missile tubes from two [[cDSRM4]] and one [[cSRM6]]. Despite its ammo-hungry build, the G has quite a bit of staying power thanks to three [[free tons]] of ammo. | |
| + | |||
| + | ==Canon== | ||
| + | The Black Lanner is a fast medium OmniMech that can take on a variety of roles. It first saw action during the Trials in the run up to the Clan Invasion, but the Inner Sphere first saw it during the Battle of Tukayyid. The front-line 'Mech makes use of all weight-saving technology available to the Clan Jade Falcon scientists who used it, including an XL Engine, Endo Steel, and eight tons of Ferro-Fibrous armor. The Black Lanner includes a MASC system on the base chassis that enables it to run up to 151 km/h in bursts. | ||
| + | Notable Pilots - Mechthild - CL, Mechwarrior - MERC, ~SJ~ Red - CL | ||
| − | + | Date Introduced 3052 during the Era known as "Clan Invasion" (3050 - 3061) - Unit Role: Skirmisher | |
| − | |||
[http://www.sarna.net/wiki/Black_Lanner BattleTech Reference] | [http://www.sarna.net/wiki/Black_Lanner BattleTech Reference] | ||
{{Template:Navbox Assets Clan}} | {{Template:Navbox Assets Clan}} | ||
Latest revision as of 08:54, 11 October 2023
| Black Lanner | ||
|---|---|---|

| ||
| Class: | Medium Mech | |
| Faction: | Clan | |
| Ticket cost: | 10 upon destruction | |
| Tier: | 10 | |
| Tonnage: | 55 tons | |
| Speed: | 119 km/h (166 km/h with MASC) | |
| Torso yaw: | 360° | |
| Torso pitch: | -30° to +50° while standing. -30° to +60° while crouching. | |
| Variant Armament | ||
| Variant | Weapons | Equipment |
| Prime: Price: 79 600 CBills Total armor: 48 019 Engine Size: 385 JF Extralight |
||
| A: Price: 76 200 CBills Total armor: 48 019 Engine Size: 385 JF Extralight |
||
| B: Price: 75 200 CBills Total armor: 48 019 Engine Size: 385 JF Extralight |
||
| C: Price: 73 800 CBills Total armor: 48 019 Engine Size: 385 JF Extralight |
||
| D: Price: 75 600 CBills Total armor: 46 092 Engine Size: 385 JF Extralight |
||
| E: Price: 73 300 CBills Total armor: 48 019 Engine Size: 385 JF Extralight |
||
| F: Price: 71 300 CBills Total armor: 48 019 Engine Size: 385 JF Extralight |
||
| G: Price: 83 050 CBills Total armor: 49 943 Engine Size: 385 JF Extralight |
||
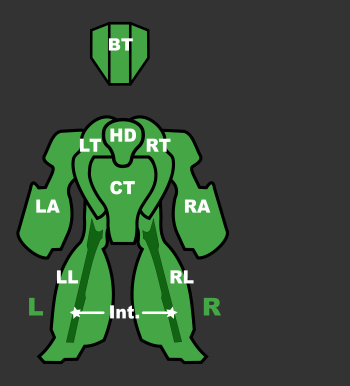
| Armor Points Distribution | ||
|
| ||
All stats current as of release 0.16.1
The Black Lanner (aka "Blanner") is a fast medium OmniMech built by the Clans with MASC installed on all chassis, excelling at harassment and scouting. The weapons loadout may seem disappointing compared to similar mechs in its weightclass- but that limited firepower is devastating in the hands of a pilot who can leverage this mech's incredible mobility.
Contents
Roles and Gameplay Hints
Prime
Being quite fast and sporting a diverse array of weapons, the Prime version is a great harasser unit, damaging enemies from long range with the LRM10 and the ER Large Laser, but also able to somewhat defend itself at shorter distances with twin ER Medium Lasers and the SRM6. Its a proficient scout, with a GECM suite that makes detection difficult and, like all Black Lanners, a MASC for quick tactical repositioning.
Variant A
The best harasser among the Black Lanner variants, it has long range, and it can use its speed to perform hit-and-run tactics. Its equipped with a cERPPC amd twin cLRM5s. Two extended range medium lasers can be used for short-range defense and medium to long range attacking, 7 Double Heatsinks help to keep some of the heat in check. In packs or along with other similar-equipped 'Mechs it can cause serious damage.
Variant B - "SunnyD"
The SunnyD is an energy-focused Black Lanner that wants to come in close and personal. With 7 Double Heat Sinks, the SunnyD can run quickly for longer than nearly any other Black Lanner when using MASC making it an excellent back capper. It is quite fast and generally well-suited for seek-and-destroy missions, except that it can't do so very stealthily because its c3 unit creates a stronger radar signature when the SunnyD is in Passive Radar mode. Under hot conditions, the SunnyD should focus on using its ATM 6 High Explosive since it is the SunnyD's more heat-efficient weapon. During the beginning of combat, so long as the SunnyD wasn't already running hot from using MASC, the SunnyD can afford to group fire all of its six Heavy Small Lasers and one Heavy Medium Laser, but after that, the SunnyD typically performs best using chain fire in order to spread out the heat
Variant C
A multirole support variant, this unit comes equipped with AECM which obfuscates nearby allies. An Ultra Autocannon 5 in the right arm provides precise, long-range burst damage that remains functional in close quarters while a Dual Streak SRM4 launcher mounted in the left torso grants this variant a potent close-range punch. A quartet of small lasers spread across the right torso and left arm round out this variant's loadout with a backup weapon system. 2 free tons are available for storing extra reloads.
When moving with a group of allies, slow down and make sure everyone is in your AECM bubble. The UAC5 allows you to plink at enemies to either force them into cover, or just add insult to injury if your allies have long range loadouts. As you close in on enemies, you should exploit its high speed and MASC to break formation and charge right behind your enemies. With any luck, they'd be caught off guard by your allies who will hopefully arrive shortly.
Due to the high ammo consumption of both of its hard-hitting weapons, even extra reloads can be burnt through rapidly. Users should be mindful of their current ammo and rearm often.
The sheer mobility afforded by the Black Lanner's chassis means that you should always try to stay behind your target when brawling.
Variant D
The ultimate drive-by support mech housing EOptics & 5 DHS. The tip of the spear is the CNARC launcher, allowing allied missile boats to engage out of the enemy line of fire, making this Black Lanner an important support asset. Offensively, it mounts a single CLRM10, 2 CMPLs, and a single CLPL, giving it a moderate amount of firepower. Although it can intercept and run down most mechs, it can't dish out enough damage in a prolonged combat. Pilots are urged to use the extra ton of ammo for the NARC launcher.
Variant E - "Airsoft"
Newly remodeled, the Black Lanner E variant now mounts a good one-two ultra long range punch with twin ATM3 (ER) and a HAG20, reaching over 1200m. When caught in close range, it can utilize MASC to break distance, and resume long range offensive operations. Four Machine guns give the mech some anti-Battlearmor and anti-aircraft utility. The E variant also fully uses EOptics, allowing for greater accuracy at long ranges.
Variant F
Operating at medium range, the Black Lanner F is able to bring a Ultra Autocannon 10 and twin heavy medium lasers. At close range, a single SRM4 launcher can help dispatch battlearmor with its splash damage. Being the least expensive Black Lanner, it does best when keeping its opponents at medium range, maximizing its survival chance by being a more difficult target to hit due to its high speed.
Variant G
The Black Lanner G is a unique Black Lanner in that it comes with an extra half ton of armor and is the only Black Lanner with support for allied missile guidance in the form of TAG. The G was born to brawl, with absolutely no weaponry reaching beyond 350m. Terrifying on the battlefield, the G can easily heat up, melt, or shut down most other ground assets with its three Flamers. Then with a frighteningly powerful alpha strike, the G can unload its staggering 22 SRM missile tubes from two cDSRM4 and one cSRM6. Despite its ammo-hungry build, the G has quite a bit of staying power thanks to three free tons of ammo.
Canon
The Black Lanner is a fast medium OmniMech that can take on a variety of roles. It first saw action during the Trials in the run up to the Clan Invasion, but the Inner Sphere first saw it during the Battle of Tukayyid. The front-line 'Mech makes use of all weight-saving technology available to the Clan Jade Falcon scientists who used it, including an XL Engine, Endo Steel, and eight tons of Ferro-Fibrous armor. The Black Lanner includes a MASC system on the base chassis that enables it to run up to 151 km/h in bursts.
Notable Pilots - Mechthild - CL, Mechwarrior - MERC, ~SJ~ Red - CL
Date Introduced 3052 during the Era known as "Clan Invasion" (3050 - 3061) - Unit Role: Skirmisher