Difference between revisions of "Puma"
m (→Variant G: fluff out of date) |
Jester Avali (talk | contribs) (Summarized Puma fluff texts and added self comment boxes.) |
||
| (19 intermediate revisions by 6 users not shown) | |||
| Line 1: | Line 1: | ||
{{Mech| | {{Mech| | ||
| − | | Image = File: | + | | Image = File:Puma.png |
| + | | ImageGif = File:Puma_spin.gif | ||
| Class = Light | | Class = Light | ||
| Faction = Clan | | Faction = Clan | ||
| Line 12: | Line 13: | ||
| PitchCrouch = -35° to +65° | | PitchCrouch = -35° to +65° | ||
| − | | Price Prime = | + | | Price Prime = 62 150 |
| − | | ArmorT Prime = | + | | ArmorT Prime = 35 629 |
| Engine Prime = Great Father 210 XL | | Engine Prime = Great Father 210 XL | ||
| Weapons Prime = <ul> | | Weapons Prime = <ul> | ||
| Line 27: | Line 28: | ||
</ul> | </ul> | ||
| − | | Price A = | + | | Price A = 50 400 |
| ArmorT A = 34 335 | | ArmorT A = 34 335 | ||
| Engine A = Great Father 210 XL | | Engine A = Great Father 210 XL | ||
| Line 66: | Line 67: | ||
</ul> | </ul> | ||
| Equip C = <ul> | | Equip C = <ul> | ||
| − | <li> [[GECM]] | + | <li>[[GECM]] |
<li>6 [[DHS]] | <li>6 [[DHS]] | ||
<li>0 [[free tons]] | <li>0 [[free tons]] | ||
| Line 72: | Line 73: | ||
</ul> | </ul> | ||
| − | | Price D = | + | | Price D = 63 150 |
| − | | ArmorT D = | + | | ArmorT D = 35 629 |
| Engine D = Great Father 210 XL | | Engine D = Great Father 210 XL | ||
| Weapons D = <ul> | | Weapons D = <ul> | ||
| − | <li>2x [[ | + | <li>2x [[iHLL]] |
<li>2x [[Flamer]] | <li>2x [[Flamer]] | ||
</ul> | </ul> | ||
| Line 103: | Line 104: | ||
</ul> | </ul> | ||
| − | | Price F = | + | | Price F = 45 300 |
| ArmorT F = 34 335 | | ArmorT F = 34 335 | ||
| Engine F = Great Father 210 XL | | Engine F = Great Father 210 XL | ||
| Line 118: | Line 119: | ||
</ul> | </ul> | ||
| − | | Price G = | + | | Price G = 49 150 |
| ArmorT G = 32 400 | | ArmorT G = 32 400 | ||
| Engine G = Great Father 210 XL | | Engine G = Great Father 210 XL | ||
| Weapons G = <ul> | | Weapons G = <ul> | ||
<li>3x [[CUAC5]] | <li>3x [[CUAC5]] | ||
| − | <li>2x [[ | + | <li>2x [[Flamer]] |
</ul> | </ul> | ||
| Equip G = <ul> | | Equip G = <ul> | ||
<li>[[EOptics]] | <li>[[EOptics]] | ||
| + | <li>[[GECM]] | ||
<li>0 [[DHS]] | <li>0 [[DHS]] | ||
<li>0 [[free tons]] | <li>0 [[free tons]] | ||
| Line 134: | Line 136: | ||
| Armor H = 1380 | | Armor H = 1380 | ||
| − | | Armor LRT = | + | | Armor LRT = 3339 |
| − | | Armor CT = | + | | Armor CT = 5779 |
| − | | Armor B = | + | | Armor B = 3082 |
| − | | Armor LRA = | + | | Armor LRA = 2697 |
| − | | Armor LRL = | + | | Armor LRL = 4161 |
| − | | Armor INT = | + | | Armor INT = 2497 |
| − | | | + | | Version153 = 0.19.1 |
}} | }} | ||
| − | |||
The '''Puma''' (Clan designation '''Adder''') is a [[Clan]] [[Light Mech]]. All Puma variants lack [[Jump Jets]] and carry a [[Flamer]], while some equip [[MASC]] giving them overall respectable maneuverability. Most Pumas are also equipped with [[GECM]], allowing them to reduce the range at which they can be detected on [[Radar]]. Pumas do have relatively weak [[Armor|Rear Torso Armor]], so care must be applied to protect this one major weak point. | The '''Puma''' (Clan designation '''Adder''') is a [[Clan]] [[Light Mech]]. All Puma variants lack [[Jump Jets]] and carry a [[Flamer]], while some equip [[MASC]] giving them overall respectable maneuverability. Most Pumas are also equipped with [[GECM]], allowing them to reduce the range at which they can be detected on [[Radar]]. Pumas do have relatively weak [[Armor|Rear Torso Armor]], so care must be applied to protect this one major weak point. | ||
| Line 150: | Line 151: | ||
==Roles and Gameplay Hints== | ==Roles and Gameplay Hints== | ||
===Prime=== | ===Prime=== | ||
| − | + | A [[cERPPC]] [[sniper]]. Engage from your maximum range and [[chain fire]] to handle the heat and cause [[screen shake]]. | |
| + | |||
| + | {{Commentbox | ||
| + | | Comment1=This mech does not have enough [[DHS]] to support two cERPPCs, so your overall DPS is going to be pretty slow, but your burst DPS is pretty high. In a [[team fight]] it is decent at providing steady, if infrequent, [[screen shake]]. The two [[flamer]]s together are great at killing [[Battle Armor]]. It also has 0.5 tons of armor above the baseline and it comes with [[GECM]]. | ||
| + | | Writer1= Willow}} | ||
===Variant A=== | ===Variant A=== | ||
| − | + | A [[mid range|mid]] to [[long range]] [[skirmisher]]. Focus on using your [[cUAC10]] in order to maximize your DPS. Use the cERPPC to open up engagements and to hit targets outside your UAC's range. | |
| + | |||
| + | {{Commentbox | ||
| + | | Comment1=This is a more sensible variant than the Prime for a similar job. It has 1 DHS and 1 free ton which is fine for the [[cUAC10]]. The [[flamer]] is good for anti-[[BA]].; | ||
| + | | Writer1= Willow}} | ||
===Variant B=== | ===Variant B=== | ||
| − | + | A very strong [[sniper]]. Open engagements with an [[alpha strike]], then [[chain fire]] for continued engagement. Supremely good at [[arming]] opponents. | |
| + | |||
| + | {{Commentbox | ||
| + | | Comment1=This mech is a better sniper than the Prime, at least in terms of DPS. It has more heat sinks and the trio of [[cERLL]] run cooler overall. It also has one [[flamer]] and [[GECM]]. | ||
| + | | Writer1= Willow}} | ||
===Variant C=== | ===Variant C=== | ||
| − | + | Very strong [[mid range]] laser [[boat]]. [[Skirmish]] and engage between 500 and 700 meters to take full advantage of your [[GECM]]. Fire a full salvo, then alternate between firing left and right arms. | |
| + | |||
| + | {{Commentbox | ||
| + | | Comment1=This mech provides one of the highest laser alphas in the game, matched or bested only by a few others, and it has the heat sinks to maintain constant alternating fire between the left and right arms. I recommend ingoring the Machine Gun entirely because it does nothing more than a little tickle at the range you should be shooting at. You should also be working on getting back to cover instead of drawing fire back to you with the MG that'll give the enemy hit markers back to your location, especially since you also have a [[GECM]] that you should be taking advantage of. | ||
| + | | Writer1= Willow}} | ||
===Variant D - ''"B.M.F"''=== | ===Variant D - ''"B.M.F"''=== | ||
| − | + | A [[mid range]] burst damage [[skirmisher]]. [[Poke]] from cover and [[chain fire]] your twin [[iHLL]]s to manage the heat. | |
| − | + | ||
| + | {{Commentbox | ||
| + | | Comment1=This is another mech that provides extremely high laser alpha, but at the cost of extremely high heat. This is best played poking from cover and then patiently waiting for your heat bar to decline. Also consider running from anything that tries to close with you because you don't have the DPS to handle brawlers or even mid range skirmishers who decide to brawl with you. | ||
| + | | Writer1= Willow}} | ||
===Variant E=== | ===Variant E=== | ||
| − | + | A powerful [[short range]] [[skirmisher]]. Close to 300 meters and engage with your [[ATM|HEATM12]]. [[MASC]] in and out of cover during the long refire of your missiles. | |
| − | + | ||
| + | {{Commentbox | ||
| + | | Comment1=Better as a [[skirmisher]], but can [[brawl]] in a pinch and even better in a team fight. | ||
| + | | Writer1= Willow}} | ||
===Variant F=== | ===Variant F=== | ||
| − | + | An [[extreme range]] [[sniper]]. Requires extensive staring with the [[cUAC2]]s, and is especially good vs tanks and aircraft. | |
| − | + | ||
| + | {{Commentbox | ||
| + | | Comment1=This is an extremely effective [[tank hunter]] if you can position yourself right to maximize your possible [[stare]] time. Ideally you want to stay above 900 meters to keep away from most other [[long range]] weapons. It is also good for [[anti-air]], especially against VTOLs and heavy fighters. Just avoid [[jamming]] the guns. | ||
| + | | Writer1= Willow}} | ||
===Variant G=== | ===Variant G=== | ||
| − | + | A [[cUAC5]] [[skirmisher]]. Engage with your full burst, but avoid jamming the guns. | |
| − | + | {{Commentbox | |
| + | | Comment1=This is a very strong mid-range skirmisher, but can struggle with the gun convergence. | ||
| + | | Writer1= Willow}} | ||
==Gallery== | ==Gallery== | ||
| Line 181: | Line 209: | ||
File:Puma.jpg|Puma ca. MWLL 0.3.0 | File:Puma.jpg|Puma ca. MWLL 0.3.0 | ||
</gallery> | </gallery> | ||
| + | |||
==Canon== | ==Canon== | ||
Latest revision as of 05:52, 1 August 2026
| Puma | ||
|---|---|---|

| ||
| Class: | Light Mech | |
| Faction: | Clan | |
| Ticket cost: | 5 upon destruction | |
| Tier: | 6 | |
| Tonnage: | 35 tons | |
| Speed: | 97.2 km/h (136 km/h with MASC) | |
| Torso yaw: | 180° | |
| Torso pitch: | -35° to +55° while standing -35° to +65° while crouching | |
| Variant Armament | ||
| Variant | Weapons | Equipment |
| Prime: Price: 62 150 CBills Total armor: 35 629 Engine Size: Great Father 210 XL |
||
| A: Price: 50 400 CBills Total armor: 34 335 Engine Size: Great Father 210 XL |
||
| B: Price: 57 400 CBills Total armor: 34 335 Engine Size: Great Father 210 XL |
||
| C: Price: 55 900 CBills Total armor: 34 335 Engine Size: Great Father 210 XL |
||
| D: Price: 63 150 CBills Total armor: 35 629 Engine Size: Great Father 210 XL |
||
| E: Price: 57 000 CBills Total armor: 34 335 Engine Size: Great Father 210 XL |
|
|
| F: Price: 45 300 CBills Total armor: 34 335 Engine Size: Great Father 210 XL |
||
| G: Price: 49 150 CBills Total armor: 32 400 Engine Size: Great Father 210 XL |
||
| Armor Points Distribution | ||
|
| ||
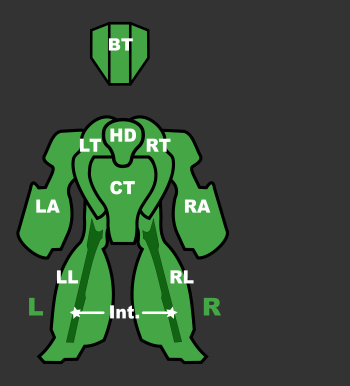
All stats current as of release 0.19.1
The Puma (Clan designation Adder) is a Clan Light Mech. All Puma variants lack Jump Jets and carry a Flamer, while some equip MASC giving them overall respectable maneuverability. Most Pumas are also equipped with GECM, allowing them to reduce the range at which they can be detected on Radar. Pumas do have relatively weak Rear Torso Armor, so care must be applied to protect this one major weak point.
Contents
Roles and Gameplay Hints
Prime
A cERPPC sniper. Engage from your maximum range and chain fire to handle the heat and cause screen shake.
Variant A
A mid to long range skirmisher. Focus on using your cUAC10 in order to maximize your DPS. Use the cERPPC to open up engagements and to hit targets outside your UAC's range.
Variant B
A very strong sniper. Open engagements with an alpha strike, then chain fire for continued engagement. Supremely good at arming opponents.
Variant C
Very strong mid range laser boat. Skirmish and engage between 500 and 700 meters to take full advantage of your GECM. Fire a full salvo, then alternate between firing left and right arms.
Variant D - "B.M.F"
A mid range burst damage skirmisher. Poke from cover and chain fire your twin iHLLs to manage the heat.
Variant E
A powerful short range skirmisher. Close to 300 meters and engage with your HEATM12. MASC in and out of cover during the long refire of your missiles.
Variant F
An extreme range sniper. Requires extensive staring with the cUAC2s, and is especially good vs tanks and aircraft.
Variant G
A cUAC5 skirmisher. Engage with your full burst, but avoid jamming the guns.
Gallery
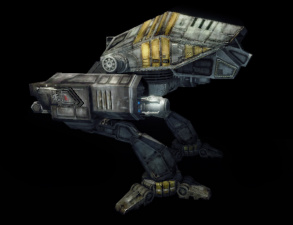
Puma ca. MWLL 0.3.0

Canon
The Adder, nicknamed by Inner Sphere forces as the Puma, is a light and fast OmniMech which was designed to emulate the weapons configurations commonly seen on IS medium 'Mechs. As a result, it carries a far more potent load of firepower than its tonnage might suggest. Originally designed by Clan Star Adder in preparation for the invasion of the Inner Sphere, the Clan was not able to retain exclusive rights to the design, and by 3045 it had become a common design throughout the Clan military. Used primarily as a fire support unit, the Adder/Puma devotes nearly half its tonnage to modular weaponry, providing easy modification for a variety of roles. The prime configuration, marrying twin ERPPCs with the finesse of an advanced targeting computer, is deadly at almost any range, but has issues with overheating.
Date Introduced 3010 during the Era known as "Late Succession War - LosTech" (2901 - 3019) - Unit Role: Sniper
