Difference between revisions of "MWLL Basics Guide"
Bird Thing (talk | contribs) m (→Inside the Mech: right ctrl key has been a thing since 0.8.0...) |
DragonGod004 (talk | contribs) m (Cleaned up some formatting stuff (we should really move these out of tables)) |
||
| Line 10: | Line 10: | ||
==Buying the Mech== | ==Buying the Mech== | ||
| − | {| | + | {| cellspacing="5" |
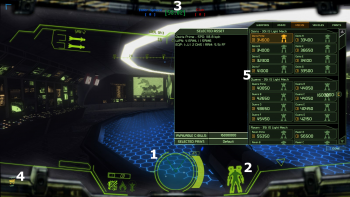
| − | + | | [[File:Guide basic buying new.png|350px]] || We'll begin with '''familiarizing you with the starting HUD''', as well as '''utilizing the Buy Menu'''. Each player starts the game in [[Battle Armor]] (abbreviated BA) - a suit that affords light protection, limited radar, BA-exclusive weapons, and [[Jump Jets]]. The interface you'll see at the beginning of the game will be similar to the image to the left. Let's see what elements we have on it: | |
# BA [[Radar]] - All friendly units are shown in blue, enemy units are red and neutral units white. Each Battle Armor has a Radar range of 300 meters. | # BA [[Radar]] - All friendly units are shown in blue, enemy units are red and neutral units white. Each Battle Armor has a Radar range of 300 meters. | ||
# Battle Armor Status - This displays both your Armor's health (external layer), and your personal health (the Human silhouette). Health will regenerate over time if you take damage, and note that the BA is far more resistant to damage than yourself; if your Armor is depleted, it is unlikely you'll survive another hit. | # Battle Armor Status - This displays both your Armor's health (external layer), and your personal health (the Human silhouette). Health will regenerate over time if you take damage, and note that the BA is far more resistant to damage than yourself; if your Armor is depleted, it is unlikely you'll survive another hit. | ||
| Line 20: | Line 20: | ||
|} | |} | ||
==Inside the Mech== | ==Inside the Mech== | ||
| − | {| | + | {| cellspacing="5" |
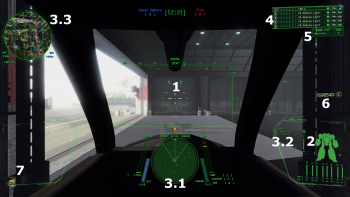
| − | + | | [[File:Guide basic interface labeled R2.png|350px]] || Welcome inside your first Mech! Controlling the Mech is relatively easy - accelerate with '''[w]''' key, slow down with '''[s]''' key, turn with '''[a]''' and '''[d]''', stop with '''[x]''' key, aim and rotate your torso with the '''mouse''', fire selected weapon group with '''left mouse button''', fire second weapon group with your '''right mouse button''', fire third weapon group with your '''third mouse button'''. You may want to check the full map of user [[Controls|controls]], but for this tutorial let's focus on the basics. | |
# Crosshair - indicates range to target (green text directly below crosshair), heading (rotation, below), elevation (left), and status of weapons group (around with numbers - green means ready to fire) | # Crosshair - indicates range to target (green text directly below crosshair), heading (rotation, below), elevation (left), and status of weapons group (around with numbers - green means ready to fire) | ||
# Mech Armor status - indicates remaining armor of your Mech parts, changes colors along with damage taken. [[Armor|Read more about armor...]] | # Mech Armor status - indicates remaining armor of your Mech parts, changes colors along with damage taken. [[Armor|Read more about armor...]] | ||
| Line 40: | Line 40: | ||
===Understanding Indicators=== | ===Understanding Indicators=== | ||
Now, let's review the various status indicators: | Now, let's review the various status indicators: | ||
| − | {| | + | {| cellspacing="5" |
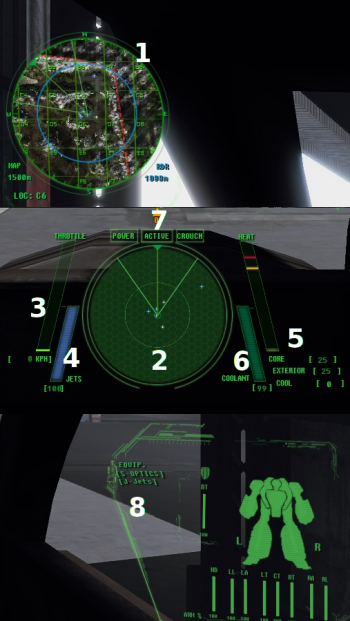
| − | | [[File:Basics_Guide_HUD_Indicators_Vertical.png|350px]] | | + | | [[File:Basics_Guide_HUD_Indicators_Vertical.png|350px]] ||Throughout your HUD, you can find several important indicators, among them the radar and heat management systems: |
# Long-range radar and tactical map - The radar circle on the top left of your HUD (displayed here on the left portion of the image) displays a more general overview of the battlefield. It tells us the location of the Mech in terms of its grid coordinates (also displayed in small green text in the bottom-left corner), tacmap display range (displayed in the same manner as grid location), our mech's radar range (displayed in blue text and dependent on the mech's selected radar mode), and our current orientation. Long-range radar also makes it easier to see some additional radar contacts outside your own radar that are shared via [[C3]]. | # Long-range radar and tactical map - The radar circle on the top left of your HUD (displayed here on the left portion of the image) displays a more general overview of the battlefield. It tells us the location of the Mech in terms of its grid coordinates (also displayed in small green text in the bottom-left corner), tacmap display range (displayed in the same manner as grid location), our mech's radar range (displayed in blue text and dependent on the mech's selected radar mode), and our current orientation. Long-range radar also makes it easier to see some additional radar contacts outside your own radar that are shared via [[C3]]. | ||
# Short-range [[Radar|radar]] - Displays the location of nearby units, as well as the current torso and leg orientation - the former being marked by the green line (along with view-angle, which is outlined by the thicker green lines), and the latter being marked by the brown line (covered by the green one when the torso faces exactly the same angle as the legs do). Short-range radar only displays contacts up to one kilometer away when in Active mode, and up to 300m away when in Passive mode. | # Short-range [[Radar|radar]] - Displays the location of nearby units, as well as the current torso and leg orientation - the former being marked by the green line (along with view-angle, which is outlined by the thicker green lines), and the latter being marked by the brown line (covered by the green one when the torso faces exactly the same angle as the legs do). Short-range radar only displays contacts up to one kilometer away when in Active mode, and up to 300m away when in Passive mode. | ||
Revision as of 19:43, 23 September 2017
Welcome to the Mechwarrior: Living Legends Basics Guide!
Here you will be able to familiarize yourself with the basics of Mechwarrior: Living Legends after installing the mod and joining a game. If you'd rather watch a video first, check out some of the tutorial videos here.
If you're new to the mod, it is highly recommended to join one of the Free Testing servers available (such as Huntress|C|Free Testing Centre), so you can get familiar with the basics on your own time and try out different assets right away.
Contents
Buying the Mech
 |
We'll begin with familiarizing you with the starting HUD, as well as utilizing the Buy Menu. Each player starts the game in Battle Armor (abbreviated BA) - a suit that affords light protection, limited radar, BA-exclusive weapons, and Jump Jets. The interface you'll see at the beginning of the game will be similar to the image to the left. Let's see what elements we have on it:
After purchasing the Mech, there will be an audible confirmation message, as well as a brief text prompt that will appear in the upper-left corner on your HUD; this prompt will indicate that your ordered Mech is on the way. Once it is built, it will tell you which bay your new Mech is in. You'll have to move out of the spawn area and down into the hangar proper to access the various Mech Bays. When your Mech is completed, an indicator will appear on your HUD, directing you to it; to enter the Mech, press [F] while you're close to and level with its cockpit - you can accomplish this either by running off the catwalk behind it or jumping toward it (tap or hold [space] to use Jump Jets). |
Inside the Mech
 |
Welcome inside your first Mech! Controlling the Mech is relatively easy - accelerate with [w] key, slow down with [s] key, turn with [a] and [d], stop with [x] key, aim and rotate your torso with the mouse, fire selected weapon group with left mouse button, fire second weapon group with your right mouse button, fire third weapon group with your third mouse button. You may want to check the full map of user controls, but for this tutorial let's focus on the basics.
For training let's re-arrange the weapon groups. It's always good to have weapons spread between the groups on energy-based Mechs, like this variant of Osiris, to avoid overheating which can power down your mech or even damage it! Use the arrow up/down keys to select different weapons, while using left and right arrow keys to move between a weapon group. You can tell what is currently selected by the box surrounding the current weapon or grouping column. To assign a weapon to a group, pick the weapon and group using the arrow keys, then hit Enter. The number for that group along the weapon's row will turn white, indicating it is now bound to that group. To un-group a weapon, simply select and hit Enter again. The number will go dark to reflect the change. Many players group their weapons based on range or travel time. In the Osiris Prime, keep your ER Medium Lasers on one group and your SRM6 rack on the other. Placing them all on one trigger can be confusing, especially when you only want to fire the lasers at a target outside the SRM's maximum range. |
Understanding Indicators
Now, let's review the various status indicators:
 |
Throughout your HUD, you can find several important indicators, among them the radar and heat management systems:
|
Check before you go
Before you buy your next Mech, open the Buy menu and click on the Paint tab. Here, you can choose the camouflage your new Mech will have. This ranges from solid colours, to striped patterns and environment-specific designs. The paint you select only applies before buying a new asset.
You should always remember to check the following things before moving away from hangar:
- Weapon groups arrangement - spread weapons between first two or three weapon groups (maybe between more if your mouse has additional buttons)
- Your current weapon group is 1 - when pressing first mouse button your active group will fire, so it is good if the active one is the first
- You bought ammunition - some Mechs have free tons you can use for additional ammo. Always buy as much as you can before leaving the base.
Basics of Combat
Mechwarrior: Living Legends is built around the Combined Arms doctrine - this means that coordinated strikes of various kinds of units is required to achieve victory, or in another way: a single, powerful unit without the support of other complementary forces is not nearly as effective as it could be. One team of experienced but disorganized players can be defeated through coordinated attacks by newer players working together. So it is very essential to stay close to your teammates, escort heavier Mechs, and use teamchat ( [u] ) for better coordination - you may read more about this more in the Teamwork Guide.
While engaging enemy units you have to target an enemy ([e] for nearest opponent, [t] to cycle through enemy contacts visible on radar, and [q] to target the asset that's in your crosshairs) in order to see its armor status on the lower left area of your HUD. From there, you can try to destroy one of its components (like an arm on a Mech, or a tank's turret) to earn credits. Destroying a Mech's center torso is one of the fastest way to earn a lot of money, as that will completely destroy the Mech, which also earns you bonus credits. At the same time, assisting a friendly player in taking an opponent out will give you plenty of CBills as well. You should also note that most direct-fire weapons - like ACs, PPCs or Gauss - may require some lead when firing at a moving target due to projectile travel time. Leading your shots generally makes it difficult to hit a specific, desired component on an enemy unit.
Other than shooting at single part of an enemy unit instead of spreading damage all over, it is also essential to stay mobile. While moving you are a far more difficult target for everyone around, and you increase the chances of getting behind an enemy Mech. A Mech's back armor is very fragile: it has about three times less armor than the front, so destroying an enemy mech by shooting it in the back is a very fast and efficient way to take down an opponent. In addition, an opponent that sustains heavy back damage will have their speed and heat dissipation reduced significantly as a result of engine damage, severely crippling their ability to fight back.
For more details about combat, check out the Combat Guide.
Common problems
- You hit the enemy but he hasn't received any damage - most likely either your ping is too high or you are desynced. Pick a server with ping lower than 100.
- You cannot move but still can aim - your Mech is crouching - press [left ctrl] to stand back up.
- Your Mech's head has been destroyed (is black instead of green) - this happens after ejecting, by double-tapping [f], without powering down the mech first with [p]. To fix this, return to a bay inside a hangar or go into a repair bay, stand in the middle of it, power down, wait a couple seconds, and power back up. (see also: repairing)
- You can sell your Mech or vehicle by going into a main hanger bay and pressing [j]. The amount you receive will be based on the condition of your Mech or vehicle, to a maximum 70% of normal buy price.
See Also
This guide led you through basics of the user interface and some pointers about combat. To explore other aspects of the game, continue browsing the Wiki or read some of the articles listed below.
- The MWLL Asset Bible covers basic asset categories and the things to keep in mind when choosing your next purchase.
- The Starter Asset Guide goes into some depth on all the assets available to you at the start of a typical match and provides some recommendations for starter assets.
- The Terrain Control Guide, which outlines the way Terrain Control matches play out and is very helpful for learning the ropes of MWLL's most popular game type.
- If you're coming from MechWarrior Online, have a look at the Primer for MWO Players to figure out what you can expect from MWLL.
- The Slang Glossary, a handy resource if you're new to BattleTech games so you can become familiar with the various words and abbreviations used in-game and on the wiki.
- If you're a visual learner, have a look at some of the MWLL Tutorial Videos.
- The Proving Grounds offers players the opportunity to learn more about a wide variety of topics from veteran mentors, while building a couple friendships along the way.
- Come join the community on Discord or TeamSpeak!
| ||||||||||||||||||
