Difference between revisions of "MWLL Basics Guide"
(→Common problems) |
(→Common problems) |
||
| Line 110: | Line 110: | ||
* Your Mech's head has been destroyed (is black instead of green) - this happens after ejecting, by double-tapping '''[F]''', without powering down the mech first with '''[P]'''. To fix this, return to a bay inside a hangar or go into a repair bay, stand in the middle of it, power down, wait a couple seconds, and power back up. (see also: [[repairing]]) | * Your Mech's head has been destroyed (is black instead of green) - this happens after ejecting, by double-tapping '''[F]''', without powering down the mech first with '''[P]'''. To fix this, return to a bay inside a hangar or go into a repair bay, stand in the middle of it, power down, wait a couple seconds, and power back up. (see also: [[repairing]]) | ||
* You are missing an arm, even after [[repairing]] - this is normal, some repairs are impossible. You can [[sell]] your mech in a [[Structures|build bay]] if you need to, but it won't be worth as much. | * You are missing an arm, even after [[repairing]] - this is normal, some repairs are impossible. You can [[sell]] your mech in a [[Structures|build bay]] if you need to, but it won't be worth as much. | ||
| − | * Your tank is stuck - Map the Suspension Kick weapon to a weapon group (See [[MWLL_Basics_Guide#Inside_the_Mech|Inside the Mech 3.1]]) and fire that weapon group. If you are upside down, try looking straight down with the tank's turret and waggle it around. | + | * Your tank is stuck - Map the '''Suspension Kick''' weapon to a weapon group (See [[MWLL_Basics_Guide#Inside_the_Mech|Inside the Mech 3.1]]) and fire that weapon group. If you are upside down, try looking straight down with the tank's turret and waggle it around. |
* Your [[asset]] is stuck in a hole, fallen off the map, or has had its [[leg|legs]] destroyed - Press '''[m]''' to bring up the [[map menu]], and left click the '''[suicide]''' button. If you are playing a game mode that uses [[tickets]] and you are in a [[BA]] when you suicide, your team will lose two tickets. If you are in any other asset, your team will not lose any tickets. (Unless your old asset is somehow destroyed afterward). Note: pressing the suicide button while your asset is powered on will cause it to fire weapon group 1. If you aren't moving, you can power down with '''[p]'''. | * Your [[asset]] is stuck in a hole, fallen off the map, or has had its [[leg|legs]] destroyed - Press '''[m]''' to bring up the [[map menu]], and left click the '''[suicide]''' button. If you are playing a game mode that uses [[tickets]] and you are in a [[BA]] when you suicide, your team will lose two tickets. If you are in any other asset, your team will not lose any tickets. (Unless your old asset is somehow destroyed afterward). Note: pressing the suicide button while your asset is powered on will cause it to fire weapon group 1. If you aren't moving, you can power down with '''[p]'''. | ||
Revision as of 07:59, 24 June 2021
Welcome to the Mechwarrior: Living Legends Basics Guide!
Here you will be able to familiarize yourself with the basics of Mechwarrior: Living Legends after installing the mod and joining a game. If you'd rather watch a video first, check out some of the tutorial videos here.
If you're new to the mod, it is highly recommended to join an available Free Testing server (usually named 12thVR Neucason | Practice - Free C-Bills), so you can get familiar with the basics on your own time and try out different assets right away.
Contents
Joining a Server
Before you can play the game, you have to join a server. Click "Multiplayer" then "Internet Game". Then double click on the server you wish to join. To start out, it is advised to get some practice on the Practice server.
Spawning
After you have joined a server from the server menu, press the [m] key to bring up the team joining menu. You can hold [tab] to see which players are on which team. After releasing [tab], click on the team you wish to join, preferably the team with the fewest players or the team that is currently losing if the player numbers are the same.
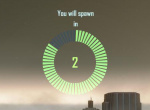
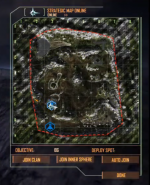
After joining a team, the map should be on the screen. If not, press [m] to bring up the map. Click on the base you wish to spawn/enter the game at. Only friendly blue bases may be selected to spawn at. Click the [Done] button or anywhere else on the screen to spawn at that location. If you were successful, a timer will appear on the screen and you will spawn once it reaches 0. Bases with a mech icon typically indicate that weapons, mechs, and other assets may be purchased there. Bases with an airplane icon typically indicate that BA Weapons and aircraft may be purchased there.
Note: Whatever base you have highlighted in the minimap will be the one that you spawn at only if your team still controls it at the end of the timer. Also, usefully, whatever base you have highlighted will show up in your HUD.
Buying the Mech
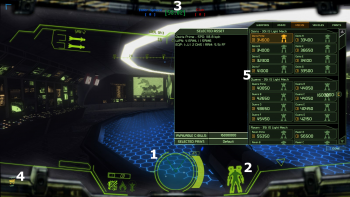
We'll begin with familiarizing you with the starting HUD, as well as utilizing the Buy Menu. Each player starts the game in Battle Armor (abbreviated BA) - a suit that affords light protection, limited radar, Battle Armor exclusive weapons, and Jump Jets. The interface you'll see at the beginning of the game will be similar to the image to the left. Let's see what elements we have on it:
- BA Radar - All friendly units are shown in blue, enemy units are red and neutral units white. Each Battle Armor has a Radar range of 350 meters.
- Battle Armor Status - This displays both your Armor's health (external layer), and your personal health (the Human silhouette). Health will regenerate over time if you take damage, and note that the BA is far more resistant to damage than yourself; if your Armor is depleted, it is unlikely you'll survive another hit.
- Timer - Displays the amount of time left in the current match.
- Buy Indicator - When it's visible, you can access the buy menu with the [,] (comma) key.
- Buy Menu - After pressing [,] (comma), the buy menu will appear on the right-hand side of your screen. From here, you will be able to buy Mechs, Vehicles and BA Equipment using C-Bills. You can also buy Aerospace Fighters or VTOLs if you've spawned at an airbase. At the top of the buy menu are tabs which indicate what type of unit or equipment is available for purchase. Within each tab, items you can afford will be highlighted, while items you cannot afford will be faded; mousing over an item will show further details about it in the "Selected Asset" box to the left. To purchase any item, simply click on it once. For the purposes of this guide, we're going to buy an Osiris Prime.
After purchasing the Mech, there will be an audible confirmation message, as well as a brief text prompt that will appear in the upper-left corner on your HUD; this prompt will indicate that your ordered Mech is on the way. Once it is built, it will tell you which bay your new Mech is in. You'll have to move out of the spawn area and down into the hangar proper to access the various Mech Bays. When your Mech is completed, an indicator will appear on your HUD, directing you to it; to enter the Mech, press [F] while you're close to and level with its cockpit - you can accomplish this either by running off the catwalk behind it or jumping toward it (tap or hold [space] to use Jump Jets).
Inside the Mech
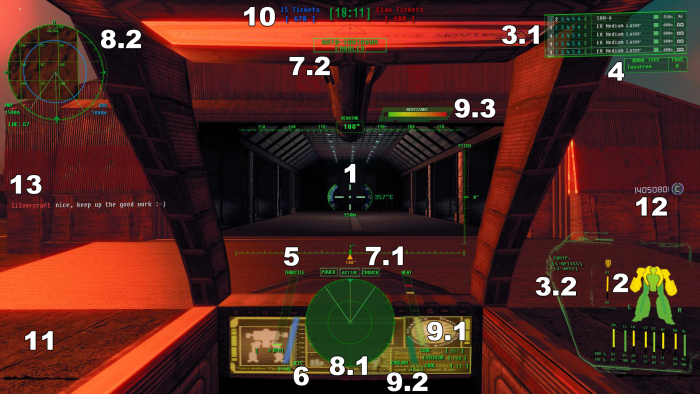
Welcome inside your first Mech! Controlling the Mech is relatively easy - press the [w] key to begin moving forward, slow down with [s] key, turn with [a] and [d], stop with [x] key. To switch from fixed throttle to throttle decay mode, press [k]. Aim and rotate your torso with the mouse, fire selected weapon group with left mouse button, fire second weapon group with your right mouse button, fire third weapon group with your third mouse button. You may want to check the full map of user controls, but for this tutorial let's focus on the basics.
- Crosshair - Also called the reticle, indicates range to target (green text directly below crosshair), heading (rotation, below), heading (above), core temperature (right), pitch (far right), and status of weapons groups (around the recticle with numbers - green means ready to fire, blue means in range, red means weapon is inside of minimum range)
- Mech Armor Status - Indicates remaining armor of your mech parts, changes colors along with damage taken. Read more about armor...
- Weapons and Equipment
- Weapon List and Groups - Here you may assign weapons to groups. Move the weapon selector with the [up and down arrows], move the weapon group selector with [left and right arrows]. Selecting or deselect the highlighted weapon/group with the the [Right Ctrl] key. Each weapon is presented in order as follows: Activated weapon groups (1,2,3,4,5,6), Name (and sometimes minimum range), Reload status (yellow - reloading, green - ready to fire), Maximum range, and Ammunition. The weapons list also shows a green bar behind the name of any weapon that can overheat. This bar will turn yellow and then red as it overheats.
- Equipment List - Lists most relevant passive equipment types such as GECM, Jump Jets, Laser Anti-missile Systems, etc.
- Ammunition Supply - Some units using Ballistic and Missile Weapons can buy additional ammunition for the currently selected weapon by pressing period [.] or by pressing comma [,] and going to the Ammo tab.
- Throttle and Current Speed - Displays the current speed, a light green bar (or red for reverse) that indicates what percentage of maximum throttle the mech is trying to reach.
- Jump Jets - How much jump jet fuel remains. This recharges when jump jets are not in use.
- Togglable Statuses
- Primary - From left to right, Power on/off status (toggle with [p]), radar mode (toggle with [r]), crouch on/off indicator (toggle with [L-Ctrl]).
- Auto-Shutdown Indicator - Helps protect armor and heat sinks from heat-related damage. Locks weapons out when overheating. Toggle with [f].
- Radar
- Main Radar - Displays the location of nearby units, as well as the current torso and leg orientation - the former being marked by the green line (along with view-angle, which is outlined by the thicker green lines), and the latter being marked by the brown line (covered by the green one when the torso faces exactly the same angle as the legs do). This part of the indicator also shows current field of view, which can be changed with [z]. Without specialized equipment, short-range radar only displays contacts up to one kilometer away when in Active mode, and up to 300m away when in Passive mode. Enemies are red, allies are blue, neutral objects are white. See key for different kinds of contacts.
- Long-Range Radar - Includes tactical map, current maximum radar range, and the current grid location of both the mech and up to one selected enemy or allied target.
- Heat
- Main Heat Indicators - This bar displays the current mech core temperature. If it goes above the yellow line, the mech will warn you of rising heat levels and may sustain some light to moderate armor and/or heat sink damage; if our core temperature will reach or surpass the red line then the Mech will begin to sustain serious damage from overheating - and will likely be destroyed if the heat isn't exhausted quickly enough. The higher the temperature, the higher the damage (so firing most weapons while above the yellow line is a bad idea, and above the red line even more so). Also to the right there are three small indicators - Core temperature (number value for the heat bar), Exterior temperature (low on ice planets, but high on volcanic planets) and Cooldown rate in degrees per second (higher when cooling in water, lower while moving, zero when internal and external temperatures have equalized). All temperatures are displayed in Celsius.
- Remaining Coolant - This shows how much coolant is left. Press [c] to flush some coolant and exchange heat with the outside world. Can only be recharged when the mech is repaired.
- Heat Sink Status - As heat sinks become damaged, they will lose health. The more damaged they are, the less effectively they cool. To return the heat sinks to full efficiency, they must be repaired.
- Game Status - From left to right: In blue, your team's current tickets or points. In green, time remaining before map change. In red, the enemy team's current tickets or points. This area also displays with posts are currently controlled by which team when playing terrain control.
- Buy Indicator - Lets you know that either assets, ammo, and/or BA weapons can be be purchased in this area.
- CBills - Displays money currently available to purchase assets, ammo, BA weapons, or donate.
For training let's re-arrange the weapon groups. It's always good to have weapons spread between the groups on energy-based Mechs, like this variant of Osiris, to avoid overheating which can power down your mech or even damage it! Use the arrow up/down keys to select different weapons, while using left and right arrow keys to move between a weapon group. You can tell what is currently selected by the box surrounding the current weapon or grouping column. To assign a weapon to a group, pick the weapon and group using the arrow keys, then hit Enter. The number for that group along the weapon's row will turn white, indicating it is now bound to that group. To un-group a weapon, simply select and hit Enter again. The number will go dark to reflect the change.
Many players group their weapons based on range or travel time. In the Osiris Prime, keep your ER Medium Lasers on one group and your SRM6 rack on the other. Placing them all on one trigger can be confusing, especially when you only want to fire the lasers at a target outside the SRM's maximum range.
Check before you go
Before you buy your next Mech, open the Buy menu and click on the Paint tab. Here, you can choose the camouflage your new Mech will have. This ranges from solid colours, to striped patterns and environment-specific designs. The paint you select only applies before buying a new asset.
You should always remember to check the following things before moving away from hangar:
- Weapon groups arrangement - spread weapons between first two or three weapon groups (maybe between more if your mouse has additional buttons or utilize the keyboard keys 1 - 6). Press [right ctrl]] to enable or disable a selected weapon in a given group. Press [left arrow] or [right arrow]] to change which group you are modifying. Press [up arrow] or [down arrow] to change which weapon you are modifying.
- Your current weapon group is 1 - when pressing first mouse button your active group will fire, so it is good if the active one is the first
- You bought ammunition - some Mechs have free tons you can use for additional ammo. Always buy as much as you can before leaving the base.
Basics of Combat
Mechwarrior: Living Legends is built around the Combined Arms doctrine - this means that coordinated strikes of various kinds of units is required to achieve victory, or in another way: a single, powerful unit without the support of other complementary forces is not nearly as effective as it could be. One team of experienced but disorganized players can be defeated through coordinated attacks by newer players working together. So it is very essential to stay close to your teammates, escort heavier Mechs, and use teamchat ( [u] ) for better coordination - you may read more about this more in the Teamwork Guide.
While engaging enemy units you have to target an enemy ([e] for nearest opponent, [t] to cycle through enemy contacts visible on radar, and [q] to target the asset that's in your crosshairs) in order to see its armor status on the lower left area of your HUD. If you have visual contact and are in range (the actual range will depend on ECM suites operating and are in effect over both units), the display will be updated, otherwise Unknown or Outdated will be shown. From there, you can try to destroy one of its components (like an arm on a Mech, or a tank's turret) to earn credits. Destroying a Mech's center torso is one of the fastest way to earn a lot of money, as that will completely destroy the Mech, which also earns you bonus credits. At the same time, assisting a friendly player in taking an opponent out will give you plenty of CBills as well. You should also note that most direct-fire weapons - like ACs, PPCs or Gauss - may require some lead when firing at a moving target due to projectile travel time. Leading your shots generally makes it difficult to hit a specific, desired component on an enemy unit.
Other than shooting at single part of an enemy unit instead of spreading damage all over, it is also essential to stay mobile. While moving you are a far more difficult target for everyone around, and you increase the chances of getting behind an enemy Mech. A Mech's back armor is very fragile: it has about three times less armor than the front, so destroying an enemy mech by shooting it in the back is a very fast and efficient way to take down an opponent. In addition, an opponent that sustains heavy back damage will have their speed and heat dissipation reduced significantly as a result of engine damage, severely crippling their ability to fight back.
For more details about combat, check out the Combat Guide. For more information about damage modelling in the game, see the Armor article.
Common problems
- You hit the enemy but he hasn't received any damage - most likely either your ping is too high or you are desynced. Pick a server with ping lower than 100. Note that some minor deviation from where your projectile appears to hit and where the game thinks it hit is normal. Best judge by the hit sound instead.
- You cannot move but still can aim - your Mech is crouching - press [Left Ctrl] to stand back up.
- Your Mech's head has been destroyed (is black instead of green) - this happens after ejecting, by double-tapping [F], without powering down the mech first with [P]. To fix this, return to a bay inside a hangar or go into a repair bay, stand in the middle of it, power down, wait a couple seconds, and power back up. (see also: repairing)
- You are missing an arm, even after repairing - this is normal, some repairs are impossible. You can sell your mech in a build bay if you need to, but it won't be worth as much.
- Your tank is stuck - Map the Suspension Kick weapon to a weapon group (See Inside the Mech 3.1) and fire that weapon group. If you are upside down, try looking straight down with the tank's turret and waggle it around.
- Your asset is stuck in a hole, fallen off the map, or has had its legs destroyed - Press [m] to bring up the map menu, and left click the [suicide] button. If you are playing a game mode that uses tickets and you are in a BA when you suicide, your team will lose two tickets. If you are in any other asset, your team will not lose any tickets. (Unless your old asset is somehow destroyed afterward). Note: pressing the suicide button while your asset is powered on will cause it to fire weapon group 1. If you aren't moving, you can power down with [p].
Useful keys
- [F1] locks the arms to your torso (make Mechs behave more like an FPS)
- [K] to change the throttle mode (represents MWO mode more)
- With your Mech or vehicle inside a hangar bay, [J] will sell it. The amount of money you receive will be based on the condition of your Mech or vehicle, to a maximum 65% of buy price.
- [Left Shift] will engage MASC if your mech is equipped with it. It will also engage boost if you are driving a hovercraft, tank, or aerospace.
See Also
This guide led you through basics of the user interface and some pointers about combat. To explore other aspects of the game, continue browsing the Wiki or read some of the articles listed below.
- The MWLL Asset Bible covers basic asset categories and the things to keep in mind when choosing your next purchase.
- The Starter Asset Guide goes into some depth on all the assets available to you at the start of a typical match and provides some recommendations for starter assets.
- The Terrain Control Guide, which outlines the way Terrain Control matches play out and is very helpful for learning the ropes of MWLL's most popular game type.
- The Air Combat Guide focuses on how to fly aircraft and how to use them against targets on the ground and in the air.
- If you're coming from MechWarrior Online, have a look at the Primer for MWO Players to figure out what you can expect from MWLL.
- The Slang Glossary is a handy resource if you're new to BattleTech games so you can become familiar with the various words and abbreviations used in-game and on the wiki.
- If you're a visual learner, have a look at some of the MWLL Tutorial Videos.
- There are also semi-regular training events you can participate in to hone your skills further.
- The Proving Grounds offers players the opportunity to learn more about a wide variety of topics from veteran mentors, while building a couple friendships along the way.
- Come join the community on Discord or TeamSpeak!
Don't be afraid to step out of your comfort zone and try something different. You may die a dozen times in the process, just learn battle by battle and before you know it, you'll be an expert in your own right.
Above all have Fun.
| ||||||||||||||||||


