Difference between revisions of "SA Gladiator"
From MechWarrior: Living Legends Wiki
RickHunter (talk | contribs) |
RickHunter (talk | contribs) (→Overview) |
||
| (5 intermediate revisions by one other user not shown) | |||
| Line 1: | Line 1: | ||
| − | |||
{{Map| | {{Map| | ||
| Image = File:SA_Gladiator1.jpg | | Image = File:SA_Gladiator1.jpg | ||
| Name = SA_Gladiator | | Name = SA_Gladiator | ||
| + | | Created By = Ancient Demise | ||
| Environment = Arena | | Environment = Arena | ||
| − | | Temperature = | + | | Temperature = 25°C |
| − | | Planet = | + | | Planet = Solaris VII |
| − | | Coords = | + | | Coords = -148.44, -398.49 |
| Size = 2048 x 2048 | | Size = 2048 x 2048 | ||
| Game Modes = <ul> | | Game Modes = <ul> | ||
| Line 12: | Line 12: | ||
<li>[[Last Man Standing]] | <li>[[Last Man Standing]] | ||
</ul> | </ul> | ||
| − | | Available = 11.0 | + | | Available = 0.11.0 |
| Mech = 1 | | Mech = 1 | ||
| Tank = 1 | | Tank = 1 | ||
| − | |||
| − | |||
| Base Defenses = 0 | | Base Defenses = 0 | ||
| BaseIS = | | BaseIS = | ||
| BaseCL = | | BaseCL = | ||
| + | | Map = SA_Gladiator_minimap.jpg | ||
| + | | Neutral_Cap_1_X = 85 | ||
| + | | Neutral_Cap_1_Y = 156 | ||
| + | | Neutral_Cap_2_X = 251 | ||
| + | | Neutral_Cap_2_Y = 156 | ||
}} | }} | ||
| − | |||
{{Quote|"Created in direct response to The Jungle, Nashan Diversified modeled Steiner Stadium on the Colosseum of Rome. An advanced lostech barrier allows the audience to watch the matches live without the risk of injury."|Map introduction}} | {{Quote|"Created in direct response to The Jungle, Nashan Diversified modeled Steiner Stadium on the Colosseum of Rome. An advanced lostech barrier allows the audience to watch the matches live without the risk of injury."|Map introduction}} | ||
| + | |||
==Overview== | ==Overview== | ||
| Line 30: | Line 33: | ||
SA Gladiator is a large rectangular arena map offering potentially long sight-lines interrupted by walls and minor elevation changes. | SA Gladiator is a large rectangular arena map offering potentially long sight-lines interrupted by walls and minor elevation changes. | ||
| − | Two repair bays with reloads exist on the map and | + | Two repair bays with reloads exist on the map and are often fought over. |
| + | |||
| + | ==Bases== | ||
| + | <div style="margin-bottom:10px></div> | ||
| + | <div style="-webkit-columns: 340px 2; -moz-columns: 340px 2; columns: 340px 2; font-size:0.95em; min-width:325px; white-space: nowrap"> | ||
| + | |||
| + | <div style="-webkit-column-break-inside: avoid; page-break-inside: avoid; break-inside: avoid; padding:8px; border-style:solid; border-color:#3e3e3e; border-width:1px;> | ||
| + | <div style=" font-size: 1.2em; font-weight: bold; text-align: center; background-color: #2c2c2c;>D3</div> | ||
| + | *'''Type:''' [[Structures#Repair Pad| Repair Pad]] | ||
| + | *'''Services:''' [[Repair]], [[Rearm]]</div> | ||
| + | |||
| + | <div style="-webkit-column-break-inside: avoid; page-break-inside: avoid; break-inside: avoid; margin-top:0.7em; padding:8px; border-style:solid; border-color:#3e3e3e; border-width:1px;> | ||
| + | <div style=" font-size: 1.2em; font-weight: bold; text-align: center; background-color: #2c2c2c;>D7</div> | ||
| + | *'''Type:''' [[Structures#Repair Pad| Repair Pad]] | ||
| + | *'''Services:''' [[Repair]], [[Rearm]]</div> | ||
| + | </div> | ||
| + | |||
| + | |||
| + | {{Clear}} | ||
==Gallery== | ==Gallery== | ||
| − | <gallery mode="slideshow" showthumbnails heights=50px style="margin-top:3px; margin-left: | + | <gallery mode="slideshow" showthumbnails heights=50px style="display: block; margin-top:3px; margin-left:2%; margin-right:2%; text-align: center; font-size:18px; padding:0px;"> |
| − | File:SA_Gladiator2.jpg | + | File:SA_Gladiator2.jpg|link={{filepath:TC_Gladiator2.jpg}} |
| − | File:SA_Gladiator3.jpg | + | File:SA_Gladiator3.jpg|link={{filepath:TC_Gladiator3.jpg}} |
| − | File:SA_Gladiator4.jpg | + | File:SA_Gladiator4.jpg|link={{filepath:TC_Gladiator4.jpg}} |
| − | File:SA_Gladiator5.jpg | + | File:SA_Gladiator5.jpg|link={{filepath:TC_Gladiator5.jpg}} |
| − | File:SA_Gladiator6.jpg | + | File:SA_Gladiator6.jpg|link={{filepath:TC_Gladiator6.jpg}} |
| − | File:SA_Gladiator7.jpg | + | File:SA_Gladiator7.jpg|link={{filepath:TC_Gladiator7.jpg}} |
| − | File:SA_Gladiator8.jpg | + | File:SA_Gladiator8.jpg|link={{filepath:TC_Gladiator8.jpg}} |
| − | File:SA_Gladiator1.jpg | + | File:SA_Gladiator1.jpg|link={{filepath:TC_Gladiator1.jpg}} |
</gallery> | </gallery> | ||
| − | |||
| − | |||
| − | |||
| − | |||
| − | |||
{{Navbox Maps}} | {{Navbox Maps}} | ||
[[Category:Official Maps]] | [[Category:Official Maps]] | ||
[[Category:Maps]] | [[Category:Maps]] | ||
Latest revision as of 17:14, 1 October 2019
| SA Gladiator | ||
|---|---|---|

| ||
| Created By: | Ancient Demise | |
| Environment: | Arena | |
| Temperature: | 25°C | |
| Planet: | Solaris VII | |
| Coords: | -148.44, -398.49 | |
| Size: | 2048 x 2048 | |
| Game Modes: | ||
| First Available In: | 0.11.0 | |
| Assets | ||
| Assets: |
| |
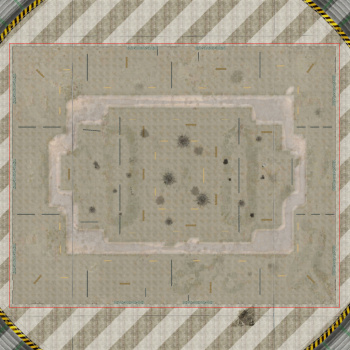
| Tactical Map | ||
  | ||
| "Created in direct response to The Jungle, Nashan Diversified modeled Steiner Stadium on the Colosseum of Rome. An advanced lostech barrier allows the audience to watch the matches live without the risk of injury." |
| — Map introduction |
Overview
SA Gladiator is a large rectangular arena map offering potentially long sight-lines interrupted by walls and minor elevation changes.
Two repair bays with reloads exist on the map and are often fought over.
Bases
D3
- Type: Repair Pad
- Services: Repair, Rearm
D7
- Type: Repair Pad
- Services: Repair, Rearm


