Difference between revisions of "AlienArt"
Fire-hound (talk | contribs) m (→Prepare your Linux) |
Fire-hound (talk | contribs) m (→Run the editor) |
||
| Line 283: | Line 283: | ||
=== Run the editor === | === Run the editor === | ||
| − | You can now start the file by typing [MWLLeditor] in a command prompt and pressing enter. | + | You can now start the file by typing ['''MWLLeditor.sh'''] in a command prompt and pressing enter. |
Pick a map ([TC_Reference] comes to mind) and try add an brush. Here on is uncharted territory, keep me posted! | Pick a map ([TC_Reference] comes to mind) and try add an brush. Here on is uncharted territory, keep me posted! | ||
Revision as of 22:28, 14 February 2023
By Alien it's meant as totally new, possibly even strange art in respect of what's present in the Asset Pool.
In effect successfully following this procedure will hopefully lead to gradual expansion and enrichment of the aforementioned Asset pool.
The process:
Preparing The geometry
now with blender 3.x
This is a procedure covering the ever growing technology gap between the free and ever livid blender and the aging cryengine2. Just get any blender past 3.x release.
Get it ready
For a Mesh to be fit for cryengine it has to fulfill several criteria due to how compromises were made. It is a convention and if one sticks to it good results won't fail to materialize. 1. No more than two triangles should share same edge. 2. There should be nothing but triangles (or quads) as the final result - remove all and any nodes and or lines (primitives)... 3. There shoudl be no triangles of surface size zero (degenerate faces). 4. It is desirable for the mesh be airtight, but there are valid exceptions.
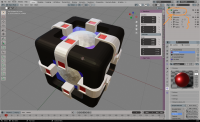
The Object is to be investigated for the quality and errors for UV mapping. Only a single UV map per mesh is supported in Cryengine
The Object is to be assigned To a Collection (no more Groups in blender 3.x) that has the same name The .blend file is to be saved with the same name as the object and collection.
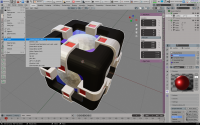
We should now be ready for the export to collada (.dae file)
Export settings
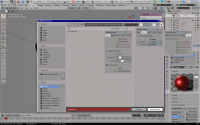
As seen on the image the favorable settings differ from defaults. It is therefore advisable to create a operator preset (i aptly named "cryengine export") for further convenience.
| Parameter name | Explanation |
|---|---|
| Transform | Decomposed (this means rotation, translation and scale are decomposed) |
| Triangulate | leave no uncertain surfaces unresolved by blender. |
| Apply Transforms | Viewport (it is usually save to assume this is true) |
| Selection Only | we rarely need everything from the file - watch for proper parenting! |
| Include children | if parenting is properly laid out - this works miracles! |
| Use Object Instances | don't use this - i tried it once and it was ugly |
| Use Blender Profile | this is best left off - always leave it off for cryengine export. |
Converting the format
Prepare your Linux
For this to work at all some prerequisites are to be met. You didn't think you'll get off
the hook as easy, didn't you?
- We need working ColladaCGF in wine, for this we need working PyFFI in wine, and for this we need working Python in wine in the first place. For this all to work at all certain versions are to be downloaded and fed to wine:
- Python 2.6.6 (or ealrier, but idealy exactly 2.6.6 (32bit release only)
- PyFFI 2.1.11 (the last one that works with 2.x python, newer require python 3.x)
- ColladaCGF 0.3.9 (the last one available)
For this to work you will need your linux to be either "multilib" (more likely applies to you) or 32bit (less likely but possible)
Install In that order (Python, PyFFI, Collada) and see it is in the right wine prefix:
both files:
"C:\Python26\python.exe"
and
"C:\Python26\Scripts\colladacgf.py"
should be present.
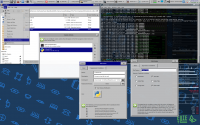
Now if you are not using XFCE4 as your GUI too bad you're just out of luck. Otherwise open the Custom Actions chooser via the Edit menu of Thunar and make a new custom action:
I named the action [ ColladaCGF ] and gave it the usual python icon. The description should be obvious: [ Convert a dae file into cgf ]. The command that worked for me was:
[ wineconsole "C:\Python26\python.exe" "C:\Python26\Scripts\colladacgf.py" %F --pause ]
where %F is a list of selected files with the full path.
The filters on the other tab are to be set accordingly:
[ *.dae;*.DAE ]
mind the semicolon. And the affected files are the text files (.dae files look like XML files) and other files, just in case. Never mind this crazy screenshot - it is CGI - so you have it all on one place.
Apply close and restart Thunar. Now on You should have a context option for each dae file:
Point the ColladaCGF to the .dae file
The dae file is to be selected, rightclick > ColladaCGF and voila! by automagic a bunch of murr-murr and computer speak will fill a dark frame, once you notice the computer has stopped spewing insults and dark magic, there might be a blinking cursor waiting no you to press [enter] key and close the window. You might have just converted your first CGF file on Linux. Or you will be in due time. Conversions often fail due to not adhering to the convention mentioned above.
Find the cgf file
The newly generated .CGF file and it's belonging .MTL file should lay next to each other and next to the source .DAE file. There might be leftovers in the form of logs and dumps. This can be safely ignored, they can safely be deleted too.
Importing into engine
How to get the editor working (Glitch TKG's github)
I see not too many casualties to this point. Good; good, here onward it gets tough as nails, and by that i mean eating chains to fart back nails!. https://github.com/Tk-Glitch (kudos to Tk-Glitch o/ ) https://github.com/Tk-Glitch/PKGBUILDS/wiki/wine-tkg-git#dependencies You want to build a not only custom version of wine (as if that wasn't intimidating enough!). No sir, you want a higly customized, overly patched VERY recent version wine-staging that has support for child-window our Sandbox2 editor uses to render the game withing it's app window. No configurationfiles need to be modified in the [wine-tkg-git] directory, You merely cd to it and run [./non-makepkg-build.sh]
first time you will be dropped to a shel with inof and stuff...
make the following file:
file: [~/.config/frogminer/wine-tkg.cfg]:
_LOCAL_PRESET="none"
_use_GE_patches="true"
_plain_version=""
_use_staging="true"
_staging_version="v7.22"
_use_fastsync="false"
_use_esync="true"
_use_fsync="true"
_fsync_futex_waitv="true"
_use_vkd3dlib="true"
_dxvk_dxgi="true"

_proton_battleye_support="false"
_proton_eac_support="false"
_warframelauncher_fix="false"
_mwo_fix="false"
_re4_fix="false"

_childwindow_fix="true"

_use_josh_flat_theme="true"
And once saved, rerun the above command. Install the new wine and make MWLL run in it's prefix.
to run the editor you will need few more winetricks... Fended of yet? no? Good, because that isn't nearly the end of the desert :D. add (via winetricks) the follwing: d3dcompiler_43 d3dcompiler_47 dotnet472 (needed for the launcher anyway (will pull in much down to dotnet40) ) dxvk (i have dxvk1101 so far) vcrun2005 (MWLL needs it won't run w/o) (add the two redists from the MWLL package, 32bit ones) Now on the editor should launch: (note there is no newline at the top of the file)
file: [~/.local/bin/MWLLeditor.sh]:
#! /bin/bash

v=0.10-beta
#executable=Crysis.exe
executable=Editor.exe
shaderspath=~/Documents/My\ Games/Crysis\ Wars/Shaders

i=${1:-3}

if [ "X"$i != "X" ] ; then
    pass=$i
    echo $i
fi

if (( $pass > 3 )) || (( $pass < 1 )); then
   echo " uasge:"
   echo $0 "{1|2|3}"
   echo "1 = winecfg, 2 = winetricks, 3 = editor"
   exit 2
fi

echo $pass

# switch comment whats appropriate
#  export WINEARCH=win32
#  winegamepath='/drive_c/Program Files (x86)/Electronic Arts/Crytek/Crysis Wars/Bin32'
#  windowsgamepath='C:\Program Files (x86)\Electronic Arts\Crytek\Crysis Wars\Bin32\'

  export WINEARCH=win64
  winegamepath='/drive_c/Program Files (x86)/Electronic Arts/Crytek/Crysis Wars/Bin64'
  windowsgamepath='C:\Program Files (x86)\Electronic Arts\Crytek\Crysis Wars\Bin64\'

#here we do "magic" to run DX9 (only supported so far)
#and tell Crysis we want the MWLL mod not the OEM game :^)
OPT="-dx9 -mod MWLL"
#OPT="-mod MWLL"
#OPT="-dx9"

# reducing what wine spews at us
#export WINEDEBUG=-fixme-all,-warn-all,-err-all,-all
export WINEDEBUG=-all

WINEFSYNC=1
WINEESYNC=1
DXVK_HUD=1
DXVK_FILTER_DEVICE_NAME="NVIDIA GeForce GTX 1060 3GB"

# we controll which directory we want be runned by the script
  export WINEPREFIX=~/.wine

#this can really beak things if enabled but try it?
#  export MESA_DEBUG=1


# we the humans check here what renders our stuff
# if not "Gallium" then it's software = too slow
REND=$(glxinfo | grep "OpenGL renderer" | awk -F: '{print $2}' | awk -F"(" '{print $1}')
echo "Renderer:"$REND
echo "if the above is llvm and not an actual card the game will not work"

#cleaning leftovers from late dinner ;)
killall $executable
killall -9 $executable

#cleaning shader cache for better performance each time
#rm -r "${shaderspath}/*"

#here I cleverly avoid calling the path with my user name :)
cd "${WINEPREFIX}${winegamepath}/${binpath}"
#here i cleverly ask to show the path so we see what WINEPREFIX was called
pwd

case $WINEARCH in
win64)
     echo 64bit
     case $pass in
     1)
         winecfg
         ;;
     2)
         winetricks
         ;;
     3)
        wine64 "${windowsgamepath}${executable}"  $OPT # 2>/dev/null # &> MWLL_debug.log
     #if uncommented, the last line's comment dumps a log file to the game folder - might prove usefull or a vaste of disk space
         ;;
     esac
     ;;
win32)
     echo 32bit
     case $pass in
     1)
         winecfg
         ;;
     2)
         winetricks
         ;;
     3)
         #here (hopefully) no shit hits the fan, and we land in game menu
         wine ${windowsgamepath}${executable} $OPT # &> MWLL_debug.log
         #if uncommented, the last line's comment dumps a log file to the game folder - might prove usefull or a vaste of disk space
         ;;
     esac
     ;;
esac
# to restore resolution put here what's appropriate or leave as is and just uncomment
xrandr -s 0 # last good resolution
This should have you all set.
Run the editor
You can now start the file by typing [MWLLeditor.sh] in a command prompt and pressing enter. Pick a map ([TC_Reference] comes to mind) and try add an brush. Here on is uncharted territory, keep me posted!
What breaks in the editor and how to work around it
TODO
