Asset creation
This is the asset creation section of the work pipeline
Contents
Test Flight
So, You've made it through the Map_Editing and the lengthy New_Art pages, following it to the letter, and have it all working? If not, please go at least to the latter and make sure You have it all properly set up.
Here we will discuss an most simple asset to be built. We will create a basic Container. Its purpose is to just have an grasp of the art pipeline and to have it done quick and easy.
Asset creation in free software
The free software movement is going strong lately. Never before could we choose an production grade suite for the cost of literally nothing. Let us harness this power for the moment and see what can be done with software free of charge (and guilt).
Blender
Most meticulous part of the art is produced in blender3D.
Luckily Blender is an dependable tool, and does not crash often. Although one can't overdo Ctrl+s.
Open blender and use the box that is present as the default scene. This object makes a good start for an container. enter edit mode by pressing [tab] key and by pressing [a] key several times, ascertain all of the nodes are selected. Select a view to easily move the box so it "touches the ground" instead being half way inside of it. the views "front" and "side" are good for this to do. press [tab] to return to Object mode and find the material properties tab.
Exporting to Cryengine is not an simple one off process. When making an complex geometry object, we are at the point of recommended initial export. The geometry alone can have quite few issues by now, and quite some effort can be saved afterwards if those are resolved before any UV mapping and more extensive mesh editing is done. Make the geometry look as intended in the editor first, then continue with ever finer details.
The recent Blenders (we tested this on 2.78 and onward) will create materials and assign UV maps on the instance of attempting to edit an UV map on an newly created object.
We have to comprehend that blender has three things defined in order to assign and UV map to an mesh (-of an object):
- the actual map name - this is the name the file will be saved to (suffixed by .png most probably)
- the texture block name - this is the internal slot where the map info is being kept (for other purposes too)
- the UV mapping info - this is an internal block of information how the mesh's faces connect to an bitmap
Note: The actual bitmaps can be kept internal to the *.blend file (packed); this is not our intention here.
 |
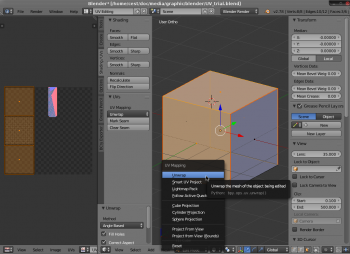
Switch to the UV mapping mode and unwrap the box to the UV map. |
UV unwrapping
Unwrapping an object for texturing isn't by any means a trivial task. Here are the guidelines to help achieving the final output.
- Have in mind the distance the object will be looked from - use texture resolution sparingly - 2048 x 2048 is the recommended one, huge objects shouldn't go over 4096 x 4096 unless unique to the map and absolutely unavoidable.
- When unwrapping, consider reusing the bitmap space - make all like surface patches overlap in a perfect fashion. This way you multiply the resulting objects resolution at no texture cost (see the image above).
- when unwrapping individual patches, consider not putting seams along emphasized edges they will most likely be skewed badly.
- Take care not to distort the patches too much - the textures will look like smeared along one axis
- Avoid stark contrasts on textures of low resolution
- Sometimes the UV unwrapping is more tedious than the actual 3d design of an object. But the work is more effective if done right - Spare no effort -it will pay back.
- Sometimes revisiting the UV unwrapping process again in a later stage can prove a good idea. Consider UV unwrapping the most important part of the 3d art work-pipeline.
- Leave islands around the patches, to avoid ugly artifacts on the seams
 |
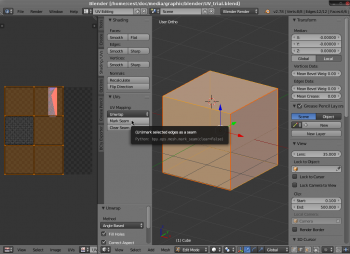
Switch to the edge selection in edit mode and select the edges shown and mark them as seams ([t] key toggles the tool box on the left of the view port) |
 |
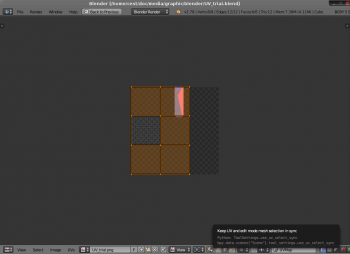
Toggle the sync selection icon to have the selected elements synchronously selected on both view ports. |
Save the UV layout to a file that best suits processing the layout of the art - I recommend *.svg for later processing in Inkscape. Inkscape is very convenient and produces quite predictable and consistent results.
Blender's native texture map format is *.png. It offers quite decent compression without whatsoever distortion of image quality. When exporting from Inkscape the native format is also *.png, so one conversion step is saved by using png in this stage of the work pipe. Many Direct X games use the DDS format for bitmap storing.
Let it be known, that blender supports natively the dds (DirectX Draw Surface) format too - at least on the windows platform.
Once we have the initial PNG file saved to the disk, assign it to the UV map and have it load in the memory. Once the view port is set to preview materials or textures, it will show up. This is usually the case if one enters the edit mode ([tab] key).
The file can be assigned either in the textures menu - by selecting material textures and assigning an slot for it and then filling that slot by an image or movie, then selecting the file to be loaded; or in the UV map editor directly. Either way the texture will define the bitmap that will be projected on the material.
Once the UV is unwrapped to suit, and an texture is assigned to it (being saved or not!) one can start drawing on it by selecting the paint mode (on the mode roll-out menu).
The paint menu has quite features beyond the basic paint, fill and brush, but for our art we will mostly be interested in three tool's two modes each: The brush can project color or bitmap. bitmaps are most useful as stencils or as random sources. The brush is recommended to be duplicated and one edited to be sharp edge ("hard") and the other to be soft edge ("soft").
Once set up like this, the painting can be used as usual brushes or air brushes are used.
Once every while press [alt]+[s] in the UV map view-port to save the updates to the bitmap, as they don't get saved by the global [ctrl]+[s] that saves the file.
Bump maps displace vertices of an underlying mesh, to be of any value, the mesh has to have subdivision applied to it - the more details the mesh has, the "better" the bumps "will" look. Normal maps are pre-calculated pixel normal angles (RGB->XYZ) that are stored for each underlying pixel. They save on floating point math (triangle 3D math) processing thus increasing FPS.
Bump Maps are very often "baked" in 3D software and then processed into Normal maps. Normal maps lacking any real displacement, can fool the eye only at certain (limited) angles of view, while true embossed geometry doesn't have to fool anything - it is just there.
Note that recent VGA are quite ample at trigonometry and suffer ever less of too many "tirs", quite less than of too many bit maps.
Inkscape
- opening the UV preset
- editing in the surfaces (clip, pattern, import bitmap)
- exporting back to PNG
Blender
- importing the UV bitmap (PNG)
- how to adjust it if necessary, what spoils the UV and what does not.
Inkscape
- producing black & withe UV map copies
GIMP
- Adjusting the colors of the black & withe UV maps to become bump maps, normal maps or specular maps...
Blender
Let's try export the art to Collada now. Collada is an interchange format defined by industry leaders and is an intermediate format both the exporting program and the receiving one understand.
To get consistent and predictable results over many export operations, I recommend the settings to be saved an as custom named preset.
For an object to be accessible to cry2 engine some conventions need be followed:
- only letters, numbers and underscores are allowed in names (no spaces)
- the parts of an cgf objects are to be grouped in a group named the same as the file to be created yet
- the material names do not discriminate materials - only the index (order of appearance) does.
- the mtl file is associated only by the name itself
- the sub materials are asigned by their index (order of appearance) alone
This means, that after changing order of materials prior to export, the materials will become "mixed" in the Collada and subsequently the final *.cgf file.
Preparation
The initial step is to Name the object to be exported (brush, entity) as it will be called in the game. Let's call it a "Box" Now create a group called the same only suffixed by .cgf and add the "Box" to it.
If we where to define lover detail objects (L.O.D. - Level of details) we would call the most detailed object as we did ("Box") and any subsequently simpler object would be a child to it, called $LOD<index> where index is the ever lower detailed object.
The original (highest quality) model is designated as $LOD0 or the "original LOD"
LODs are needed if we want to control how our object affects the performance of the engine.
When $LOD1 is present, the original("$LOD0") model isn't rendered below "high spec" system settings for object quality.
Here a checklist of things that can go wrong on exporting from Blender to Cryengine:
- triangulation in Blender is different than in Cryengine (try triangulate in Blender forcibly by hand)
- face normals are flipped (correct this in Blender and re-export)
- our meshes aren't oriented in Cryengine the same as in Blender (apply the transforms in Blender and re-export)
- when changing LOD our object "jumps" or disappears (one of the LODs has any of the above problems?)
- our object is black (material colors don't get exported - set them in SB2's material editor after export)
- our object has no textures (Bender exports the textures as png; Cryengine uses DDS or TIF as textures - assign them in the SB2's material editor)
- frozen textures can only be of limited tile size (reconsider UV mapping the object)
- sometimes nothing appears in the resulting *.cgf file (check for degenerate faces and multiface lines)
- sometimes nothing appears in the resulting *.cgf file (check the units and scale setup in blender)
Double sided materials and faces
We do not want to have 2-sided materials for several reasons:
- performance - as soon as the face sin't facing our way if single sided it won't use any processing power
- physics interaction - no material interacts physically "from inside" so it's a good sanity check of inverted (bad) faces
- 2 sided materials hide inverted faces and are a night mare to troubleshoot for
Export options
/TODO/
- exporting to Collada(DAE, options which and why set or not)
- exporting to lightvawe (OBJ, options)
Collada
- Once the art is exported as a Collada file (*.dae) the file is to be found with the Windows Explorer.
- Select the *.dae file and open the right click menu - select export to cryengine (DAE to CGF) in the context menu.
- an command prompti will open for each file selected (yes more can be converted concurrently)
- upon completion of the process the prompt expects an [enter] key to close itself.
if you sort the view by creation time, on top of the list new *.cgf and *.mtl files will appear.
if one examines the newly created *.mtl file, one will find it references the *.png file(s) right bellow holding the map(s) of the material(s). Remember those for then next section
GIMP
Remember the *.mtl and *.png files from the last section? Excellent! we will now deal with those:
Cryengine 2 and Sandbox 2 can't handle *.png files for no obvious reason. Luckily they handle *.dds and *.tif files,for which we have readied our plugins.
- select the *.png files of interest.
Selecting creation time for the sort of the view will put them close to the top of the list.
- in context menu select open with GIMP
- once certain of the file in process, in GIMP's File menu select Export as...
- in the file export dialog edit the filename to replace the .png by an .dds
- make sure the file format is determined "by extension"
- click export, a new dialog will appear asking for compression and mip map creation among other options
- select DC1 for compression
- select create mip maps
- commence the actual export of the file
- close the file without any changes saved
repeat until done for all files. Each *.png file will have it's *.dds sibling.
This procedure is referred to as export (to DDS) with GIMP
File Manager
For each object the belonging *.cgf *.mtl and *.dds file is to be located and copied to the place it will be referenced from (usually the map's folder).
The MTL file is to be edited for the bitmap names to be adjusted. This can be done in the Sandbox2 editor when the object is already imported into the map. In the material editor just select the according material and adjust the file in the maps section. Usually it is the Difuse map and it will usually have an *.png entry. The proper DDS bitmap is to be found in the map folder. This will allow for the bitmap to be distributed alongside the map.
Sandbox2
- the editors likes starting from scratch (Save, Exit, Run, rE-load Map = SEREM)
- the copies get corrupted all of sudden (copy1, copy 11, copy111, copy1111) and daily backups, version control
- importing the asset from inside the map folder (new assets are those not included with the game - so the only place left is the downloadable map folder)
- correcting materials (material editor of Sandbox2 updates edits in real-time - like Gnome and GTK apps)
- checking if corrections are properly applied (SEREM)
Asset creation with professional tools
While professional tools of such mileage (~10 years) are plagued by many short comings, still there is no match for the level of feature support versus them. The only way to import animations into Sandbox2 are the professional tools (yet).
3D Studio Max
- make box
- export UVs
Photoshop
- process the maps from 3dsmax
- produce height, bump and normal maps
- export for cryengine compatible formats (DDS,TIF)
3dStudioMax
- apply the UV maps created in the Photoshop
- export the object to cryengine from within 3dsmax
Sandbox2
- check the created object in the editor
- locate it on the filesystem
OS file manager
- copy the files (graphics file (cgf, cga), textures (DDS, TIF, TGA) and material (MTL) files) to the map-local folder( new assets are those not included with the game - so the only place left is the downloadable map folder).