|
|
| Line 1: |
Line 1: |
| | =To Ride, Shoot Straight and Speak the truth= | | =To Ride, Shoot Straight and Speak the truth= |
| | | | |
| − | ==Tables==
| |
| | | | |
| − | <div style="overflow-x: auto; margin-right:auto; margin-left:auto; margin-top: 20px; margin-bottom: 0px;">
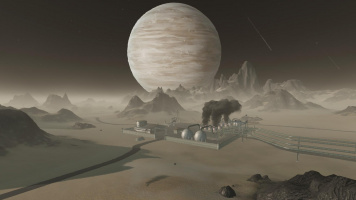
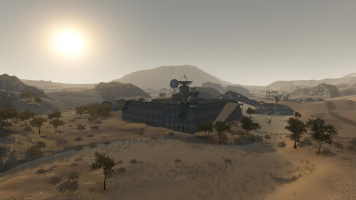
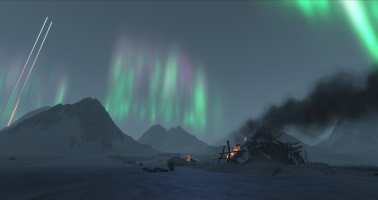
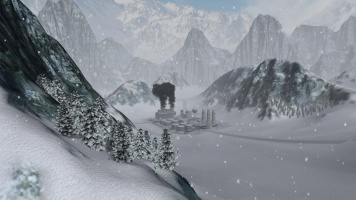
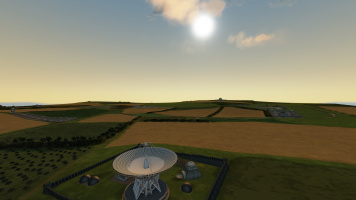
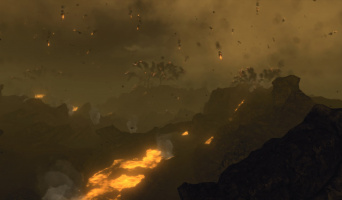
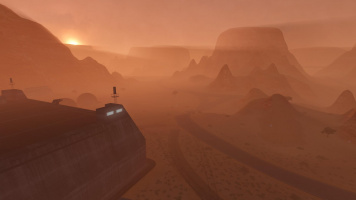
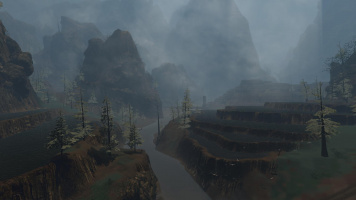
| + | ==Maps== |
| − | {| class= "wikitable sortable" style="text-align:center; font-size:13px; margin:auto;"
| |
| − | |- style="text-align:center; height:70px;"
| |
| − | ! data-sort-type="number" style="width: 90px" | '''Weapon'''
| |
| − | ! data-sort-type="number" style="width: 70px" | '''Min Range'''
| |
| − | ! data-sort-type="number" style="width: 70px" | '''Max Range''' <!-- calculated and/or approximated max range to cause damage -->
| |
| − | ! style="width: 80px" | '''Damage<wbr/>/Shot''' <!-- Shot is the minimum amount of ammo/beams one can shoot-->
| |
| − | ! class="unsortable" style="width: 100px; padding: 5px;" | '''[[Damage types|Damage<br>Type]]'''
| |
| − | ! style="width: 80px" | '''Secondary<br>Damage<wbr/>/Shot'''
| |
| − | ! class="unsortable" style="width: 100px; padding: 5px;" | '''Sec.<br>[[Damage types|Damage Type]]'''
| |
| − | ! data-sort-type="number" style="width: 100px" | '''Splash Radius'''<br>(prm/sec)
| |
| − | ! data-sort-type="number" style="width: 80px" | '''Shots<br>/min''' <!-- Shot cycles per minute more accurately. (Max rpm for rapid fire weapons) -->
| |
| − | ! style="width: 70px" | '''Sustained<br>[[DPS]]''' <!-- expected max DPS against other assets -->
| |
| − | ! style="width: 70px" | '''[[Heat]]<br>/Shot'''
| |
| − | ! style="width: 70px" | '''Ammo<br>/ton''' <!-- Half ton ammo treated as one ton -->
| |
| − | ! style="width: 70px" | '''Ammo cost<br>/ton'''
| |
| − | |-
| |
| | | | |
| − | | data-sort-value="1" | [[Battle_Armor_Weapons#SRM-2| '''BA SRM2''']]
| + | <div style="width:90%; margin:auto; text-align: center;> |
| − | | 6m
| + | {| style="display: inline-block" |
| − | | 400m
| + | {{ContentCell|420px|[[TC_DeathValley]]| |
| − | | data-sort-value="400" | 400*
| + | [[Image:TC_DeathValley.jpg|x200px|link=TC_DeathValley]]}} |
| − | | Light Kinetic
| + | |} |
| − | | data-sort-value="200" | 200*
| + | {| style=" display: inline-block" |
| − | | Missile
| + | {{ContentCell|420px|[[TC_DustBowl]]| |
| − | | 2m / 4m
| + | [[Image:TC_Dustbowl.jpg|x200px|link=TC_DustBowl]]}} |
| − | | data-sort-value="16" | 2 x 8 | + | |} |
| − | | 201
| + | {| style="display: inline-block" |
| − | | ---
| + | {{ContentCell|420px|[[TC_Enkeladus]]| |
| − | | data-sort-value="16" | ---
| + | [[Image:TC_Enkeladus.jpg|x200px|link=TC_Enkeladus]]}} |
| − | | 1000* | + | |} |
| − | |-
| + | {| style="display: inline-block" |
| − | | + | {{ContentCell|420px|[[TC_Frostbite]]| |
| − | | data-sort-value="2" | [[SRM2 | '''(C)SRM2''']]
| + | [[Image:Frostbite.jpg|x200px|link=TC_Frostbite]]}} |
| − | | rowspan="3" | ---
| |
| − | | 350m
| |
| − | | data-sort-value="200" | 2 x 100
| |
| − | | rowspan="3" | Missile
| |
| − | | data-sort-value="200" | 2 x 100
| |
| − | | rowspan="3" | Frag
| |
| − | | rowspan="3" | 0.95m / 2m
| |
| − | | 16.3 | |
| − | | 55 | |
| − | | 12
| |
| − | | 48
| |
| − | | 125
| |
| − | |-
| |
| − | | |
| − | | data-sort-value="3" | [[SRM4 | '''(C)SRM4''']]
| |
| − | | rowspan="2" | 355m | |
| − | | data-sort-value="400" | 4 x 100 | |
| − | | data-sort-value="400" | 4 x 100
| |
| − | | 15.7
| |
| − | | 107
| |
| − | | 24
| |
| − | | rowspan="2" | 96 | |
| − | | rowspan="2" | 250
| |
| − | |-
| |
| − | | |
| − | | data-sort-value="4" | [[SRM6 | '''(C)SRM6''']]
| |
| − | | data-sort-value="600" | 6 x 100
| |
| − | | data-sort-value="600" | 6 x 100
| |
| − | | 15.1
| |
| − | | 154
| |
| − | | 36
| |
| − | |- | |
| − | | |
| − | | data-sort-value="5" | [[DSRM4 | '''(C)DSRM4''']] | |
| − | | rowspan="2" | --- | |
| − | | rowspan="2" | 355m | |
| − | | data-sort-value="800" | 8 x 100
| |
| − | | rowspan="2" | Missile | |
| − | | data-sort-value="800" | 8 x 100
| |
| − | | rowspan="2" | Frag
| |
| − | | rowspan="2" | 0.95m / 2m
| |
| − | | 14.5
| |
| − | | 198
| |
| − | | 48
| |
| − | | rowspan="2" | 96
| |
| − | | rowspan="2" | 250
| |
| − | |-
| |
| − | | |
| − | | data-sort-value="6" | [[DSRM6 | '''(C)DSRM6''']]
| |
| − | | data-sort-value="1200" | 12 x 100
| |
| − | | data-sort-value="1200" | 12 x 100
| |
| − | | 13.5
| |
| − | | 276
| |
| − | | 72 | |
| − | |- | |
| − | | |
| − | | data-sort-value="7" | [[Air_Weapons#Missile Air Weapons | '''Air SRM2''']]
| |
| − | | rowspan="3" | --- | |
| − | | rowspan="3" | 500m | |
| − | | data-sort-value="200" | 2 x 100
| |
| − | | rowspan="3" | Missile
| |
| − | | data-sort-value="200" | 2 x 100
| |
| − | | rowspan="3" | Frag
| |
| − | | rowspan="3" | 0.95m / 2m
| |
| − | | 8.8
| |
| − | | 30
| |
| − | | 12
| |
| − | | 48
| |
| − | | 125
| |
| − | |-
| |
| − | | |
| − | | data-sort-value="8" | [[Air_Weapons#Missile Air Weapons | '''Air SRM4''']] | |
| − | | data-sort-value="400" | 4 x 100 | |
| − | | data-sort-value="400" | 4 x 100
| |
| − | | 8.6
| |
| − | | 59
| |
| − | | 24
| |
| − | | rowspan="2" | 96
| |
| − | | rowspan="2" | 250 | |
| − | |-
| |
| − | | |
| − | | data-sort-value="9" | [[Air_Weapons#Missile Air Weapons | '''Air SRM6''']]
| |
| − | | data-sort-value="600" | 6 x 100
| |
| − | | data-sort-value="600" | 6 x 100
| |
| − | | 8.4
| |
| − | | 86
| |
| − | | 36
| |
| − | |-
| |
| | |} | | |} |
| − | </div>
| + | {| style="display: inline-block" |
| − | {| style="font-size:12px; margin:auto; width:100%; max-width: 1370px; margin-bottom: 30px" | + | {{ContentCell|420px|[[TC_Harvest]]| |
| − | |- | + | [[Image:TC_Harvest.jpg|x200px|link=TC_Harvest]]}} |
| − | | style=" width: 50%; text-align:left;" | *Single missile (BA SRM2 launches one missile at a time)
| |
| − | | style=" width: 50%; text-align:right;" | All stats are current as of release 0.10.3 | |
| | |} | | |} |
| − | | + | {| style="display: inline-block" |
| − | <div style="overflow-x: auto; margin-right:auto; margin-left:auto; margin-top: 20px; margin-bottom: 0px;">
| + | {{ContentCell|420px|[[TC_Inferno]]| |
| − | {| class= "wikitable sortable" style="text-align:center; font-size:13px; margin:auto;" | + | [[Image:SA_Inferno.jpg|x200px|link=SA_Inferno]]}} |
| − | |- style="text-align:center; height:70px;" | |
| − | ! data-sort-type="number" style="width: 90px" | '''Weapon'''
| |
| − | ! data-sort-type="number" style="width: 70px" | '''Max Range''' <!-- calculated and/or approximated max range to cause damage -->
| |
| − | ! data-sort-type="number" style="width: 70px" | '''Dmg Drop<br>Range'''
| |
| − | ! data-sort-type="number" style="width: 70px" | '''Dmg Drop<br>/m'''
| |
| − | ! style="width: 80px" | '''Damage<wbr/>/Shot''' <!-- Shot is the minimum amount of ammo/beams one can shoot-->
| |
| − | ! class="unsortable" style="width: 100px; padding: 5px;" | '''[[Damage types|Damage<br>Type]]'''
| |
| − | ! style="width: 80px" | '''Secondary<br>Damage<wbr/>/Shot'''
| |
| − | ! class="unsortable" style="width: 100px; padding: 5px;" | '''Sec.<br>[[Damage types|Damage Type]]'''
| |
| − | ! data-sort-type="number" style="width: 100px" | '''Splash Radius'''<br>(prm/sec)
| |
| − | ! data-sort-type="number" style="width: 80px" | '''Shots<br>/min''' <!-- Shot cycles per minute more accurately. (Max rpm for rapid fire weapons) -->
| |
| − | ! style="width: 70px" | '''Sustained<br>[[DPS]]''' <!-- expected max DPS against other assets -->
| |
| − | ! style="width: 70px" | '''[[Heat]]<br>/Shot'''
| |
| − | ! style="width: 70px" | '''Ammo<br>/ton''' <!-- Half ton ammo treated as one ton -->
| |
| − | ! style="width: 70px" | '''Ammo cost<br>/ton'''
| |
| − | |-
| |
| − | | |
| − | | data-sort-value="1" | [[AC2 | '''AC2''']]
| |
| − | | 1200m
| |
| − | | 1200m
| |
| − | | rowspan="2" | 10
| |
| − | | Data-sort-value="346" | 6 x 58
| |
| − | | rowspan="2" | Light Kinetic
| |
| − | | Data-sort-value="120" | 6 x 20
| |
| − | | rowspan="4" | Frag
| |
| − | | 1m / 1.5m
| |
| − | | 11.8
| |
| − | | 96
| |
| − | | 9
| |
| − | | 360
| |
| − | | 250
| |
| − | |-
| |
| − | | |
| − | | data-sort-value="2" | [[AC5 | '''AC5''']]
| |
| − | | 795m
| |
| − | | 800m
| |
| − | | Data-sort-value="390" | 3 x 130
| |
| − | | Data-sort-value="135" | 3 x 45
| |
| − | | 1m / 1.8m
| |
| − | | 12.6
| |
| − | | 116
| |
| − | | 3
| |
| − | | 128
| |
| − | | 450
| |
| − | |-
| |
| − | | |
| − | | data-sort-value="3" | [[AC10 | '''AC10''']]
| |
| − | | 625m
| |
| − | | 600m
| |
| − | | rowspan="2" | 20
| |
| − | | Data-sort-value="550" | 225 (225)
| |
| − | | rowspan="2" | Heavy Kinetic (Energy)
| |
| − | | Data-sort-value="500" | 500
| |
| − | | 1.3m / 2.6m
| |
| − | | 17.7
| |
| − | | 156
| |
| − | | 15
| |
| − | | 28
| |
| − | | 750
| |
| − | |- | |
| − | | |
| − | | data-sort-value="4" | [[AC20 | '''AC20''']] | |
| − | | 345m
| |
| − | | 350m
| |
| − | | Data-sort-value="600" | 300 (300)
| |
| − | | Data-sort-value="600" | 600
| |
| − | | 1.6m / 3.2m
| |
| − | | 26.6
| |
| − | | 310
| |
| − | | 38
| |
| − | | 22
| |
| − | | 1000
| |
| − | |-
| |
| − | | |
| | |} | | |} |
| − | </div>
| + | {| style="display: inline-block" |
| − | {| style="font-size:12px; margin:auto; width:100%; max-width: 1510px; margin-bottom: 30px" | + | {{ContentCell|420px|[[TC_IvoryTower]]| |
| − | |- | + | [[Image:TC_IvoryTower.jpg|x200px|link=TC_IvoryTower]]}} |
| − | | style=" width: 100%; text-align:right;" | All stats are current as of release 0.10.3 | |
| | |} | | |} |
| − | | + | {| style="display: inline-block" |
| − | <div style="overflow-x: auto; margin-right:auto; margin-left:auto; margin-top: 20px; margin-bottom: 0px;">
| + | {{ContentCell|420px|[[TC_Kagoshima]]| |
| − | {| class= "wikitable sortable" style="text-align:center; font-size:13px; margin:auto;" | + | [[Image:TC_Kagoshima.jpg|x200px|link=Kagoshima]]}} |
| − | |- style="text-align:center; height:70px;" | |
| − | ! data-sort-type="number" style="width: 90px" | '''Weapon'''
| |
| − | ! data-sort-type="number" style="width: 70px" | '''Max Range''' <!-- calculated and/or approximated max range to cause damage -->
| |
| − | ! data-sort-type="number" style="width: 70px" | '''Dmg Drop<br>Range'''
| |
| − | ! data-sort-type="number" style="width: 70px" | '''Dmg Drop<br>/m'''
| |
| − | ! style="width: 80px" | '''Damage<wbr/>/Shot''' <!-- Shot is the minimum amount of ammo/beams one can shoot-->
| |
| − | ! class="unsortable" style="width: 100px; padding: 5px;" | '''[[Damage types|Damage<br>Type]]'''
| |
| − | ! data-sort-type="number" style="width: 80px" | '''Shots<br>/min''' <!-- Shot cycles per minute more accurately. (Max rpm for rapid fire weapons) -->
| |
| − | ! style="width: 70px" | '''Sustained<br>[[DPS]]''' <!-- sustained max DPS against other assets -->
| |
| − | ! style="width: 70px" | '''Burst<br>[[DPS]]''' <!-- max DPS against other assets -->
| |
| − | ! style="width: 70px" | '''[[Heat]]<br>/Shot'''
| |
| − | ! data-sort-type="number" style="width: 70px" | '''Cooldown<br>Time''' <!-- Full weapon heat bar to 0 -->
| |
| − | ! data-sort-type="number" style="width: 70px" | '''Jam<br>Duration'''
| |
| − | ! style="width: 70px" | '''Ammo<br>/ton''' <!-- Half ton ammo treated as one ton -->
| |
| − | ! style="width: 70px" | '''Ammo cost<br>/ton'''
| |
| − | |-
| |
| − | | |
| − | | data-sort-value="1" | [[HAG20 | '''HAG20''']]
| |
| − | | rowspan="3" | 1200m
| |
| − | | rowspan="3" | 1200m
| |
| − | | rowspan="3" | 40
| |
| − | | rowspan="3" Data-sort-value="82" | 82
| |
| − | | rowspan="3" | Kinetic
| |
| − | | 97 (900)*
| |
| − | | 159
| |
| − | | rowspan="3" | 1476
| |
| − | | rowspan="3" | 3
| |
| − | | rowspan="3" | 16s
| |
| − | | 6s
| |
| − | | rowspan="3" | 240
| |
| − | | rowspan="3" | 1500
| |
| − | |-
| |
| − | | |
| − | | data-sort-value="2" | [[HAG30 | '''HAG30''']]
| |
| − | | 129 (900)*
| |
| − | | 211
| |
| − | | 8s
| |
| − | |-
| |
| − | | |
| − | | data-sort-value="3" | [[HAG40 | '''HAG40''']]
| |
| − | | 153 (900)*
| |
| − | | 251
| |
| − | | 10s
| |
| − | |-
| |
| − | | |
| | |} | | |} |
| | </div> | | </div> |
| − | {| style="font-size:12px; margin:auto; width:100%; max-width: 1420px; margin-bottom: 30px"
| + | |
| − | |- | + | <!--- |
| − | | style=" width: 50%; text-align:left;" | *Max rate of fire | + | Image:TC_MirageOverview.jpg | [[TC_Mirage]] |
| − | | style=" width: 50%; text-align:right;" | All stats are current as of release 0.10.3
| + | Image:Sandblasted.png | [[TC_Sandblasted]] |
| − | |} | + | Image:TC_Taiga.jpg | [[TC_Taiga]] |
| | + | Image:TC_ValleyForge.jpg | [[TC_ValleyForge]] |
| | + | Image:TC_Outskirts-1.jpg | [[TC_Outskirts]] ---> |