Difference between revisions of "Hollander II"
Fire-hound (talk | contribs) (→Variant C: updated fluff) |
m |
||
| (47 intermediate revisions by 9 users not shown) | |||
| Line 1: | Line 1: | ||
{{Mech| | {{Mech| | ||
| − | | Image = File: | + | | Image = File:HollanderII.png |
| − | | | + | | ImageGif = File:HollanderII_spin.gif |
| Class = Medium | | Class = Medium | ||
| Faction = Inner Sphere | | Faction = Inner Sphere | ||
| Line 7: | Line 7: | ||
| Tier = 5 | | Tier = 5 | ||
| Tonnage = 45 | | Tonnage = 45 | ||
| − | | Speed = 86 | + | | Speed = 86 |
| − | | SpeedWithMasc = | + | | SpeedWithMasc = 121 |
| Rotation = 360 | | Rotation = 360 | ||
| − | | PitchStand = - | + | | PitchStand = -35° to +55° |
| − | | PitchCrouch = - | + | | PitchCrouch = -35° to +65° |
| Price Prime = 55 300 | | Price Prime = 55 300 | ||
| − | | ArmorT Prime = 35 | + | | ArmorT Prime = 35 648 |
| + | | Engine Prime = Omni 175 XL | ||
| Weapons Prime = <ul> | | Weapons Prime = <ul> | ||
| − | <li>2x [[ | + | <li> 2x [[ERML]] |
| − | <li>1x [[Gauss]] | + | <li> 1x [[Gauss]] |
</ul> | </ul> | ||
| Equip Prime = <ul> | | Equip Prime = <ul> | ||
| − | <li>[[EOptics]] | + | <li> [[EOptics]] |
| − | <li>[[iJJ]] | + | <li> [[iJJ]] |
| − | <li>2 [[HS]] | + | <li> 2 [[HS]] |
| − | <li>2 [[free tons]] | + | <li> 2 [[free tons]] |
| − | <li>7.5t [[Armor]] | + | <li> 7.5t [[Armor]] |
</ul> | </ul> | ||
| Price A = 60 500 | | Price A = 60 500 | ||
| − | | ArmorT A = | + | | ArmorT A = 32 046 |
| + | | Engine A = Omni 175 XL | ||
| Weapons A = <ul> | | Weapons A = <ul> | ||
| − | <li>4x [[ | + | <li> 4x [[SL]] |
| − | <li>1x [[HGauss]] | + | <li> 1x [[HGauss]] |
</ul> | </ul> | ||
| Equip A = <ul> | | Equip A = <ul> | ||
| − | <li>[[EOptics]] | + | <li> [[EOptics]] |
| − | <li>[[MASC]] | + | <li> [[MASC]] |
| − | <li>0 [[HS]] | + | <li> 0 [[HS]] |
| − | <li>2 [[free tons]] | + | <li> 2 [[free tons]] |
| − | <li>6.5t [[Armor]] | + | <li> 6.5t [[Armor]] |
</ul> | </ul> | ||
| − | | Price B = | + | | Price B = 57 000 |
| − | | ArmorT B = | + | | ArmorT B = 39 256 |
| + | | Engine B = Omni 175 XL | ||
| Weapons B = <ul> | | Weapons B = <ul> | ||
| − | <li> | + | <li> 1x [[UAC20]] |
| − | <li> | + | <li> 2x [[SL]] |
| + | <li> 2x [[Flamer]] | ||
</ul> | </ul> | ||
| Equip B = <ul> | | Equip B = <ul> | ||
| − | <li>[[iJJ]] | + | <li> [[iJJ]] |
| − | <li>2 [[ | + | <li> 2 [[DHS]] |
| − | <li>2 [[free tons]] | + | <li> 2 [[free tons]] |
| − | <li> | + | <li> 8t [[Armor]] |
</ul> | </ul> | ||
| − | | Price C = | + | | Price C = 49 100 |
| − | | ArmorT C = | + | | ArmorT C = 37 452 |
| + | | Engine C = Omni 175 STD | ||
| Weapons C = <ul> | | Weapons C = <ul> | ||
| − | <li>2x [[ | + | <li> 2x [[SXPL]] |
| − | <li>1x [[ | + | <li> 1x [[SRM6]] |
| − | <li> | + | <li> 1x [[AC20]] |
</ul> | </ul> | ||
| Equip C = <ul> | | Equip C = <ul> | ||
| − | <li>[[EOptics]] | + | <li> [[EOptics]] |
| − | <li> | + | <li> 2 [[HS]] |
| − | + | <li> 1 [[free ton]] | |
| − | <li> | + | <li> 7.5t [[Armor]] |
| − | <li>7.5t [[Armor]] | ||
</ul> | </ul> | ||
| Price D = 54 750 | | Price D = 54 750 | ||
| − | | ArmorT D = 33 | + | | ArmorT D = 33 848 |
| + | | Engine D = Omni 175 XL | ||
| Weapons D = <ul> | | Weapons D = <ul> | ||
| − | <li> | + | <li> 4x [[AC2]] |
| − | <li> | + | <li> 1x [[LtGauss]] |
</ul> | </ul> | ||
| Equip D = <ul> | | Equip D = <ul> | ||
| − | <li>[[EOptics]] | + | <li> [[EOptics]] |
| − | <li>[[ | + | <li> [[JJ]] |
| − | <li>[[ | + | <li> [[BAP]] |
| − | <li>0 [[HS]] | + | <li> 0 [[HS]] |
| − | <li>2 [[free tons]] | + | <li> 2 [[free tons]] |
| − | <li>7t [[Armor]] | + | <li> 7t [[Armor]] |
</ul> | </ul> | ||
| − | | Price E = | + | | Price E = 58 350 |
| − | | ArmorT E = | + | | ArmorT E = 33 848 |
| + | | Engine E = Omni 175 XL | ||
| Weapons E = <ul> | | Weapons E = <ul> | ||
| − | <li>4x [[LBX2]] | + | <li> 4x [[LBX2]] |
| − | <li>1x [[LBX20]] | + | <li> 1x [[LBX20]] |
</ul> | </ul> | ||
| Equip E = <ul> | | Equip E = <ul> | ||
| − | <li>[[EOptics]] | + | <li> [[EOptics]] |
<li> [[JJ]] | <li> [[JJ]] | ||
| − | <li>[[BAP]] | + | <li> [[BAP]] |
| − | <li>0 [[HS]] | + | <li> 0 [[HS]] |
| − | <li>1 [[free ton]] | + | <li> 1 [[free ton]] |
| − | <li>7t [[Armor]] | + | <li> 7t [[Armor]] |
</ul> | </ul> | ||
| − | | Price F = | + | | Price F = 60 500 |
| − | | ArmorT F = | + | | ArmorT F = 37 452 |
| + | | Engine F = Omni 175 XL | ||
| Weapons F = <ul> | | Weapons F = <ul> | ||
| − | <li> | + | <li> 1x [[HPPC]] |
| − | <li>2x [[ | + | <li> 2x [[UAC5]] |
| − | + | </ul> | |
| − | <ul> | ||
| Equip F = <ul> | | Equip F = <ul> | ||
| − | <li>[[ | + | <li> [[EOptics]] |
| − | <li>[[ | + | <li> [[iJJ]] |
| − | <li> | + | <li> 1 [[DHS]] |
| − | <li> | + | <li> 0 [[free tons]] |
| − | <li> | + | <li> 7.5t [[Armor]] |
</ul> | </ul> | ||
| − | | Price G = | + | | Price G = 56 300 |
| − | | ArmorT G = 35 | + | | ArmorT G = 35 648 |
| + | | Engine G = Omni 175 XL | ||
| Weapons G = <ul> | | Weapons G = <ul> | ||
| − | <li>2x [[ | + | <li> 2x [[ERML]] |
| − | <li>1x [[ | + | <li> 1x [[HVAC10]] |
</ul> | </ul> | ||
| Equip G = <ul> | | Equip G = <ul> | ||
| − | <li>[[EOptics]] | + | <li> [[EOptics]] |
| − | <li>[[ | + | <li> [[iJJ]] |
| − | <li>[[ | + | <li> [[GECM]] |
| − | <li>2 [[HS]] | + | <li> 2 [[HS]] |
| − | <li>3 [[free tons]] | + | <li> 3 [[free tons]] |
| − | <li>7.5t [[Armor]] | + | <li> 7.5t [[Armor]] |
</ul> | </ul> | ||
| Armor H = 2760 | | Armor H = 2760 | ||
| − | | Armor CT = | + | | Armor CT = 5101 |
| − | | Armor LT = | + | | Armor LT = 3315 |
| − | | Armor RT = | + | | Armor RT = 4846 |
| − | | Armor B = | + | | Armor B = 3060 |
| − | | Armor LRA = | + | | Armor LRA = 2040 |
| − | | Armor INT = | + | | Armor LRL = 3902 |
| − | | | + | | Armor INT = 2341 |
| + | |||
| + | | Version153 = 0.16.1 | ||
}} | }} | ||
| − | + | ||
| − | The '''Hollander II''' is an [[Inner Sphere]] [[Medium Mech]] well known for its powerful weaponry and gangly appearance. The Hollander II has relatively light [[Armor]] for a Medium Mech, and is not particularly speedy or maneuverable; it makes up for this by mounting some of the most damaging weaponry in [[MWLL]]. Hollander IIs tend to stick to the same basic design: one large, powerful weapon mounted on the [[Armor|Right Torso]], and smaller, weaker weapons mounted on the Left and Right [[Armor|Arms]]. The Hollander II does have a couple of glaring weaknesses: both the [[Armor|Cockpit]] and its main weapon are very visible atop the [[Armor|Center Torso]], making it fairly easy to either kill the Pilot or disable the weapon. The Hollander's spotlight is mounted directly above the cockpit. Turning on the spotlight can partially blind the pilot due to glare and the light reflecting off of fog. | + | |
| − | One of the obvious methods for defeating this Mech is to destroy the right torso | + | The '''Hollander II''' is an [[Inner Sphere]] [[Medium Mech]] well known for its powerful weaponry and gangly appearance. The Hollander II has relatively light [[Armor]] for a Medium Mech, and is not particularly speedy or maneuverable; it makes up for this by mounting some of the most damaging weaponry in [[MWLL]]. Hollander IIs tend to stick to the same basic design: one large, powerful weapon mounted on the [[Armor|Right Torso]], and smaller, weaker weapons mounted on the Left and Right [[Armor|Arms]]. The Hollander II does have a couple of glaring weaknesses: both the [[Armor|Cockpit]] and its main weapon are very visible atop the [[Armor|Center Torso]], making it fairly easy to either kill the Pilot or disable the weapon. The Hollander's spotlight is mounted directly above the cockpit. Turning on the spotlight can partially blind the pilot due to glare and the light reflecting off of fog. |
| + | One of the obvious methods for defeating this Mech is to destroy the right torso, thus removing the vast majority of this Mech's firepower. Additionally, one in combat with this Mech may choose to destroy the [[Armor|Left Torso]]. Although this section does not mount weaponry to remove, it is less armored, and therefore easier to blow away. | ||
| + | |||
==Roles and Gameplay Hints== | ==Roles and Gameplay Hints== | ||
| + | |||
===Prime=== | ===Prime=== | ||
| − | The Prime variant mounts 1 [[Gauss]] as its main weapon, and supports that with 2 [[ | + | The Prime variant mounts 1 [[Gauss]] as its main weapon, and supports that with 2 [[ERML]]s, giving it a respectable long-range punch. It lacks any close-range firepower to deter [[Battle Armor]] and brawling [[Light Mechs]] so a prudent Mechwarrior should try to keep his foes at long range. Care must be taken to protect both the Gauss and Cockpit, as they are both very vulnerable. However, because the Gauss is positioned on the highest point of the Mech, it allows the majority of the Mech to remain in cover when [[Gameplay Tactics#Poptarting|poptarting]] which the Prime excels at due to its [[iJJ|improved jump jets]]. Furthermore, each gauss shot can be carefully placed with pinpoint accuracy using the Prime's [[eoptics|enhanced optics]]. |
| − | ===Variant A=== | + | ===Variant A - ''"Acht-Acht"''=== |
| − | The Hollander II A mounts a single [[HGauss]] as its main weapon, and supports this with 4 [[ | + | The Hollander II A mounts a single [[HGauss]] as its main weapon, and supports this with 4 [[SL]]s and a [[MASC]] system. This gives the A variant absolutely fearsome firepower at close to medium range, and allows it to close at unexpectedly quick speeds. This is balanced by the A's low ammo, the long [[refire rate]] of its HGauss, and the lack of any extra [[heat sink|heat sinks]] to support the MASC system. Extra care must be given to protecting the HGauss, as that is this variant's primary means of defending itself. This variant is extremely susceptible to spontaneously exploding when the Gauss Rifle is destroyed, due to overloading causing additional damage to neighbor sections. The A also is the only Hollander that does not have jump jets which gives it far less mobility than its cousins. |
===Variant B=== | ===Variant B=== | ||
| − | The B variant is a pure brawler. Its massive [[UAC20]] is capable of dealing heavy damage to targets | + | The B variant is a pure brawler. Its massive [[UAC20]] is capable of dealing heavy damage to targets 350m or closer, followed 2 [[SL|Small Lasers]] while its 2 [[Flamer|Flamers]] are effective out to 150m. The B variant is best used as a brawler, quickly jumping into battle with its [[iJJ|Improved Jump Jets]], and dealing high DPS with the UAC20 supported by its Small Lasers. An extra 2 free tons allows it to remain in combat for a long time. Alas only having 2 [[DHS|Double Heat Sinks]] causes mechwarriors to struggle with the B's combined weapon and jump jet heat output. Equipped with only close-ranged weaponry means that at range, the Hollander II B is defenseless. Its large autocannon sitting on its right shoulder is also relatively easy to hit, so Mechwarriors should try torso twisting away from enemies to distribute damage and travel with a teammate. |
| − | ===Variant C=== | + | ===Variant C - ''"Conscript"''=== |
| − | + | The cheapest Hollander, and the cheapest [[AC20]] asset. An [[SRM6]] and twin [[SXPL|SXPLs]] complement the close-range loadout, with all weapons having a max range of 350m. The Conscript lacks any movement equipment, and must rely on [[screenshake]] and its [[engines|Standard Engine]] to keep it alive. Having only 1 [[free ton]] leaves a tough choice: the AC20 is the more powerful weapon, but the SRM6 will run out of ammo 8 shots earlier, if both weapons are constantly fired in sync. | |
| − | |||
| − | |||
| − | |||
| − | ===Variant D=== | + | ===Variant D - ''"Jesse James"''=== |
| − | The D variant is an extreme long range sniper. Its [[gauss|light gauss]] hits targets up to | + | The D variant is an extreme long range sniper. Its [[gauss|light gauss]] hits targets up to 1250m away while its quad [[AC2]]s reach out to 1200m. Mechwarriors piloting the D should stay at long range, liberally using its [[Eoptics|enhanced optics]] and [[BAP]] to find distant targets to quickly deal combined gauss and autocannon damage to mechs that can't retaliate. Additionally, employing [[Gameplay_Tactics#Poptarting|poptarting]] tactics allows the D to reduce its exposure to enemy sniper counter-fire. 2 [[free tons]] of ammo allows it to spend significant time in combat before having to return to base for reloads. Its greatest weakness is enemy mechs that manage to close the distance as the D variant lacks any backup weaponry. |
===Variant E=== | ===Variant E=== | ||
| − | The Hollander II E variant mounts the largest shotgun autocannon on its right shoulder - the [[LBX20]]. Dealing a massive burst of autocannon pellets accurately up to 450m, the E should be taken seriously at close- to medium ranges. Furthermore, it carries 4 [[LBX2]]s which function as very long range harassing guns as well as great anti-aircraft deterrents. One free ton of ammo keeps the LBX20 firing a decent 24 shots before having to return to base to reload. [[BAP]] and [[ | + | The Hollander II E variant mounts the largest shotgun autocannon on its right shoulder - the [[LBX20]]. Dealing a massive burst of autocannon pellets accurately up to 450m, the E should be taken seriously at close- to medium ranges. Furthermore, it carries 4 [[LBX2]]s which function as very long range harassing guns as well as great anti-aircraft deterrents. One [[free tons|free ton]] of ammo keeps the LBX20 firing a decent 24 shots before having to return to base to reload. [[BAP]] and [[EOptics]] allow the E to find and antagonize distant targets with accuracy.<br \> Extra [[Lubalin Ballistics-X AutoCannons|LBX]] damage caused to [[tank]]s and [[ASF]]s makes this variant good early-mid game counter, should your opponent decides to spam them. |
===Variant F=== | ===Variant F=== | ||
| − | Mounting | + | Mounting the massive [[HPPC|Heavy Particle Projection Cannon,]] providing exactly twice as much damage with a doubled splash radius at the cost of twice as much heat. Close to mid range the HPPC becomes your enemies worst nightmare. Two devistating [[UAC5|Ultra AutoCannon5]] blast holes right through whatever they touch, out to 800m. [[iJJ]] for greater positioning, [[EOptics]] to survey the battlefield but beware, only one [[DHS]] will give cause for pilots to be extra aware of their heat management. |
===Variant G=== | ===Variant G=== | ||
| − | Essentially a poor man's [[Bushwacker|Bushwacker Prime]], this Hollander carries an [[HVAC10]] in the right torso mount, with two [[ | + | Essentially a poor man's [[Bushwacker|Bushwacker Prime]], this Hollander carries an [[HVAC10]] in the right torso mount, with two [[ERML]]s in the arms for backup. Its ranged firepower is fairly lackluster compared to many other 'Mechs in its price category; the variant's main saving grace is its [[GECM]] and improved [[Jump Jets]], allowing this Hollander to sit high up on a hill and empty its generous ammo bins of 3 [[free tons|extra tons]] of ammo into any hostiles in the vicinity. |
| + | |||
==Canon== | ==Canon== | ||
| − | The closest thing to the Hollander II in Battletech is the Hollander model BZK-F5, which carries a Gauss Rifle, a single Medium Laser, and a Streak SRM 2. There is also no mention of Jump Jets. | + | The closest thing to the Hollander II in Battletech is the Hollander model BZK-F5, which carries a Gauss Rifle, a single Medium Laser, and a Streak SRM 2. There is also no mention of Jump Jets. The F5 variant, called the Hollander II, is a variant of the Hollander that looks to alleviate the 'Mech's problems by building it on a chassis ten tons heavier than the original, pushing it into the medium weight class. First built in 3058. |
| + | |||
| + | Date Introduced 3054 during the Era known as "Clan Invasion" (3050 - 3061)) - Unit Role: Sniper | ||
[http://www.sarna.net/wiki/Hollander#Variants BattleTech Reference] | [http://www.sarna.net/wiki/Hollander#Variants BattleTech Reference] | ||
{{Template:Navbox_Assets_IS}} | {{Template:Navbox_Assets_IS}} | ||
Latest revision as of 21:13, 7 August 2023
| Hollander II | ||
|---|---|---|

| ||
| Class: | Medium Mech | |
| Faction: | Inner Sphere | |
| Ticket cost: | 5 upon destruction | |
| Tier: | 5 | |
| Tonnage: | 45 tons | |
| Speed: | 86 km/h (121 km/h with MASC) | |
| Torso yaw: | 360° | |
| Torso pitch: | -35° to +55° while standing. -35° to +65° while crouching. | |
| Variant Armament | ||
| Variant | Weapons | Equipment |
| Prime: Price: 55 300 CBills Total armor: 35 648 Engine Size: Omni 175 XL |
||
| A: Price: 60 500 CBills Total armor: 32 046 Engine Size: Omni 175 XL |
||
| B: Price: 57 000 CBills Total armor: 39 256 Engine Size: Omni 175 XL |
||
| C: Price: 49 100 CBills Total armor: 37 452 Engine Size: Omni 175 STD |
||
| D: Price: 54 750 CBills Total armor: 33 848 Engine Size: Omni 175 XL |
||
| E: Price: 58 350 CBills Total armor: 33 848 Engine Size: Omni 175 XL |
||
| F: Price: 60 500 CBills Total armor: 37 452 Engine Size: Omni 175 XL |
||
| G: Price: 56 300 CBills Total armor: 35 648 Engine Size: Omni 175 XL |
||
| Armor Points Distribution | ||
|
| ||
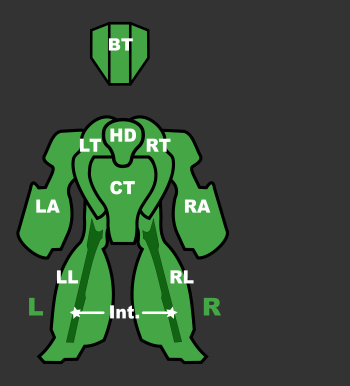
All stats current as of release 0.16.1
The Hollander II is an Inner Sphere Medium Mech well known for its powerful weaponry and gangly appearance. The Hollander II has relatively light Armor for a Medium Mech, and is not particularly speedy or maneuverable; it makes up for this by mounting some of the most damaging weaponry in MWLL. Hollander IIs tend to stick to the same basic design: one large, powerful weapon mounted on the Right Torso, and smaller, weaker weapons mounted on the Left and Right Arms. The Hollander II does have a couple of glaring weaknesses: both the Cockpit and its main weapon are very visible atop the Center Torso, making it fairly easy to either kill the Pilot or disable the weapon. The Hollander's spotlight is mounted directly above the cockpit. Turning on the spotlight can partially blind the pilot due to glare and the light reflecting off of fog.
One of the obvious methods for defeating this Mech is to destroy the right torso, thus removing the vast majority of this Mech's firepower. Additionally, one in combat with this Mech may choose to destroy the Left Torso. Although this section does not mount weaponry to remove, it is less armored, and therefore easier to blow away.
Contents
Roles and Gameplay Hints
Prime
The Prime variant mounts 1 Gauss as its main weapon, and supports that with 2 ERMLs, giving it a respectable long-range punch. It lacks any close-range firepower to deter Battle Armor and brawling Light Mechs so a prudent Mechwarrior should try to keep his foes at long range. Care must be taken to protect both the Gauss and Cockpit, as they are both very vulnerable. However, because the Gauss is positioned on the highest point of the Mech, it allows the majority of the Mech to remain in cover when poptarting which the Prime excels at due to its improved jump jets. Furthermore, each gauss shot can be carefully placed with pinpoint accuracy using the Prime's enhanced optics.
Variant A - "Acht-Acht"
The Hollander II A mounts a single HGauss as its main weapon, and supports this with 4 SLs and a MASC system. This gives the A variant absolutely fearsome firepower at close to medium range, and allows it to close at unexpectedly quick speeds. This is balanced by the A's low ammo, the long refire rate of its HGauss, and the lack of any extra heat sinks to support the MASC system. Extra care must be given to protecting the HGauss, as that is this variant's primary means of defending itself. This variant is extremely susceptible to spontaneously exploding when the Gauss Rifle is destroyed, due to overloading causing additional damage to neighbor sections. The A also is the only Hollander that does not have jump jets which gives it far less mobility than its cousins.
Variant B
The B variant is a pure brawler. Its massive UAC20 is capable of dealing heavy damage to targets 350m or closer, followed 2 Small Lasers while its 2 Flamers are effective out to 150m. The B variant is best used as a brawler, quickly jumping into battle with its Improved Jump Jets, and dealing high DPS with the UAC20 supported by its Small Lasers. An extra 2 free tons allows it to remain in combat for a long time. Alas only having 2 Double Heat Sinks causes mechwarriors to struggle with the B's combined weapon and jump jet heat output. Equipped with only close-ranged weaponry means that at range, the Hollander II B is defenseless. Its large autocannon sitting on its right shoulder is also relatively easy to hit, so Mechwarriors should try torso twisting away from enemies to distribute damage and travel with a teammate.
Variant C - "Conscript"
The cheapest Hollander, and the cheapest AC20 asset. An SRM6 and twin SXPLs complement the close-range loadout, with all weapons having a max range of 350m. The Conscript lacks any movement equipment, and must rely on screenshake and its Standard Engine to keep it alive. Having only 1 free ton leaves a tough choice: the AC20 is the more powerful weapon, but the SRM6 will run out of ammo 8 shots earlier, if both weapons are constantly fired in sync.
Variant D - "Jesse James"
The D variant is an extreme long range sniper. Its light gauss hits targets up to 1250m away while its quad AC2s reach out to 1200m. Mechwarriors piloting the D should stay at long range, liberally using its enhanced optics and BAP to find distant targets to quickly deal combined gauss and autocannon damage to mechs that can't retaliate. Additionally, employing poptarting tactics allows the D to reduce its exposure to enemy sniper counter-fire. 2 free tons of ammo allows it to spend significant time in combat before having to return to base for reloads. Its greatest weakness is enemy mechs that manage to close the distance as the D variant lacks any backup weaponry.
Variant E
The Hollander II E variant mounts the largest shotgun autocannon on its right shoulder - the LBX20. Dealing a massive burst of autocannon pellets accurately up to 450m, the E should be taken seriously at close- to medium ranges. Furthermore, it carries 4 LBX2s which function as very long range harassing guns as well as great anti-aircraft deterrents. One free ton of ammo keeps the LBX20 firing a decent 24 shots before having to return to base to reload. BAP and EOptics allow the E to find and antagonize distant targets with accuracy.
Extra LBX damage caused to tanks and ASFs makes this variant good early-mid game counter, should your opponent decides to spam them.
Variant F
Mounting the massive Heavy Particle Projection Cannon, providing exactly twice as much damage with a doubled splash radius at the cost of twice as much heat. Close to mid range the HPPC becomes your enemies worst nightmare. Two devistating Ultra AutoCannon5 blast holes right through whatever they touch, out to 800m. iJJ for greater positioning, EOptics to survey the battlefield but beware, only one DHS will give cause for pilots to be extra aware of their heat management.
Variant G
Essentially a poor man's Bushwacker Prime, this Hollander carries an HVAC10 in the right torso mount, with two ERMLs in the arms for backup. Its ranged firepower is fairly lackluster compared to many other 'Mechs in its price category; the variant's main saving grace is its GECM and improved Jump Jets, allowing this Hollander to sit high up on a hill and empty its generous ammo bins of 3 extra tons of ammo into any hostiles in the vicinity.
Canon
The closest thing to the Hollander II in Battletech is the Hollander model BZK-F5, which carries a Gauss Rifle, a single Medium Laser, and a Streak SRM 2. There is also no mention of Jump Jets. The F5 variant, called the Hollander II, is a variant of the Hollander that looks to alleviate the 'Mech's problems by building it on a chassis ten tons heavier than the original, pushing it into the medium weight class. First built in 3058.
Date Introduced 3054 during the Era known as "Clan Invasion" (3050 - 3061)) - Unit Role: Sniper