DPS
DPS or Damage Per Second is a popular measure of a weapons worth, and besides Range and Alpha Damage (damage per single shot) constitutes the most looked after characteristic of particular weapon in the sense of battle worthiness.
Contents
Introduction
Delivering an actual DPS value for any weapon is easier said than done, because the rate of fire or effective hit locations might be affected by various factors and circumstances that are subject to change during the time of battle. This complexity is at moments bordering uncertainty while never really crossing the line. This mechanic alone is what makes Battle Tech games one of the finest entertainment delights for the truly devoted players.
Damage Types
Each weapon hit that lands on an asset produces damage. MW:LL differentiates between a few damage methods:
- direct damage - dealt by collision or contact
- splash damage - dealt by explosion
- secondary splash damage - dealt by explosion (or fire?) as well
Total Damage
Total damage of a hit is usually calculated by simply adding all damages up. The actual damage in game can be more than this, due to splash damage being accounted for hitting adjacent components of one or more assets in the vicinity of the hit.
Damage Modifiers
Assets and weapons in the game have each their own adjusted damage modifiers to compensate for optimal balance, skill and fun across the various types.
Average Total Damage
To account for all modifier types in a single number, we can derive an average by adding them all together and dividing that by number of them. This is the simple linear average. Then we can apply this number to the Total Damage to calculate the Average Damage for any given weapon.
Damage per ton of Ammo
The maximally possible damage dealt for firing one ton of ammo. Actual damage will usually be less or equal to this number. This value does not take into account any modifiers.
Weapon Overheat (Jam)
When firing a burst-fire weapon, every shot instantly produces a characteristic amount of "overheat" that is internal to the weapon only in addition to the heat transferred to the asset's internals. This weapon overheat begins to dissipate quickly when the weapon stops firing. Once a certain threshold is reached the weapon overheat causes the weapon to stop firing (or jam). For the weapon to come back online a certain amount of time needs to pass. The time to recover from a single or short burst of fire is not the same as the time to recover from an overheat (jam).
- On UAC and RAC type AutoCannons it takes more time to un-jam than to cool down from an overheat, as can be observed by the indicators on the weapon HUD section.
- On HAG type weapons, on the other hand, it takes less time to un-jam than to cool down from an overheat, due to the different nature of the weapon system and it's internal mechanic.
Weapon Overheat/Jam Time Ratios
The ratio of the time spent shooting versus in a jammed state is the Jam Time Ratio, while the time spent firing as much as possible and waiting to cool down without ever being jammed is the Overheat Time Ratio. These two ratios play a significant role in numerically evaluating any burst-fire weapon, thus it is of importance we shed some light to how those come to be and are calculated.
Sustained DPS's Fire Rate
The fire rate a clip can be fired on average, taking into account overheat jams but not heat dissipation.
Clip Reload Time Ratio
The time to reload a clip versus the time to shoot a clip at Sustained DPS's fire rate without any regards for heat dissipation.
Types of DPS
Note that, while not actually having a real jam mechanic, MW:LL accounts for jam quirks by the introduction of weapon-local "overheat mechanic", that unluckily overlaps in naming convention with the weapon-to-asset "heat mechanic". We will call it jam onward for the purpose of clarity.
In Battletech and Mechwarrior games we understand that there are some so-called "basic" weapons, the loadouts of the "lostech" era. These are the standard Inner Sphere Lasers, Autocannons, SRM, MRM, and LRM missiles. These weapons generally don't have jam constrains and usually are delivering more hurt than heat. Calculating DPS for those weapons usually involves only the fire rate and damage per shot. The same applies for LB-X Autocannons.
Enter Ultra Autocannons:
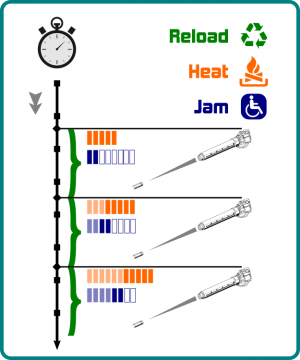
Everyone who ever fired an Ultra AutoCannon knows the delight of it's almost double both rate of fire and damage output. Alas, the delight that has to end every so often as the weapon jams up and ceases to deliver the hurt. The number of shots fired, or rather the time spent non-stop firing until fully jammed we call the jam time or time-to-jam. To the right is a visual representation of this mechanic.
Typically there are 4 to 6 salvos to be fired before a jam. In the image to the right those salvos are represented by the blue tokens - the empty ones are shots left before the jam, the pale ones are shots that still count as fired in close succession. As time lapses, the pale shots might deplete and allow for more shots to be fired. This spoils the DPS calculations however, as we are trying to shoot as much as possible and as soon as possible.
Additionally, not only does the jam probability build up while firing in quick succession, each shot also produces heat. That heat is transferred to the assets internals and has to be dissipated via the heatsinks present on the asset. This mechanism is represented in orange on the image to the right. We see that each successive shot adds approximately 5 tokens, but on the next shot only 3 of them remain as pale tokens, while 2 have "gone missing". Those tokens are dissipated via the heatskins by the time the next shot is fired. Should the asset build up too much heat by carelessly firing too many weapons or too many times in succession, adverse effects and conditions might rise to be and reduce the DPS further. In effect that means that besides the Burst DPS, which lasts only so long, we have some other, Sustained DPS, if we want to account for all the jams and heat buildups.
Sustained DPS
The Sustained DPS value is something we can rely on in most circumstances to somewhat fairly compare weapons across various classes. Taken into account are the following:
- Jam(overheat) and cool down times
- Spool-up times (RACs)
- Charging times (Air-Gauss)
- Damage modifiers to give average value against Mech, Tank, Hovercraft, ASF and VTOL armor
Not taken into account are:
Burst DPS
Burst DPS is the maximum hurt rate that it is possible to get out of the weapon before the weapon limitations (typically jams/overheating) put an end to the dakka. For most weapons Burst DPS is the same as the Sustained DPS, as most weapons shoot with constant rate, but for ammunition based rapid-fire (Machine Guns, RACs, HAGs) and burst-fire weapons (UACs) the Burst DPS is considerably higher. Damage modifiers are applied same way as for Sustained DPS to give average value against Mech, Tank, Hover, ASF and VTOL armor.

