|
|
| Line 1: |
Line 1: |
| − | The endorsed library of art and objects.
| + | {{Map| |
| − | ==Tools== | + | | Image = File:TC_ZoetermeerV6-4.jpg |
| − | ===Sandbox2=== | + | | Name = TC_ZoetermeerV6 |
| − | The [[Sandbox_2|editor]] of the game levels, we call maps.
| + | | Version = 6.0 |
| − | Besides the editor itself, there are external programs that ease some steps in creating the map. Most notably creating a terrain, or calculating the time of day light effect (ToD)
| + | | Created By = Ancient Demise |
| | + | | Environment = Urban Duststorm |
| | + | | Temperature = 15°C |
| | + | | Planet = |
| | + | | Coords = |
| | + | | Size = 4096 x 4096 |
| | + | | Game Modes = <ul> |
| | + | <li>[[Terrain Control]] |
| | + | </ul> |
| | + | | Available = 10.0.3 |
| | + | | Mech = 1 |
| | + | | Tank = 1 |
| | + | | Aero = 1 |
| | + | | Base Defenses = 1 |
| | + | | BaseIS = 1 |
| | + | | BaseCL = 1 |
| | + | | BaseNtl = 5 |
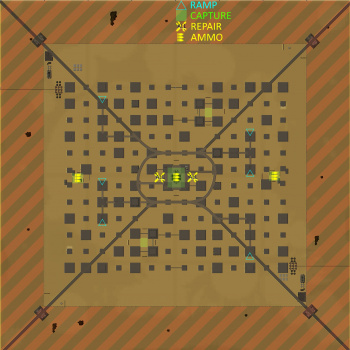
| | + | | Map = TC_ZoetermeerV6-minimap.jpg |
| | + | | Clan_X = 20 |
| | + | | Clan_Y = 50 |
| | + | | Clan_Mech_1_X = 37 |
| | + | | Clan_Mech_1_Y = 44 |
| | | | |
| − | NOTE: the '''Sandbox2''' editor was never intended to be used without underlying version control software preserving the progress of the map creation
| + | | IS_X = 312 |
| | + | | IS_Y = 275 |
| | + | | IS_Mech_1_X = 288 |
| | + | | IS_Mech_1_Y = 284 |
| | | | |
| − | NOTE: Map creation by the means of '''Sandbox2''' was never conceived to be performed by a lone individual. This alone might be the reason why some portions of the work pipe might seem overwhelming and too arduous.
| + | | Neutral_Mech_1_X = 132 |
| | + | | Neutral_Mech_1_Y = 230 |
| | + | | Neutral_Mech_2_X = 195 |
| | + | | Neutral_Mech_2_Y = 99 |
| | | | |
| − | Quite a few of the artists are known to have taken a longer hiatus even before a map got finished, let alone after. It is quite a lot of work and quite a palette of skill to master - so prepare to take the time, if you want to do it properly.
| + | | Neutral_Cap_1_X = 67 |
| | + | | Neutral_Cap_1_Y = 168 |
| | + | | Neutral_Cap_2_X = 260 |
| | + | | Neutral_Cap_2_Y = 160 |
| | + | | Neutral_Cap_3_X = 164 |
| | + | | Neutral_Cap_3_Y = 165 |
| | + | }} |
| | | | |
| − | ----
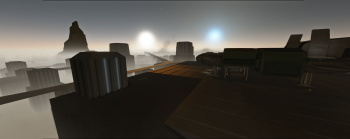
| + | {{quote|"Zoetermeer, a dusty urban ghost town with raised walkways that lead to the center located dropship. Visibility is limited at ground level but increases greatly higher up. The twin sun day/night cycle is spectacular and further changes the stealthy and brawly gameplay."|Map Introduction}} |
| − | PROTIPS:
| |
| − | * '''''Save your map often and create backups!''''' This is '''critical''' in case your working version becomes corrupted.
| |
| − | * Plan your maps before you actually begin making them. Have a good idea of how the map will ''flow'', that is, how players are likely to interact with the terrain, buildings and/or capture zones you intend to place. You may want to run your draft map/terrain past other players to help refine your design.
| |
| − | * Make sure the path of the editor shortcut you use ends with the command switch -mod mwll, otherwise it will not work properly. Place this switch at the end of the file the shortcut points to.
| |
| − | * Most heightmaps are generated as 4096 x 4096 units in size, using a scaling of 2 meters per unit.
| |
| − | * Hold down the right mouse button to rotate the camera on spot. Holding down the middle mouse button lets you slide the camera side to side & up and down. Holding both the middle & right mouse buttons enables you to zoom in and out. You can also use the scroll wheel for finer control and the Speed value near the bottom of the Sandbox UI changes the sensitivity of camera movement.
| |
| − | * To load MWLL's prefabs into the editor, go to View > Open View Pane > Database View, click the Prefab Library tab and locate mwll_assets.xml. They will then appear under the Prefab section on the right-hand pane.
| |
| − | ----
| |
| | | | |
| − | ==Setup==
| |
| − | Caveat: I assume all info as if the game was installed in "C:\Program Files (x86)\Electronic Arts\Crytek\Crysis Wars". However it is recommended not to do so. Pick a path other than "C:\Program Files (x86)\" to avoid the ever increasing issues when running this game on '''Win10''' and newer operating systems.
| |
| | | | |
| − | Since the new launcher is in service, the Sanbox2 is part of each installation.<br>
| + | ==Overview== |
| − | The various tools have each it's separate requirements and/or quirks<br>
| |
| − | Besides of that we want to make the Sandbox2 editor accessible via following 4 icons:<br>
| |
| − | [[File:5.Custom_Shortcuts.PNG]]<br>
| |
| − | The most left one is the game shortcut - i prefer to have it launch for the least time possible to streamline the process of troubleshooting.<br>
| |
| − | This is how we make those shortcuts:
| |
| − | 1. find where you installed the game and find the Bin32 and Bin64 folders:<br>
| |
| − | [[File:Folders.png]]<br>
| |
| − | 2. Right click and copy the Editor.exe<br>
| |
| − | 3. get to the Desktop and right click & paste shortcuts there:<br>
| |
| − | [[File:6.right_click.png]]<br>
| |
| − | 4. right click on the shortcut and select properties:<br>
| |
| − | [[File:1.Properties_Win7.PNG]] [[File:2.Properties_Win10.PNG]]<br>
| |
| − | (I renamed mine '''SandBox2''')<br>
| |
| − | 5. Edit the Target line to include the rest of the text as shown in the editor on the above image<br>
| |
| − | 6. Apply, close and try run it - make sure no omissions or type errors are present.<br>
| |
| | | | |
| − | ----
| + | Zoetermeer, a dusty urban ghost town with raised walkways that lead to the center located dropship. Visibility is limited at ground level but increases greatly higher up. The twin sun day/night cycle is spectacular and further changes the stealthy and brawly gameplay. Capture and spawn at the F4 or C5 forward mech factories that spawn 100t asssets. Controlling the elevated center cap point reachable via ramps and JJ assets is ultimately the goal. It provides great visibility and ammo for the brave souls that fearlessly hold it. Repair pads are located at the center building's base, providing potential repairs for mechs. Maneuvering a team to successfully assault the center requires good communication. |
| − | Sample code:
| |
| − | "C:\Program Files (x86)\Electronic Arts\Crytek\Crysis Wars\Bin64\Editor.exe" -mod MWLL -root "C:\Users\cest\Documents\My Games\Crysis Wars\MWLL\Editor"
| |
| | | | |
| − | ----
| |
| − | 7. Now make a copy of the working shortcut<br>
| |
| − | [[File:3.64-32bit.PNG]]<br>
| |
| − | 8. Changing the 64 to 32 or vice versa in the ''copyed'' shortcut will provide for both 32 and 64 bit direct Editor access.<br>
| |
| | | | |
| − | there are functions that are accessible only to the 32 bit editor while, the 32bit edotr's GUI is broken and won't work as good as the 64bit one. We use the 32bit shortcut obly for those rare functions and as soon as we save the changes to disk - run the 64bit editor and work on in it.
| + | ==Bases== |
| − | 9. Now make copies of both 64 and 32 bit shortcuts and edit them:<br>
| + | <div style="margin-bottom:10px></div> |
| − | [[File:4.mod_or_nomod.PNG]]
| + | <div style="-webkit-columns: 340px 3; -moz-columns: 340px 3; columns: 340px 3; font-size:0.95em; min-width:325px; white-space: nowrap"> |
| − | So to omit the '''-mod MWLL''' from the target box. leave the remaining -root "..." designation stay, just get rid of the -mod parameter.<br>
| |
| − | This will provide you with direct access to an editor without the MWLL mod overhead - while many things will be missing and/or different, the sole basic terrain forming and ToD functions are just the same - this is for heavy terrain development as the non modded editor is reputable or running smoother and somewhat more stable (Still can't overdo saving and backup)<br>
| |
| − | 10. All that is left is to wade to the My Games\... and make a shortcut to the MWLL\Server folder right on the desktop - to streamline deploying an different map to the local server and access to tweaking the various options somewhat quicker.<br>
| |
| | | | |
| − | ==Art creation== | + | <div style="-webkit-column-break-inside: avoid; page-break-inside: avoid; break-inside: avoid; padding:8px; border-style:solid; border-color:#3e3e3e; border-width:1px;> |
| − | Being vast as it is, the Sandbox2 database of assets and items isn't a thing that can be glanced over in a day or even a week. It is recommended to take few steps at a time, not to overwhelm one self with it.
| + | <div style=" font-size: 1.2em; font-weight: bold; text-align: center; background-color: #2c2c2c;>B2</div> |
| | + | *'''Type:''' [[Clan]] home base |
| | + | *'''Defenses:''' <span style="white-space: normal">2x [[Turrets#LAMS Turret|LAMS]], 5x [[Turrets#Calliope|Calliope]], 1x [[Turrets#Hellgiver|Hellgiver]], 1x [[Turrets |Twin HGauss]]</span> |
| | + | *'''Capture weight''': --- |
| | + | *'''Spawn''': Yes |
| | + | *'''Can build:''' all [[Mechs]] and [[Vehicles]] |
| | + | *'''Services:''' [[Repair]], [[Rearm]]</div> |
| | | | |
| − | ===Tweaking=== | + | <div style="-webkit-column-break-inside: avoid; page-break-inside: avoid; break-inside: avoid; margin-top:0.7em; padding:8px; border-style:solid; border-color:#3e3e3e; border-width:1px;> |
| − | Tweaking an existing map that actually has the source files present. Useful to grasp the editor and its basic concepts. We recommend everyone start with the '''TC_Reference''' as it has it's sources alongside the release in the supplied map archive.<br>
| + | <div style=" font-size: 1.2em; font-weight: bold; text-align: center; background-color: #2c2c2c;>C5</div> |
| − | <br> | + | *'''Type:''' neutral factory |
| − | ====Starting the Editor==== | + | *'''Defenses:''' none |
| − | Nothing much to it, launcher or direct shortcut, make it handy as practical - You will use it quite often, as the editor is as prone to crashing as the game it self. The more so the further we deploy it form the Windows XP environment it was developed in.<br>
| + | *'''Capture weight''': 1 |
| − | <br>
| + | *'''Spawn''': Yes |
| − | ====Moving in the Editor by the mouse and keyboard====
| + | *'''Can build:''' all [[Mechs]] and [[Vehicles]] |
| − | Find how the modifiers (shift, alt and control keys) affect the mouse motion and effect with the various mouse buttons pressed or rolled.<br>
| + | *'''Services:''' [[Rearm]]</div> |
| − | The mouse control most closely resemble that of 3Dstudio MAX - wheel click and modifier keys will be used a lot.<br>
| |
| − | <br> | |
| | | | |
| − | ====Entering the Editors own game mode==== | + | <div style="-webkit-column-break-inside: avoid; page-break-inside: avoid; break-inside: avoid; margin-top:0.7em; padding:8px; border-style:solid; border-color:#3e3e3e; border-width:1px;> |
| − | Besides the Editor mode, there is a Game mode accessible by the '''[Ctrl]+[g]''' combo. It can be exited by pressing the '''[esc]''' key. While some of the functionality of the multiplayer mode might be absent, the engine closely resembles the physics (to a degree) and looks of the actual game. To ascertain all features beyond any doubt, however, the mapper is advised to fire up the Server, load the map and access it with the Client - the full game.<br>
| + | <div style=" font-size: 1.2em; font-weight: bold; text-align: center; background-color: #2c2c2c;>D7</div> |
| − | <br> | + | *'''Type:''' neutral outpost |
| − | ====Saving the map====
| + | *'''Defenses:''' none |
| − | For some reason or the other, the instant I save the map, or modify any file of it's folder (materials) the editor locks up while entering the game mode.<br>
| + | *'''Capture weight''': 1 |
| − | Note, tho, that one must not restart the editor if not intending to enter the game mode - just edit and save as usual. One can't overdo saving.
| + | *'''Spawn''': Yes |
| − | Over time I just got used to just, save-exit-relaunch->game mode. YMMV<br>
| + | *'''Can build:''' none |
| − | <br> | + | *'''Services:''' [[Rearm]]</div> |
| − | ====Selecting objects====
| |
| − | Maps can have quite many objects that might be impossible to point to at times.<br>
| |
| − | Selecting could become a nightmare if there where no alternative options.
| |
| − | * Use Layers (and sub layers) to separate objects by purpose - one can change if the map is TC or TSA - quickly this way, and export it ('''[Ctrl]+[e]''') to the engine. | |
| − | * Use Groups to join objects into functional entities (houses, facilities, vehicles, buildings, factories) or sub-entities. | |
| − | * As well as the group can be undone (un-group) or opened/closed to make objects accessible within, they can be edited (closed or not) by attaching or detaching yet another member. | |
| − | * There is the ''selection editor'', accessible by '''[Ctrl]+[t]''', that can help pinpoint that one deeply nested part, that otherwise can't be brought to highlight under the cursor - a reason more to give objects names - that both - make sense and partake in the overall hierarchy of the level.
| |
| − | * Pressing the '''[Space]''' bar helps highlight the names of the objects - can help pinpoint that one ''effect'' or object stubbornly evading selection. | |
| − | * Control key allows adding more objects to the selection with left mouse clicks.
| |
| | | | |
| − | As much as one keeps the level more structured - the more easy will he/she work as the complexity increases over time. <br>
| + | <div style="-webkit-column-break-inside: avoid; page-break-inside: avoid; break-inside: avoid; margin-top:0.7em; padding:8px; border-style:solid; border-color:#3e3e3e; border-width:1px;> |
| − | ''Selections too are part of the undo system.''<br>
| + | <div style=" font-size: 1.2em; font-weight: bold; text-align: center; background-color: #2c2c2c;>E2</div> |
| | + | *'''Type:''' neutral outpost |
| | + | *'''Defenses:''' none |
| | + | *'''Capture weight''': 1 |
| | + | *'''Spawn''': Yes |
| | + | *'''Can build:''' none |
| | + | *'''Services:''' [[Rearm]]</div> |
| | | | |
| − | ====Modes and Constrains (steps) of transformation==== | + | <div style="-webkit-column-break-inside: avoid; page-break-inside: avoid; break-inside: avoid; margin-top:0.7em; padding:8px; border-style:solid; border-color:#3e3e3e; border-width:1px;> |
| − | Each select object can be subject to spatial transformation, one can - move ([1] key),rotate ([2] key) or scale ([3] key) the object. It can be done by entering numerical values on the bottom line of the editor, or by pulling the gimball with the mouse - single, pair or all three axis.<br>
| + | <div style=" font-size: 1.2em; font-weight: bold; text-align: center; background-color: #2c2c2c;>E5</div> |
| − | The change can be smooth or incremental - the increments are right next to the transform icons.<br>
| + | *'''Type:''' neutral strategic point |
| − | As well as moving along any axis, each object can be moved adjacent to the terrain surface - in two modes:<br>
| + | *'''Defenses:''' none |
| − | * Disregarding any present objects it comes across | + | *'''Capture weight''': 1 |
| − | * including any objects it moves across as if they where part of the terrain as well<br> | + | *'''Spawn''': No |
| | + | *'''Can build:''' none |
| | + | *'''Services:''' [[Rearm]]</div> |
| | | | |
| − | ====Prefabs - usage and processing==== | + | <div style="-webkit-column-break-inside: avoid; page-break-inside: avoid; break-inside: avoid; margin-top:0.7em; padding:8px; border-style:solid; border-color:#3e3e3e; border-width:1px;> |
| − | Prefabs are groups that became endorsed to the distribution. Like the Main Hanger for example. Putting a prefab into an map ensures it will be automatically updated as the game develops - without the need to make any changes to the map.
| + | <div style=" font-size: 1.2em; font-weight: bold; text-align: center; background-color: #2c2c2c;>F4</div> |
| − | Prefabs that are made in the editor will be located in the <root>/Game directory, like many other stuff, yet belong to the '''Mods\MWLL\Game\''' once they are endorsed.
| + | *'''Type:''' neutral factory |
| | + | *'''Defenses:''' none |
| | + | *'''Capture weight''': 1 |
| | + | *'''Spawn''': Yes |
| | + | *'''Can build:''' all [[Mechs]] and [[Vehicles]] |
| | + | *'''Services:''' [[Rearm]]</div> |
| | | | |
| − | ====Groups==== | + | <div style="-webkit-column-break-inside: avoid; page-break-inside: avoid; break-inside: avoid; margin-top:0.7em; padding:8px; border-style:solid; border-color:#3e3e3e; border-width:1px;> |
| − | Besides saving an layer to disk, the editor supports saving a group as well.<br>
| + | <div style=" font-size: 1.2em; font-weight: bold; text-align: center; background-color: #2c2c2c;>G7</div> |
| − | Once saved, the group can even be copied to any map folder at will and loaded into any arbitrary map. The only rule for the transfer to work are the file dependencies - each file referenced has to be accessible with the receiving map.<br>
| + | *'''Type:''' [[IS]] home base |
| − | One might consider moving the non endorsed files along with the group file - and just change the file references, in the editor or directly in the file to point to the newly made copies instead.<br>
| + | *'''Defenses:''' <span style="white-space: normal">2x [[Turrets#LAMS Turret|LAMS]], 5x [[Turrets#Calliope|Calliope]], 1x [[Turrets#Hellgiver|Hellgiver]], 1x [[Turrets |Twin HGauss]]</span> |
| − | If the files referenced in the group are endorsed, no such precautions are necessary.<br>
| + | *'''Capture weight''': --- |
| | + | *'''Spawn''': Yes |
| | + | *'''Can build:''' all [[Mechs]] and [[Vehicles]] |
| | + | *'''Services:''' [[Repair]], [[Rearm]]</div> |
| | + | </div> |
| | | | |
| − | ====Modification/editing of the cgf (3d art) files====
| + | {{Clear}} |
| − | The editor seems to support editing the intimate geometry of the imported *.cgf file. I am uncertain if it works as intended and if it can be exported to work any good. We only endorse making custom geometry in 3rd party programs and then importing them to cryengine native format.
| |
| | | | |
| − | ====Adding new Brushes or Entities to the map====
| |
| − | To add a brush, one has simply to click the '''brush''' button on the '''roll-up tab''', select one from the library tree, and drag it to the map view port. After some goofing and experience, the artist will become quite skilled at doing this.<br>
| |
| − | If the freshly placed entity can't be moved or adjusted - just press the [1] key, to enable move translation, and try on.<br>
| |
| − | Placing an entity is the same, except that some entities are lacking the model assigned to them - they get placed empty on the map.<br>
| |
| − | Moreover, the editor seems lacking the ability to assign the proper concept to some - once placed on the map, like the particle entity.<br>
| |
| − | To add particle effect, either copy & paste to the empty entity, or use the '''DB''' manager and place it from there.<br>
| |
| | | | |
| − | ====Changing present objects 3d art==== | + | ==Points of Interest== |
| − | Once an ''brush object'' has been placed into the map, it will be seen as it's assigned 3d art (the *.cgf file). One can change the file the object points to and this will immediately change its appearance on the map.<br>
| + | Unique to ZoetermeerV6, the base of the center E4/E5 building provides two repair pads that can be used regardless which team controls the center capture point. |
| − | Sometimes it is easier to change the 3d art reference, than to get an different brush from the roll-up tab.<br>
| |
| | | | |
| − | ====the Material editor====
| |
| − | Each 3d object in the engine can have some material assigned to it. The object has to have UV maps by it self, that is the only prerequisite. Each object can be explored with the ''eyedropper'' tool of the materials tab. Further, there are icons to assign, get or remove materials from the selected object.<br>
| |
| − | If the engine finds a *.mtl file with the same name as the *.cgf file, it will try apply the materials within to the 3d art. Only the number of material slots and the order in both files determine which material gets which slot.<br>
| |
| − | The material editor directly affects the *.mtl file and writes into it synchronously as the fields are edited.<br>
| |
| − | Without an *.mtl file assigned to it, the 3d art will have sooth black surface.<br>
| |
| | | | |
| − | ====Materials - effects and options==== | + | ==Gallery== |
| − | Besides the most obvious properties, each of the assigned material has various additional properties that further the immersion for the players.
| + | <gallery mode="slideshow" showthumbnails heights=240px style="margin-top:10px; margin-left:5%; margin-right:5%; margin-bottom:30px"> |
| − | * Effect on hit (water has splash, stone spawns small dust clouds,metal spawns small sparks)<br>
| + | File:TC_ZoetermeerV6-1.jpg |
| − | * Bounciness - a value, elsewhere called ''restitution'', responsible for how much of the impact energy is shared to bounce off and how much is "swallowed as apparent damage". think of it as the pressure in a basket ball.<br>
| + | File:TC_ZoetermeerV6-5.jpg |
| − | * The many bitmap manipulation and effect adjustments, including but not limited to rotation, sweep and intensity changes over time
| + | File:TC_ZoetermeerV6-6.jpg |
| − | /TODO/ explain more effects of the material surfaces | + | File:TC_ZoetermeerV6-2.jpg |
| | + | File:TC_ZoetermeerV6-3.jpg |
| | + | File:TC_ZoetermeerV6-7.jpg |
| | + | </gallery> |
| | | | |
| − | The C8 bug ("un natural" acceleration by impact), it seems, can be circumvented by using '''mat_water''' as the material of the moving rigid body. The side effect is that the surface obviously becomes splashy and water alike.
| + | {{Navbox Maps}} |
| | | | |
| − | Some of the material properties can't be directly accessed by the Sandbox2 Editors many tools - they can be accessed only by editing the files in question directly with an text or code editor.
| + | [[Category:Maps]] |
| − | | |
| − | ====Database Editor - editing archetypes of entities====
| |
| − | Therefrom the artist can add new libraries to the level, like some custom turrets, particle effects (heat haze, explosions...). Especially the group '''fire and explosions''' are of interest.<br>
| |
| − | | |
| − | ====Entities - editing individual entities====
| |
| − | Besides the motionless brushes and solids, the multiplayer game can reliably support other more complex entities.<br>
| |
| − | Among those are '''MWLL destructible entities''' and the '''RigidBodyEx'''.<br>
| |
| − | | |
| − | The new map maker is strongly warned to avoid using any other entities except '''Brush, MWLL destructible entities and RigidBodyEx''' as extensive testing has proven that failing to obey this advice leads to numerous hard to track down oddities and issues with the map on later stages.<br>
| |
| − | | |
| − | ====Special entities - doors, elevators====
| |
| − | Many of those work in the editor's game mode, but are broken in one way or the other in the multiplayer game - either by being affected by an nasty bug (C8 grenade impact) or by the nasty lag/lack of sync (elevators). There are efforts underway to make reliable doors and elevators available to the players as we speak. You might apply to join that effort.
| |
| − | | |
| − | ===Creating===
| |
| − | Those, set up to create a new map, usually have found that there is no terrain fit for the idea. Or time of day lightning (ToD). Or the general setting of the map in question is too different.
| |
| − | | |
| − | ====Concept====
| |
| − | The most efficient way to create an map from scratch, I strongly advise, is to lay it out outside of Sandbox2 editor beforehand.
| |
| − | | |
| − | # Have the '''size''' determined first, usually MW:LL maps are 8km x 8km defined as 4096px x 4096px height maps. Some maps have "natural limits" that occlude the "outer world" from the player, such maps can be constrained to the actual play area size. Others, "wide open" maps, are best created double the size and the "outer world" is obscured by "distance fog", distant mountains (or slopes), or the like. Avoid having "end of world" abruptly ending maps.<br>
| |
| − | # Decide of the game type - '''TC''' maps can be used for both TC and TSA games, '''SA''' are specific to Solaris arena game types.<br>
| |
| − | # Figure out the game flow - how the match should flow, how the game will develop as the players progress with their spawn funds (and maybe more join or some leave towards the end of the match).<br>
| |
| − | # Figure out the setting - DoT lightning - is it warm or cold climate? adjust the shades later accordingly.<br>
| |
| − | # Does the intended terrain require any special software for terrain shape design?<br>
| |
| − | # Avoid any ''too fancy'' mechanic outside the player interaction - flowgraphs usually get out of sync player-to-player and usually subtract from the immersion rather than add to it. Proper events are hard to implement properly. If it can't be avoided, go to all necessary lengths to troubleshoot it and weed out any oddities before ending the map development<br>
| |
| − | | |
| − | ====Creation====
| |
| − | After all those are defined and known in advance, one can approach the process of starting an creation from scratch.<br>
| |
| − | | |
| − | The single most cumbersome step of making a map from scratch is starting it due to some yet unseen oddities of the editor.
| |
| − | | |
| − | Here goes:
| |
| − | | |
| − | The instance you fired up the editor you are presented with an empty world in the Cryengine. Start by selecting '''File>New'''<br>
| |
| − | [[File:NewLevel.JPG]]<br>
| |
| − | Assuming you starting a known ''map to be'', enter the intended name ("'''TC_Test'''") and pick the resolution, the usual values for MWLL being '''4096x4096''' and '''2'''.
| |
| − | The editor will complain as it will fail to write into an non existing directory. Don't worry yet.<br>
| |
| − | go to the '''File>Save as...''' and navigate to the '''TC''' for our example, or some other folder of the multiplayer levels as it applies to your use case.<br>
| |
| − | There you will find that you have no folder that is named as your map name, but you need one. Make the new folder by the dialog button and name it the same as you did the map ('''TC_Test''').
| |
| − | Enter that folder and save your '''*.cry''' file, naming it (yet again) the same as your map ('''TC_Test.cry''') the extension will be auto-added if omitted.
| |
| − | Only now you have a saved empty map file generated fresh from start.
| |
| − | This assumes you go familiarized with the [[Folderstructure]] before, if not, it's about high time. We'll be waiting here 'till you return.<br>
| |
| − | | |
| − | =====Terrain=====
| |
| − | | |
| − | The terrain has been traditionally the pride and joy of many a computer game and the developers have gone to lengths to make it look as natural as possible over the years. As of recently ever more designers use the very ''Google Earth'' to source pieces of maps and convert them into the game - can't go much more natural than that i guess.<br>
| |
| − | Other than that there is the renowned '''geocontrol2''' a somewhat dated software with excellent results for artificially generated landscapes.<br>
| |
| − | Sanbox2 understands landscapes of following variety:<br>
| |
| − | * bmp (binary format -8 bit)
| |
| − | * pgm (ascii format -8 bit)
| |
| − | * raw (binary format 32 bit )
| |
| − | Only the '''raw''' won't require manually smoothing the terrain after import.<br>
| |
| − | | |
| − | /TODO:/
| |
| − | * fine tuning the terrain in the editor - the tools and tips
| |
| − | * setting the ToD - quirks and tips - export the file and tune it by hand
| |
| − | * water
| |
| − | * clouds
| |
| − | * weather
| |
| − | * layers
| |
| − | * vegetation - how to efficiently make vegetation - pitfalls ("flying trees")
| |
| − | * further immersion factors
| |
| − | * effects
| |
| − | | |
| − | ====Specifics====
| |
| − | Game mode specific considerations.
| |
| − | * TC
| |
| − | * TSA
| |
| − | * SA
| |
| − | | |
| − | [[Terrain_Control_Tutorial_for_Mappers]] is based on Wilsons [http://forum.mechlivinglegends.net/index.php/topic,11973.0.html Terrain Control Mapping Guide].
| |
| − | | |
| − | [[MWLL_Flowgraph_Nodes]] are additional Flowgraph nodes available in Sandbox 2 Editor for crysis
| |
| − | | |
| − | Ancient_demise's [https://www.youtube.com/watch?v=7yJzhQj42LE&feature=youtu.be 3 hour long map creation video].
| |
| − | | |
| − | ===Improving===
| |
| − | Making (or tweaking) an map with items outside of the present MW:LL asset pool.
| |
| − | ===Adding Art===
| |
| − | Making art and assets not currently present in MW:LL and importing them into the Sandbox2 and further to the MW:LL pool. For further information, refer to [[New_Art|not yet endorsed art]].
| |
| − | | |
| − | {{Navbox Mapping}}
| |
| − | | |
| − | [[Category:Mapping]] | |
Zoetermeer, a dusty urban ghost town with raised walkways that lead to the center located dropship. Visibility is limited at ground level but increases greatly higher up. The twin sun day/night cycle is spectacular and further changes the stealthy and brawly gameplay. Capture and spawn at the F4 or C5 forward mech factories that spawn 100t asssets. Controlling the elevated center cap point reachable via ramps and JJ assets is ultimately the goal. It provides great visibility and ammo for the brave souls that fearlessly hold it. Repair pads are located at the center building's base, providing potential repairs for mechs. Maneuvering a team to successfully assault the center requires good communication.
Unique to ZoetermeerV6, the base of the center E4/E5 building provides two repair pads that can be used regardless which team controls the center capture point.