Difference between pages "How To Get Your Comeback" and "Avatar"
Fire-hound (talk | contribs) |
Chairkicker (talk | contribs) m (→Variant E) |
||
| Line 1: | Line 1: | ||
| + | {{Mech| | ||
| + | | Image = File:Avatar.jpg | ||
| + | | Class = Heavy | ||
| + | | Faction = Inner Sphere | ||
| + | | Tickets = 9 | ||
| + | | Tier = 11 | ||
| + | | Tonnage = 70 | ||
| + | | Speed = 76 | ||
| + | | SpeedWithMasc = 106 | ||
| + | | Rotation = 360 | ||
| + | | PitchStand = -34° to +45° | ||
| + | | PitchCrouch = -34° to +55° | ||
| − | = | + | | Price Prime = 79 500 |
| + | | ArmorT Prime = 60 258 | ||
| + | | Engine Prime = 280 XL | ||
| + | | Weapons Prime = <ul> | ||
| + | <li>1x [[LBX10]] | ||
| + | <li>2x [[LRM10]] | ||
| + | <li>4x [[MXPL]] | ||
| + | </ul> | ||
| + | | Equip Prime = <ul> | ||
| + | <li>[[EOptics]] | ||
| + | <li>5 [[DHS]] | ||
| + | <li>0 [[free tons]] | ||
| + | <li>12.5t [[Armor]] | ||
| + | </ul> | ||
| − | + | | Price A = 84 100 | |
| − | + | | ArmorT A = 60 258 | |
| − | + | | Engine A = 280 XL | |
| − | + | | Weapons A = <ul> | |
| − | + | <li>1x [[Gauss]] | |
| + | <li>1x [[ERPPC]] | ||
| + | <li>2x [[ERMBL]] | ||
| + | <li>2x [[LRM5]] | ||
| + | <li>2x [[MGun]] | ||
| + | </ul> | ||
| + | | Equip A = <ul> | ||
| + | <li>[[EOptics]] | ||
| + | <li>[[JJ]] | ||
| + | <li>2 [[DHS]] | ||
| + | <li>1 [[free ton]] | ||
| + | <li>12.5t [[Armor]] | ||
| + | </ul> | ||
| − | == | + | | Price B = 84 000 |
| + | | ArmorT B = 60 258 | ||
| + | | Engine B = 280 XL | ||
| + | | Weapons B = <ul> | ||
| + | <li>3x [[ERLBL]] | ||
| + | <li>5x [[ERMBL]] | ||
| + | </ul> | ||
| + | | Equip B = <ul> | ||
| + | <li>[[iJJ]] | ||
| + | <li>[[EOptics]] | ||
| + | <li>9 [[DHS]] | ||
| + | <li>0 [[free tons]] | ||
| + | <li>12.5t [[Armor]] | ||
| + | </ul> | ||
| − | + | | Price C = 87 800 | |
| − | + | | ArmorT C = 60 258 | |
| − | + | | Engine C = 280 XL | |
| − | + | | Weapons C = <ul> | |
| − | < | + | <li>1x [[HGauss]] |
| − | + | <li>2x [[SRM6]] | |
| + | <li>3x [[MPL]] | ||
| + | </ul> | ||
| + | | Equip C = <ul> | ||
| + | <li>[[EOptics]] | ||
| + | <li>2 [[DHS]] | ||
| + | <li>4 [[free ton]] | ||
| + | <li>12.5t [[Armor]] | ||
| + | </ul> | ||
| − | + | | Price D = 80 900 | |
| − | + | | ArmorT D = 60 258 | |
| − | + | | Engine D = 280 XL | |
| − | + | | Weapons D = <ul> | |
| − | + | <li>1x [[AC20]] | |
| − | + | <li>3x [[MBL]] | |
| − | + | <li>2x [[DSRM4]] | |
| − | + | </ul> | |
| − | + | | Equip D = <ul> | |
| − | + | <li> [[iJJ]] | |
| − | + | <li>2 [[DHS]] | |
| + | <li>3 [[free tons]] | ||
| + | <li>12.5t [[Armor]] | ||
| + | </ul> | ||
| − | == | + | | Price E = 84 500 |
| − | + | | ArmorT E = 60 258 | |
| − | + | | Engine E = 280 XL | |
| − | + | | Weapons E = <ul> | |
| − | + | <li>5x [[ERMBL]] | |
| − | + | <li>2x [[MRM20]] | |
| − | + | <li>1x [[NARC]] | |
| − | + | | Equip E = <ul> | |
| − | + | <li>[[EOptics]] | |
| − | + | <li>[[MASC]] | |
| − | + | <li>6 [[DHS]] | |
| − | + | <li>0 [[free tons]] | |
| − | + | <li>12.5t [[Armor]] | |
| − | + | </ul> | |
| − | |||
| − | + | | Price F = 85 300 | |
| − | + | | ArmorT F = 66 648 | |
| + | | Engine F = 280 XL | ||
| + | | Weapons F = <ul> | ||
| + | <li>1 [[UAC10]] | ||
| + | <li>3x [[ERMBL]] | ||
| + | <li>1x [[LRM15]] | ||
| + | <li>1x [[SRM6]] | ||
| + | | Equip F = <ul> | ||
| + | <li>[[EOptics]] | ||
| + | <li>[[GECM]] | ||
| + | <li>5 [[DHS]] | ||
| + | <li>2 [[free ton]] | ||
| + | <li>13.5t [[Armor]] | ||
| + | </ul> | ||
| − | + | | Price G = 82 600 | |
| − | + | | ArmorT G = 60 258 | |
| − | + | | Engine G = 280 XL | |
| − | + | | Weapons G = <ul> | |
| − | + | <li>2x [[PPC]] | |
| − | + | <li>2x [[ERMBL]] | |
| − | + | <li>2x [[LRM15]] | |
| + | </ul> | ||
| + | | Equip G = <ul> | ||
| + | <li>[[AECM]] | ||
| + | <li>4 [[DHS]] | ||
| + | <li>2 [[free ton]] | ||
| + | <li>12.5t [[Armor]] | ||
| + | </ul> | ||
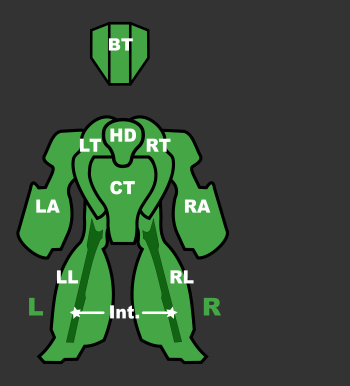
| − | === | + | | Armor H = 2760 |
| − | + | | Armor CT = 9502 | |
| − | + | | Armor LRT = 6108 | |
| − | + | | Armor B = 5430 | |
| − | + | | Armor LRA = 4751 | |
| − | + | | Armor INT = 3909 | |
| + | | Armor LRL = 6515 | ||
| − | + | <!--Current for 0.9.3--> | |
| + | }} | ||
| − | |||
| − | |||
| − | |||
| − | |||
| − | |||
| − | |||
| − | |||
| − | |||
| − | + | The '''Avatar''' is a [[Heavy_Mechs|heavy Omnimech]] built by the [[Inner Sphere]]. Comparable to the [[Clan]] [[Thor]], it is an agile multipurpose asset, trading the Thor's top speed for a full 360 degree torso. The Avatar gains in enough open tonnage and pod space to outgun the Vulture, while simultaneously boasting superior armor protection as well. | |
| − | |||
| − | |||
| − | |||
| − | |||
| − | |||
| − | |||
| − | == | + | ==Roles and Gameplay Hints== |
| + | ===Prime=== | ||
| + | The Avatar Prime is defined by its mix of medium to long range weapons supported by [[Eoptics|enhanced optics]]. Its duo of [[LRM10]] launchers allow it to provide long range indirect fire support and a [[LBX10]] is capable of peppering enemies from 700m out, despite needing them to close in further in order to focus its damage. Four [[MXPL|Medium X-Pulse Lasers]] significantly enhance its ability to protect itself from enemies that break into close combat range. The mech's main issue is sustaining long range fire, as it has no free tons to reload its ammo-dependent weapons. Its 5 [[DHS]] can manage to dissipate the heat of its full arsenal. | ||
| − | + | ===Variant A=== | |
| − | + | A variant focusing on long range firepower, the Avatar A's main armaments are its [[gauss|gauss rifle]] and [[ERPPC]]. Sharing a range of 900m they allow the variant to provide long range direct fire support and in combination with its [[Eoptics|enhanced optics]] and [[JJ|jumpjets]] make the Avatar A capable of jump sniping. In engagements over open ground, two [[LRM5]]s further boost the variant's long range firepower, while allowing it to provide a degree of indirect fire support. The pair of [[ERMBL|Medium Beam Lasers]] standard to the Avatar, in their extended range form, give it a little extra punch against enemies that manage to close in. A pair of [[mgun|machineguns]] offer much needed protection against Battlearmor. A single free ton keeps its gauss rifle fed and 2 [[DHS]] somewhat manage the combined heat of its weapons and jumpjets, as long as minimal fire discipline is practiced. | |
| − | |||
| − | + | ===Variant B=== | |
| + | [[File:Flyingred.jpg|100px|left|The Flying Red]] | ||
| + | Dubbed "'''''The Flying Red'''''," The Avatar B is the Inner Sphere's ultimate answer to [[Clan]] long range superiority among heavy 'Mechs. Featuring a blistering array of lasers, this variant mounts a trio of [[ERLBL]] on its right arm, while carrying an additional set of five [[ERMBL]] spread across its left arm and torso. This multitude of lasers allows this variant to blast through enemy armor with a mighty [[Gameplay Tactics#Alpha Strike|alpha strike]], hitting with extreme precision from great range supported by [[Eoptics|enhanced optics]]. [[Jump Jets|Improved Jump Jets]] further allow [[Gameplay Tactics#Poptarting|poptart]] tactics and increased maneuverability, while nine [[Double Heat Sinks|double heat sinks]] are plenty to keep heat under control thanks to the cooler nature of Inner Sphere lasers. All in all, the Avatar B is a terrifying addition to the Inner Sphere's heavy 'Mech arsenal, one capable of inspiring fear even amongst pilots of the most premier Clan assets. | ||
| − | + | ===Variant C=== | |
| + | A brawler at heart, the Avatar C is capable of dealing damage from 700m out, but it needs to break into medium and even close range to bring its full firepower to bear. A [[gauss|Heavy Gauss Rifle]] with the help of [[Eoptics|enhanced optics]] lets it fire potshots at its enemies from medium-long range, but it's best used at ranges less than 450m for it to do maximum damage. Complimented by three [[MPL|Medium Pulse Lasers]] and a pair of [[SRM|SRM6]] launchers, the Avatar C's close combat power is not to be ignored. Its relative slowness and lack of jump jets means that its users must have a good grasp of combat flow and map awareness, but its 360 degree torso twist allows it to manoeuvre while keeping its arsenal trained on the target and its heavy armor gives it some confidence in prolonged engagements. Its lack of lock-on weapons and powerful optics allow it to comfortably maintain passive radar most of the time. 2 [[DHS]] are passable for its relatively low heat arsenal and its 4 free tons allow an extended combat period. | ||
| − | + | ===Variant D=== | |
| + | The Avatar D, known as the "'''''Fallshirmjaeger'''''", is one of the more dangerous Inner Sphere heavy 'Mech brawlers and sports a well-balanced blend of weaponry. An arm-mounted [[AC20]] easily blows holes in opposing 'Mechs which its two [[DSRM4]] packs can then exploit. Three [[MBL|Medium Lasers]] provide good, sustaining fire and are well-suited to precisely dishing out the final few points of damage needed to destroy a component or score a kill, while also being a danger to unwary [[Battle Armor]]. On top of all this, three tons of free space allows the Avatar D to carry more than enough ammo for extended combat. [[Jump Jets|Improved Jump Jets]] provide a lot of utility; this Avatar can quickly lunge at a target to perform a takedown, or leap back into cover to escape a bad engagement. Despite its incredible jump mobility, the D only has a maximum range of only 500m and as a result is woefully unsuited to fighting in open terrain. Pilots considering this variant should think carefully about their overall strategy before deploying this 'Mech on such maps. | ||
| − | + | ===Variant E=== | |
| + | The Avatar E is most at home in medium range engagements. The variant's fussiest weapon is its pair of [[MRM20]]s. While sporting a max range of 700m and a minimum of around 20m, as their name implies they are best used at medium ranges. A weapon with great damage dealing potential, their spread firing pattern and wire-guiding mean a certain degree of experience is needed to take advantage of them. A blistering array of 5 [[ERMBL]] accompany them, providing a pinpoint strike to complement the missiles' indiscriminate nature. Aiding the variant with mobility is a [[MASC]], allowing it to achieve speeds capable of competing with medium mechs and clan heavies for short bursts. Thankfully, six [[DHS]] help dissipate the significant heat generated by the variant, and along with the cooler nature of Inner Sphere lasers make its heat manageable as long as pilots are wise enough to only use MASC to get into position and give it a few seconds to cool down before engaging. The [[NARC]] launcher and [[Eoptics|enhanced optics]] allows it to act as a limited support role. | ||
| − | + | ===Variant F=== | |
| + | Dubbed "'''''Scorpio'''''" | ||
| + | Another variant sporting weaponry for every range, the Avatar F has a much clearer focus towards medium range combat. A [[UAC10]] and 3 [[ERMBL]] form the main sources of firepower for this variant. Its single [[LRM15]] supported by [[Eoptics|enhanced optics]] provides a significant long range boost, and one [[SRM6]] gives it an extra edge in close range combat. Its two free tons is usually dedicated to its ultra autocannon and the long range missile rack. 3 [[DHS]] do a decent job of managing the variant's heat, as long as everything isn't fired at once. A [[GECM|Guardian ECM]] gives this variant the chance to stealthily close in or use its LRMs without being outright detected by its active radar. | ||
| + | |||
| + | ===Variant G=== | ||
| + | The Avatar G is a fire support mech designed with teamwork in mind. Its rarest piece of equipment is an [[AECM]], allowing it to hide the radar signals of its teammates and offer protection from [[NARC]]s. Spending most of its time running active as the most visible signature is bound to attract enemy fire, but makes the use of its pair of [[LRM15]] launchers more straightforward when used as direct fire support. Enemies that close into middle range will have to contend with a pair of [[PPC]]s, synergising with its missiles as a source of screenshake and splash damage, but potentially disabling friendly NARC beacons. Its two [[ERMBL]] offer some extra damage against enemies that begin to close in uncomfortably, as well as acting as a BA deterrent. Four [[DHS]] keep the asset's heat manageable. | ||
| + | |||
| + | ==Canon== | ||
| + | The first of the Inner Sphere OmniMechs to be conceptualized and one of the last to reach production by the Draconis Combine as part of its "first generation", the Avatar's design is based on captured Vulture OmniMechs. The Avatar is used primarily by the DCMS, but has also been sold to the Lyran Alliance and ComStar. The Avatar weighs in at seventy tons and is powered by a Hermes 280 XL Engine that gives it a top speed of 64.8 km/h. It is protected by twelve tons of StarSlab/4 armor that comes with CASE to protect the 'Mech against complete destruction from an internal ammunition explosion. The Avatar is a powerful OmniMech in its various configurations, with an impressive thirty-four tons of pod space allowing it to carry a wide range of weapons. | ||
| + | |||
| + | [http://www.sarna.net/wiki/Avatar_(BattleMech) BattleTech Reference] | ||
| + | {{Template:Navbox_Assets_IS}} | ||
Revision as of 16:27, 5 October 2018
| Avatar | ||
|---|---|---|

| ||
| Class: | Heavy Mech | |
| Faction: | Inner Sphere | |
| Ticket cost: | 9 upon destruction | |
| Tier: | 11 | |
| Tonnage: | 70 tons | |
| Speed: | 76 km/h (106 km/h with MASC) | |
| Torso yaw: | 360° | |
| Torso pitch: | -34° to +45° while standing. -34° to +55° while crouching. | |
| Variant Armament | ||
| Variant | Weapons | Equipment |
| Prime: Price: 79 500 CBills Total armor: 60 258 Engine Size: 280 XL |
||
| A: Price: 84 100 CBills Total armor: 60 258 Engine Size: 280 XL |
||
| B: Price: 84 000 CBills Total armor: 60 258 Engine Size: 280 XL |
||
| C: Price: 87 800 CBills Total armor: 60 258 Engine Size: 280 XL |
||
| D: Price: 80 900 CBills Total armor: 60 258 Engine Size: 280 XL |
||
| E: Price: 84 500 CBills Total armor: 60 258 Engine Size: 280 XL |
||
| F: Price: 85 300 CBills Total armor: 66 648 Engine Size: 280 XL |
||
| G: Price: 82 600 CBills Total armor: 60 258 Engine Size: 280 XL |
||
| Armor Points Distribution | ||
|
| ||
All stats current as of release 0.15.3 </div>
The Avatar is a heavy Omnimech built by the Inner Sphere. Comparable to the Clan Thor, it is an agile multipurpose asset, trading the Thor's top speed for a full 360 degree torso. The Avatar gains in enough open tonnage and pod space to outgun the Vulture, while simultaneously boasting superior armor protection as well.
Contents
Roles and Gameplay Hints
Prime
The Avatar Prime is defined by its mix of medium to long range weapons supported by enhanced optics. Its duo of LRM10 launchers allow it to provide long range indirect fire support and a LBX10 is capable of peppering enemies from 700m out, despite needing them to close in further in order to focus its damage. Four Medium X-Pulse Lasers significantly enhance its ability to protect itself from enemies that break into close combat range. The mech's main issue is sustaining long range fire, as it has no free tons to reload its ammo-dependent weapons. Its 5 DHS can manage to dissipate the heat of its full arsenal.
Variant A
A variant focusing on long range firepower, the Avatar A's main armaments are its gauss rifle and ERPPC. Sharing a range of 900m they allow the variant to provide long range direct fire support and in combination with its enhanced optics and jumpjets make the Avatar A capable of jump sniping. In engagements over open ground, two LRM5s further boost the variant's long range firepower, while allowing it to provide a degree of indirect fire support. The pair of Medium Beam Lasers standard to the Avatar, in their extended range form, give it a little extra punch against enemies that manage to close in. A pair of machineguns offer much needed protection against Battlearmor. A single free ton keeps its gauss rifle fed and 2 DHS somewhat manage the combined heat of its weapons and jumpjets, as long as minimal fire discipline is practiced.
Variant B

Dubbed "The Flying Red," The Avatar B is the Inner Sphere's ultimate answer to Clan long range superiority among heavy 'Mechs. Featuring a blistering array of lasers, this variant mounts a trio of ERLBL on its right arm, while carrying an additional set of five ERMBL spread across its left arm and torso. This multitude of lasers allows this variant to blast through enemy armor with a mighty alpha strike, hitting with extreme precision from great range supported by enhanced optics. Improved Jump Jets further allow poptart tactics and increased maneuverability, while nine double heat sinks are plenty to keep heat under control thanks to the cooler nature of Inner Sphere lasers. All in all, the Avatar B is a terrifying addition to the Inner Sphere's heavy 'Mech arsenal, one capable of inspiring fear even amongst pilots of the most premier Clan assets.
Variant C
A brawler at heart, the Avatar C is capable of dealing damage from 700m out, but it needs to break into medium and even close range to bring its full firepower to bear. A Heavy Gauss Rifle with the help of enhanced optics lets it fire potshots at its enemies from medium-long range, but it's best used at ranges less than 450m for it to do maximum damage. Complimented by three Medium Pulse Lasers and a pair of SRM6 launchers, the Avatar C's close combat power is not to be ignored. Its relative slowness and lack of jump jets means that its users must have a good grasp of combat flow and map awareness, but its 360 degree torso twist allows it to manoeuvre while keeping its arsenal trained on the target and its heavy armor gives it some confidence in prolonged engagements. Its lack of lock-on weapons and powerful optics allow it to comfortably maintain passive radar most of the time. 2 DHS are passable for its relatively low heat arsenal and its 4 free tons allow an extended combat period.
Variant D
The Avatar D, known as the "Fallshirmjaeger", is one of the more dangerous Inner Sphere heavy 'Mech brawlers and sports a well-balanced blend of weaponry. An arm-mounted AC20 easily blows holes in opposing 'Mechs which its two DSRM4 packs can then exploit. Three Medium Lasers provide good, sustaining fire and are well-suited to precisely dishing out the final few points of damage needed to destroy a component or score a kill, while also being a danger to unwary Battle Armor. On top of all this, three tons of free space allows the Avatar D to carry more than enough ammo for extended combat. Improved Jump Jets provide a lot of utility; this Avatar can quickly lunge at a target to perform a takedown, or leap back into cover to escape a bad engagement. Despite its incredible jump mobility, the D only has a maximum range of only 500m and as a result is woefully unsuited to fighting in open terrain. Pilots considering this variant should think carefully about their overall strategy before deploying this 'Mech on such maps.
Variant E
The Avatar E is most at home in medium range engagements. The variant's fussiest weapon is its pair of MRM20s. While sporting a max range of 700m and a minimum of around 20m, as their name implies they are best used at medium ranges. A weapon with great damage dealing potential, their spread firing pattern and wire-guiding mean a certain degree of experience is needed to take advantage of them. A blistering array of 5 ERMBL accompany them, providing a pinpoint strike to complement the missiles' indiscriminate nature. Aiding the variant with mobility is a MASC, allowing it to achieve speeds capable of competing with medium mechs and clan heavies for short bursts. Thankfully, six DHS help dissipate the significant heat generated by the variant, and along with the cooler nature of Inner Sphere lasers make its heat manageable as long as pilots are wise enough to only use MASC to get into position and give it a few seconds to cool down before engaging. The NARC launcher and enhanced optics allows it to act as a limited support role.
Variant F
Dubbed "Scorpio" Another variant sporting weaponry for every range, the Avatar F has a much clearer focus towards medium range combat. A UAC10 and 3 ERMBL form the main sources of firepower for this variant. Its single LRM15 supported by enhanced optics provides a significant long range boost, and one SRM6 gives it an extra edge in close range combat. Its two free tons is usually dedicated to its ultra autocannon and the long range missile rack. 3 DHS do a decent job of managing the variant's heat, as long as everything isn't fired at once. A Guardian ECM gives this variant the chance to stealthily close in or use its LRMs without being outright detected by its active radar.
Variant G
The Avatar G is a fire support mech designed with teamwork in mind. Its rarest piece of equipment is an AECM, allowing it to hide the radar signals of its teammates and offer protection from NARCs. Spending most of its time running active as the most visible signature is bound to attract enemy fire, but makes the use of its pair of LRM15 launchers more straightforward when used as direct fire support. Enemies that close into middle range will have to contend with a pair of PPCs, synergising with its missiles as a source of screenshake and splash damage, but potentially disabling friendly NARC beacons. Its two ERMBL offer some extra damage against enemies that begin to close in uncomfortably, as well as acting as a BA deterrent. Four DHS keep the asset's heat manageable.
Canon
The first of the Inner Sphere OmniMechs to be conceptualized and one of the last to reach production by the Draconis Combine as part of its "first generation", the Avatar's design is based on captured Vulture OmniMechs. The Avatar is used primarily by the DCMS, but has also been sold to the Lyran Alliance and ComStar. The Avatar weighs in at seventy tons and is powered by a Hermes 280 XL Engine that gives it a top speed of 64.8 km/h. It is protected by twelve tons of StarSlab/4 armor that comes with CASE to protect the 'Mech against complete destruction from an internal ammunition explosion. The Avatar is a powerful OmniMech in its various configurations, with an impressive thirty-four tons of pod space allowing it to carry a wide range of weapons.