Difference between pages "Morrigu" and "TC Tukayyid"
From MechWarrior: Living Legends Wiki
(Difference between pages)
Fire-hound (talk | contribs) (→Variant B: added drama) |
RickHunter (talk | contribs) |
||
| Line 1: | Line 1: | ||
| − | {{ | + | {{Map| |
| − | | Image = File: | + | | Image = File:Tukk-3-dusk.jpg |
| − | | | + | | Name = TC_Tukayyid |
| − | | | + | | Created By = Ancient Demise |
| − | | | + | | Environment = Forest / Farmland |
| − | | | + | | Temperature = 29°C day / 25°C night |
| − | + | | Planet = Tukayyid | |
| − | + | | Coords = -4.431, 210.42 | |
| − | | | + | | Size = 8192 x 8192 |
| − | | | + | | Game Modes = <ul> |
| − | + | <li>[[Terrain Control]] | |
| − | |||
| − | |||
| − | | | ||
| − | |||
| − | |||
| − | |||
| − | |||
| − | | | ||
| − | <li>[[ | ||
| − | |||
| − | |||
| − | |||
| − | |||
| − | |||
</ul> | </ul> | ||
| + | | Available = 0.11.0 | ||
| + | | Mech = 1 | ||
| + | | Tank = 1 | ||
| + | | VTOL = 1 | ||
| + | | Aero = 1 | ||
| + | | Base Defenses = 1 | ||
| + | | BaseIS = 1 | ||
| + | | BaseCL = 1 | ||
| + | | BaseNtl = 7 | ||
| + | | Map = TC_Tukayyid_minimap.jpg | ||
| + | | Clan_X = 300 | ||
| + | | Clan_Y = 140 | ||
| + | | Clan_Mech_1_X = 269 | ||
| + | | Clan_Mech_1_Y = 141 | ||
| + | | Clan_ASF_1_X = 274 | ||
| + | | Clan_ASF_1_Y = 145 | ||
| − | | | + | | IS_X = 20 |
| − | | | + | | IS_Y = 165 |
| − | | | + | | IS_Mech_1_X = 62 |
| − | | | + | | IS_Mech_1_Y = 169 |
| − | + | | IS_ASF_1_X = 57 | |
| − | + | | IS_ASF_1_Y = 165 | |
| − | |||
| − | | | ||
| − | |||
| − | |||
| − | |||
| − | |||
| − | |||
| − | |||
| − | |||
| − | | | + | | Neutral_Mech_1_X = 120 |
| − | | | + | | Neutral_Mech_1_Y = 173 |
| − | | | + | | Neutral_Mech_2_X = 153 |
| − | | | + | | Neutral_Mech_2_Y = 229 |
| − | + | | Neutral_Mech_3_X = 172 | |
| − | + | | Neutral_Mech_3_Y = 74 | |
| − | + | | Neutral_Mech_4_X = 215 | |
| − | | | + | | Neutral_Mech_4_Y = 146 |
| − | |||
| − | |||
| − | |||
| − | |||
| − | |||
| − | |||
| − | |||
| − | | | + | | Neutral_Cap_1_X = 149 |
| − | | | + | | Neutral_Cap_1_Y = 125 |
| − | | | + | | Neutral_Cap_2_X = 165 |
| − | | | + | | Neutral_Cap_2_Y = 156 |
| − | + | | Neutral_Cap_3_X = 196 | |
| − | + | | Neutral_Cap_3_Y = 188 | |
| − | + | }} | |
| − | | | ||
| − | |||
| − | |||
| − | |||
| − | |||
| − | |||
| − | |||
| − | |||
| − | | | + | {{quote|"A Word of Blake raid on the Dominion held Tukayyid has escalated into a battle between the cities of Spanac and Luk, the objectives of Clan Ghost Bear during the Battle of Tukayyid twenty years ago."|Map Introduction}} |
| − | | | ||
| − | |||
| − | |||
| − | |||
| − | |||
| − | |||
| − | |||
| − | |||
| − | |||
| − | |||
| − | |||
| − | |||
| − | + | ==Overview== | |
| − | |||
| − | |||
| − | |||
| − | |||
| − | |||
| − | |||
| − | |||
| − | |||
| − | |||
| − | |||
| − | |||
| − | |||
| − | |||
| − | |||
| − | + | '''Tukayyid''', a picturesque, massive forested farmland pocketed with large rolling hills. Battle into the night over the exposed center cap zone surrounded by many bases. Sightlines can be long but the ample trees offer some cover. All assets are available. | |
| − | |||
| − | |||
| − | |||
| − | |||
| − | |||
| − | |||
| − | |||
| − | + | Capture the valuable center D5 area and vital repair bases at D4/E5. The unique base layout makes flanking tactics to the enemy's forward factories (D4/E6) key. Doing so can break entrenched enemies. Further disrupt them with fast backcaps. | |
| − | |||
| − | The ' | ||
| − | |||
| − | == | + | ==Bases== |
| − | == | + | <div style="margin-bottom:10px></div> |
| − | + | <div style="-webkit-columns: 340px 3; -moz-columns: 340px 3; columns: 340px 3; font-size:0.95em; min-width:325px; white-space: nowrap"> | |
| − | |||
| − | == | + | <div style="-webkit-column-break-inside: avoid; page-break-inside: avoid; break-inside: avoid; padding:8px; border-style:solid; border-color:#3e3e3e; border-width:1px;> |
| − | + | <div style=" font-size: 1.2em; font-weight: bold; text-align: center; background-color: #2c2c2c;>B5</div> | |
| + | *'''Type:''' neutral base | ||
| + | *'''Defenses:''' 2x [[Turrets#Sentinel|Sentinel]], 1x [[Turrets#Hawk Eye|Hawk Eye]], 1x [[Turrets#|AMS]] | ||
| + | *'''Capture weight''': 1 | ||
| + | *'''Spawn''': Yes | ||
| + | *'''Can build:''' all [[Mechs]] and [[Vehicles]] | ||
| + | *'''Services:''' [[Rearm]]</div> | ||
| − | == | + | <div style="-webkit-column-break-inside: avoid; page-break-inside: avoid; break-inside: avoid; margin-top:0.7em; padding:8px; border-style:solid; border-color:#3e3e3e; border-width:1px;> |
| − | + | <div style=" font-size: 1.2em; font-weight: bold; text-align: center; background-color: #2c2c2c;>D4</div> | |
| + | *'''Type:''' neutral outpost | ||
| + | *'''Defenses:''' 2x [[Turrets#Sentinel|Sentinel]] | ||
| + | *'''Capture weight''': 1 IS / 1.5 Clan | ||
| + | *'''Spawn''': No | ||
| + | *'''Can build:''' none | ||
| + | *'''Services:''' [[Repair]]</div> | ||
| − | == | + | <div style="-webkit-column-break-inside: avoid; page-break-inside: avoid; break-inside: avoid; margin-top:0.7em; padding:8px; border-style:solid; border-color:#3e3e3e; border-width:1px;> |
| − | + | <div style=" font-size: 1.2em; font-weight: bold; text-align: center; background-color: #2c2c2c;>D5</div> | |
| + | *'''Type:''' neutral strategic point | ||
| + | *'''Defenses:''' none | ||
| + | *'''Capture weight''': 1.5 | ||
| + | *'''Spawn''': No | ||
| + | *'''Can build:''' none | ||
| + | *'''Services:''' none</div> | ||
| − | == | + | <div style="-webkit-column-break-inside: avoid; page-break-inside: avoid; break-inside: avoid; margin-top:0.7em; padding:8px; border-style:solid; border-color:#3e3e3e; border-width:1px;> |
| − | + | <div style=" font-size: 1.2em; font-weight: bold; text-align: center; background-color: #2c2c2c;>D6</div> | |
| + | *'''Type:''' neutral base | ||
| + | *'''Defenses:''' 2x [[Turrets#Sentinel|Sentinel]] | ||
| + | *'''Capture weight''': 1 | ||
| + | *'''Spawn''': Yes | ||
| + | *'''Can build:''' all [[Mechs]] and [[Vehicles]] | ||
| + | *'''Services:''' [[Rearm]]</div> | ||
| − | === | + | <div style="-webkit-column-break-inside: avoid; page-break-inside: avoid; break-inside: avoid; margin-top:0.7em; padding:8px; border-style:solid; border-color:#3e3e3e; border-width:1px;> |
| − | + | <div style=" font-size: 1.2em; font-weight: bold; text-align: center; background-color: #2c2c2c;>D7</div> | |
| + | *'''Type:''' [[Clan]] home base | ||
| + | *'''Defenses:''' <span style="white-space: normal">3x [[Turrets#LAMS Turret|LAMS]], 2x [[Turrets#Calliope|Calliope]], 2x [[Turrets#Eagle Eye|Eagle Eye]], 2x [[Turrets|Twin Gauss Turret]]</span> | ||
| + | *'''Capture weight''': --- | ||
| + | *'''Spawn''': Yes | ||
| + | *'''Can build:''' all [[Mechs]], [[Vehicles]], [[ASF]]s and [[VTOL]]s | ||
| + | *'''Services:''' [[Repair]], [[Rearm]]</div> | ||
| − | + | <div style="-webkit-column-break-inside: avoid; page-break-inside: avoid; break-inside: avoid; margin-top:0.7em; padding:8px; border-style:solid; border-color:#3e3e3e; border-width:1px;> | |
| + | <div style=" font-size: 1.2em; font-weight: bold; text-align: center; background-color: #2c2c2c;>E2</div> | ||
| + | *'''Type:''' [[IS]] home base | ||
| + | *'''Defenses:''' <span style="white-space: normal">3x [[Turrets#LAMS Turret|LAMS]], 2x [[Turrets#Calliope|Calliope]], 2x [[Turrets#Eagle Eye|Eagle Eye]], 2x [[Turrets|Twin Gauss Turret]]</span> | ||
| + | *'''Capture weight''': --- | ||
| + | *'''Spawn''': Yes | ||
| + | *'''Can build:''' all [[Mechs]], [[Vehicles]], [[ASF]]s and [[VTOL]]s | ||
| + | *'''Services:''' [[Repair]], [[Rearm]]</div> | ||
| + | <div style="-webkit-column-break-inside: avoid; page-break-inside: avoid; break-inside: avoid; margin-top:0.7em; padding:8px; border-style:solid; border-color:#3e3e3e; border-width:1px;> | ||
| + | <div style=" font-size: 1.2em; font-weight: bold; text-align: center; background-color: #2c2c2c;>E4</div> | ||
| + | *'''Type:''' neutral base | ||
| + | *'''Defenses:''' 2x [[Turrets#Sentinel|Sentinel]] | ||
| + | *'''Capture weight''': 1 | ||
| + | *'''Spawn''': Yes | ||
| + | *'''Can build:''' all [[Mechs]] and [[Vehicles]] | ||
| + | *'''Services:''' [[Rearm]]</div> | ||
| − | == | + | <div style="-webkit-column-break-inside: avoid; page-break-inside: avoid; break-inside: avoid; margin-top:0.7em; padding:8px; border-style:solid; border-color:#3e3e3e; border-width:1px;> |
| − | + | <div style=" font-size: 1.2em; font-weight: bold; text-align: center; background-color: #2c2c2c;>E5</div> | |
| + | *'''Type:''' neutral outpost | ||
| + | *'''Defenses:''' 2x [[Turrets#Sentinel|Sentinel]], 1x [[Turrets#Hawk Eye|Hawk Eye]], 1x [[Turrets#|AMS]] | ||
| + | *'''Capture weight''': 1 Clan / 1.5 IS | ||
| + | *'''Spawn''': No | ||
| + | *'''Can build:''' none | ||
| + | *'''Services:''' [[Repair]]</div> | ||
| − | + | <div style="-webkit-column-break-inside: avoid; page-break-inside: avoid; break-inside: avoid; margin-top:0.7em; padding:8px; border-style:solid; border-color:#3e3e3e; border-width:1px;> | |
| + | <div style=" font-size: 1.2em; font-weight: bold; text-align: center; background-color: #2c2c2c;>F4</div> | ||
| + | *'''Type:''' neutral base | ||
| + | *'''Defenses:''' 2x [[Turrets#Sentinel|Sentinel]] | ||
| + | *'''Capture weight''': 1 | ||
| + | *'''Spawn''': Yes | ||
| + | *'''Can build:''' all [[Mechs]] and [[Vehicles]] | ||
| + | *'''Services:''' [[Repair]], [[Rearm]]</div> | ||
| + | </div> | ||
| − | + | {{Clear}} | |
| − | < | + | ==Gallery== |
| + | <gallery mode="slideshow" showthumbnails heights=50px style="display: block; margin-top:3px; margin-left:2%; margin-right:2%; text-align: center; font-size:18px; padding:0px;"> | ||
| + | File:Tukk-1-dawn.jpg|link={{filepath:Tukk-1-dawn.jpg}} | ||
| + | File:Tukk-2-dusk.jpg|link={{filepath:Tukk-2-dusk.jpg}} | ||
| + | File:Tukk-3-dusk.jpg|link={{filepath:Tukk-3-dusk.jpg}} | ||
| + | File:Tukk-4-morning.jpg|link={{filepath:4-morning.jpg}} | ||
| + | File:Tukk-5-night.jpg|link={{filepath:Tukk-5-night.jpg}} | ||
| + | File:Tukk-6-morning.jpg|link={{filepath:Tukk-6-morning.jpg}} | ||
| + | File:Tukk-7-morning.jpg|link={{filepath:Tukk-7-morning.jpg}} | ||
| + | </gallery> | ||
| − | {{ | + | {{Navbox Maps}} |
| + | [[Category:Official Maps]] | ||
| + | [[Category:Maps]] | ||
Revision as of 18:19, 1 October 2019
| TC Tukayyid | ||
|---|---|---|

| ||
| Created By: | Ancient Demise | |
| Environment: | Forest / Farmland | |
| Temperature: | 29°C day / 25°C night | |
| Planet: | Tukayyid | |
| Coords: | -4.431, 210.42 | |
| Size: | 8192 x 8192 | |
| Game Modes: | ||
| First Available In: | 0.11.0 | |
| Assets | ||
| Assets: | ||
| Number of Bases: | IS: 1 Clan: 1 Neutral: 7 | |
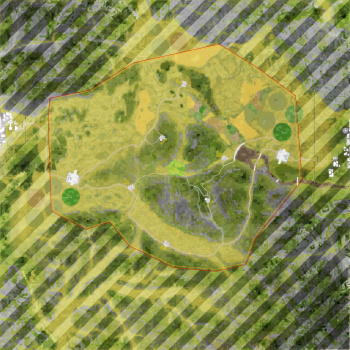
| Tactical Map | ||
  | ||
| "A Word of Blake raid on the Dominion held Tukayyid has escalated into a battle between the cities of Spanac and Luk, the objectives of Clan Ghost Bear during the Battle of Tukayyid twenty years ago." |
| — Map Introduction |
Overview
Tukayyid, a picturesque, massive forested farmland pocketed with large rolling hills. Battle into the night over the exposed center cap zone surrounded by many bases. Sightlines can be long but the ample trees offer some cover. All assets are available.
Capture the valuable center D5 area and vital repair bases at D4/E5. The unique base layout makes flanking tactics to the enemy's forward factories (D4/E6) key. Doing so can break entrenched enemies. Further disrupt them with fast backcaps.
Bases
B5
D4
D5
- Type: neutral strategic point
- Defenses: none
- Capture weight: 1.5
- Spawn: No
- Can build: none
- Services: none
D6
D7
E2
E4
E5